Time series data is being used more and more in all industries, and of course we want to be able to forecast and predict future values. There are however a variety of challenges that come with producing a large number of forecasts across a variety of time series.
The Facebook’s data science team has worked with time series forecasting for quite a while, and recently they open-sourced an internal tool for this type of forecasting: Facebook Prophet.
Recently there was a post on the Microsoft R Server forum if it was possible to use Prophet with Microsoft R Server, so I thought I’d test it out. This post covers how to use it, both from a standalone Microsoft R Server as well as SQL Server R Services.
NOTE: Prophet requires an R version of 3.2.3 or greater. Unfortunately an installation of SQL Server 2016 R Services, in-database as well as standalone, uses R 3.2.2. So Prophet cannot be run on SQL Server R Services 2016, unless you upgrade the R version. In this post I am running SQL Server R Services 2017, both in-database and standalone.
So, in essence Prophet is just an R packet and should be installed as such. However on Windows, Prophet requires a compiler, Stan, which incurs some extra steps when installing Prophet.
NOTE: The description of Stan from Wikipedia: Stan is a probabilistic programming language for statistical inference written in C++. The Stan language is used to specify a (Bayesian) statistical model with an imperative program calculating the log probability density function.. So there!
Stan & Dependencies
If you are on Windows, regardless if you want to use Prophet in a standalone version of Microsoft R Server or in SQL Server R Services, you need to install Stan, or rather the R version (RStan). There is also a Stan version for Python; PyStan. In addition to RStan there are some dependencies that need to be installed.
There is a very good article about how to install RStan on Windows here, and below follows a very short summary of the article.
RTools Installation
Before you can install RStan you need to install a tool-chain that works with R, and - for this - RTools is an excellent choice.
RTools can be downloaded form here, and you download the version that matches your Microsoft R Server’s / SQL Server R Services version. The table below is a map between various Microsoft R Servers and the corresponding R version. I have not included SQL Server 2016 R Services as the R version is not compatible with Prophet:
| R Server | R Version |
|---|---|
| Microsoft R Server 8.x - 9.01 | 3.3.2 |
| ——————————- | ———– |
| Microsoft R Server 9.1 | 3.3.3 |
| ——————————- | ———– |
| SQL Server 2017 R Services | 3.3.3 |
| ——————————- | ———– |
On the machine I test this on, I have the in-database as well as the standalone R Services from SQL Server 2017, so I downloaded the Rtools34.exe.
NOTE: If you have installed the stand-alone version of Microsoft R that comes with SQL Server R Services, the version of R is the same as for SQL Server R Services.
To install RTools double click the executable you just downloaded. What you need to ensure is that the PATH is set properly. So during the installation process, when it comes to the dialog Select Additional Tasks ensure that you check the check-box for Edit the system PATH:
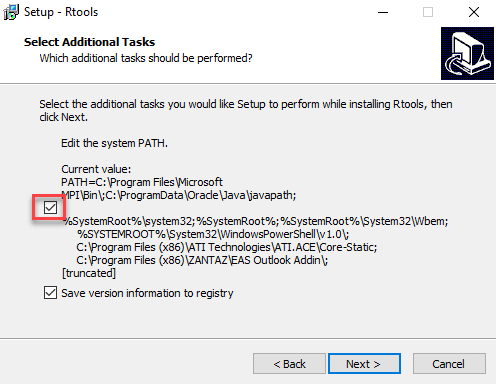
Figure 1: Edit the System Path
After having checked the box for editing the PATH, just click through and let the install finish. After installation check that the PATH has been set. You do this by running RTerm.exe and executing Sys.getenv('PATH') from command prompt.
Dependent on if you want to run RTools on a standalone Microsoft Windows R Server installation or in-database, you find RTerm.exe at different locations. On my box the locations are:
- Standalone Microsoft R Server:
C:\Program Files\Microsoft SQL Server\140\R_SERVER\bin\x64 - SQL Server R Services:
C:\Program Files\Microsoft SQL Server\MSSQL14.INST2K17CTP20\R_SERVICES\bin\x64
After executing Sys.getenv('PATH'), you should see something like so:

Figure 2: RTools Path
You can also check that g++ (C++ compiler) can be called: system('g++ -v'). That should result in something like:
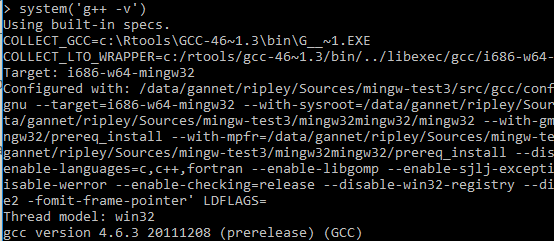
Figure 3: Checking for g++
RStan Installation
OK, so after all the above is OK - we can finally install RStan. RStan is just another package, and it should be installed as any other package (like Prophet, which we will see in a bit). Whereas RTools is just installed to a shared directory on the box where R resides, RStan needs to be installed for each R instance specifically.
Standalone Microsoft R Server
To install R packages you use the function install.packages(). For a standalone Microsoft R Server instance there is not much more you need to do, apart from saying where to install the package from and what to do about dependencies:
- Open
RTerm.exeas admin from the location for the standalone instance (in my case:C:\Program Files\Microsoft SQL Server\140\R_SERVER\bin\x64). - Execute the following code:
install.packages("rstan", repos = "https://cloud.r-project.org/", dependencies=TRUE) - This will run for a while, click yes for any questions during installation.
When the installation has finished you can test that it has succeeded and that the tool chain works:
- Close down the
RTerm.exeterminal and re-open it (as admin). - Execute the code in Code Snippet 1 below.
|
|
Code Snippet 1: Test of RStan Installation
When executing the above, the result from fx(2L,5) should be 10.
SQL Server R Services Installation
The way to install a package in SQL Server R Services is similar to the standalone installation. However you cannot install a package to any directory, it has to be installed to the default package directory for the instance, as only only one package library is allowed.
The code in Code Snippet 2 below shows how to retrieve the default package library:
|
|
Code Snippet 2: Retrieving Default Package Directory
On my machine the directory is: C:/Program Files/Microsoft SQL Server/MSSQL14.INST2K17CTP20/R_SERVICES/library. So to install RStan:
- Open
RTerm.exeas admin from the location for the SQL Server R Services instance (in my case:C:\Program Files\Microsoft SQL Server\MSSQL14.INST2K17CTP20\R_SERVICES\bin\x64). - Execute the code in Code Snippet 3 at command prompt.
|
|
Code Snippet 3: Installing RStan on SQL Server R Services
When I ran the code in Code Snippet 3 on my box it ran OK, but it did not install all the dependencies as the install for the standalone installation did. I then tested the installation like so:
|
|
Code Snippet 4 Test of RStan Installation SQL Server R Services
Initially, straight after installation, I received an error that ggplot2 was missing. I resorted to copying all the packages from the package library for the standalone installation (W:\Documents\R\win-library\3.3) to the package library for the SQL Server R Services, and that sorted it the issue. When executing the code in Code Snippet 4 a second time, all was OK:
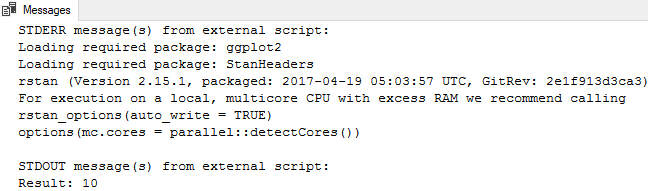
Figure 4: Result from SQl Server R Services
NOTE: My assumption is that when installing RStan the second time, the installation saw that I had the dependent packages installed already. However for SQL Server R Services all packages need to be installed in the default package library directory. For now it all works though.
OK, now when we we have the various pre-requisites installed we can install Prophet.
Prophet Installation
Compared to the installation of RStan (and its dependencies), the installation of Prophet is really straight forward. Let us start installing Prophet on a standalone Microsoft R Server instance.
Install Prophet on Microsoft R Server
As you did with RStan you:
- Open
RTerm.exeas admin from the location for the standalone instance (in my case:C:\Program Files\Microsoft SQL Server\140\R_SERVER\bin\x64). - Set the package library where to install Prophet to:
lib.dir <- "C:\\Program Files\\Microsoft SQL Server\\140\\R_SERVER\\library" - Execute the actual installation: install.packages(“prophet”, lib = lib.dir, repos = “ https://cloud.r-project.org/", dependencies = TRUE)
NOTE: The reason why I explicitly state where to get the package from in the code above is that I had problems with the Prophet package installing from Microsoft’s R repo.
The output from the code above will be something like so (heavily redacted):
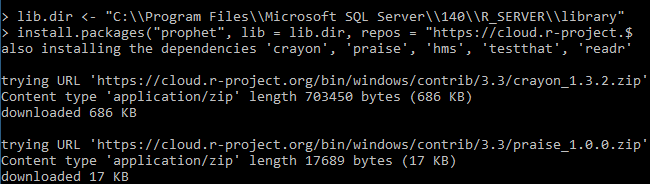
Figure 5: Install Prophet Microsoft R Server
Prophet should now be installed and ready to use. Further below we’ll see some examples how to use it.
Install Prophet on SQL Server 2017 R Services
The install of Prophet on SQL Server R Services does not differ much from the install on a standalone server:
- Open
RTerm.exeas admin from the location for the SQL Server R Services instance (in my case:C:\Program Files\Microsoft SQL Server\MSSQL14.INST2K17CTP20\R_SERVICES\bin\x64). - Execute the code in Code Snippet 5.
lib.dir <- "C:\\Program Files\\Microsoft SQL Server\\MSSQL14.INST2K17CTP20\\R_SERVICES\\library"
install.packages("prophet", lib = lib.dir, repos = "https://cloud.r-project.org/", dependencies = TRUE)
Code Snippet 5: Installation of Prophet on SQL Server 2017 R Services
The output from the execution is the same as you see in Figure 5.
Use Prophet
Now everything should be ready, and we should be able to use Prophet. To test it out I am “shamelessly” “borrowing” the examples from
here (but I will just do the bare minimum to see that it works - no plotting etc.). The data I use is also the same; the log number of views to
Petyon Manning’s Wikipedia page. The csv file can be downloaded from
here.
After you have downloaded the csv file you can see it has two columns: ds which are dates, and y which shows the number of views of his page. This is now the data we’ll use to predict future hits of his page. We’ll start with the standalone Microsoft R Server installation.
Test Code Microsoft R Server
For this test you can use any IDE you want, I’m using R Tools for Visual Studio 2017. So following the example, this is what the code will look like:
|
|
Code Snippet 6: Forecasting With Prophet
If you want to know what the code does, look at the comments in the code block. You can also look at the Prophet Quick Start page mentioned above, there they explain it quite well.
Below you see the output from running the code, from the point where forecast <- predict(m, future) was called:
|
|
Code Snippet 7: Result from Forecasting with Prophet
The forecast object is a data frame with a column yhat containing the forecast. It has additional columns for uncertainty intervals and seasonal components.
Test Code SQL Server R Services
Having done the Microsoft R Server test, let us do the test against SQL Server R Services. I want upfront say that there is an issue with running this on SQL Server R Services, whereby dates returned in the model are shown incorrectly. At the moment I am not sure why this is the case - if someone reading this knows the reason, please let me know. I do believe it may be due to some incorrect package in the SQL Server R Services installation, but I am not sure.
Anyway, let’s just see what it would look like running more or less the same code as in Code Snippet 6, inside SQL Server R Services. Let’s take the code in Code Snippet 6, and enable it to run in SQL Server. You do that by encapsulation the R code inside the @script parameter in sp_execute_external_script:
|
|
Code Snippet 8: Executing Prophet in SQL Server
The only difference from what we see in Code Snippet 6, is that we output the result as a result set. When you execute the code you will get 3270 rows back: 2905 historical, and 365 predicted. However as I said above, there seems to be something not quite right when running it in SQL Server as the dates are completely wrong, and the values are also a bit off. In Figure 6 below, you see the last 6 rows returned from SQL Server, compare that with the same in Code Snippet 7, and you will see some differences (apart from the dates).

Figure 6: Result from SQL Server Execution
Anyway, this post was more about if you can, and if so how, run Prophet in Microsoft R Server and SQL Server R Services, which we now see we can.
Summary
- Prophet can be run in both Microsoft R Server as well as SQL Server R Services.
- Prophet requires R 3.2.3 or above, so a standard SQL Server 2016 R installation is not going to work.
- There seems to be an issue when executing Prophet inside SQL Server, as dates come out completely wrong, and values are somewhat off. I’ll try and find out why this is the case.
~ Finally
If you have comments, questions etc., please comment on this post or ping me.