You who follows my blog and have read my weekly roundups you know that I am quite (that is an understatement) interested in Apache Kafka and I am curious to find out what “cool” things one can do with it. For that, I want to be able to test “stuff” quickly. When I test and try out new things, I usually do it on my development box which contains everything I need: SQL Server, RabbitMQ, RStudio, Microsoft Machine Learning Server, Visual Studio and the list goes on.
So seeing that I have most of my “tools of the trade” on my machine I obviously also would like to have Kafka on the box. Herein lies a problem, I am a Windows dude and Kafka, and Windows do not gel. Yes, some people are running Kafka on Windows, but it is a chore. OK, so what to do? Sure, I could potentially run Kafka on a virtual machine, or in a Docker image, but it is not as transparent as I would like it to be (yeah, I am lazy).
Hmm, Microsoft did introduce the ability to run Linux binary executables (in ELF format) natively on Windows 10 in Windows 10 version 1607. The feature is called Windows Subsystem for Linux (WSL), and since I am now running version 1803, maybe I should try and install Kafka in WSL.
Pre-reqs
To install and run the Confluent Platform, (which contains Kafka), on WSL there are some pre-reqs:
- WSL installed (fairly obvious).
- Java 1.7 or later.
Windows Subsystem for Linux
WSL is primarily aimed at developers, and it allows you to run Linux environments directly on Windows in a native format and without the overhead of a virtual machine. Let us retake a look at that statement: run Linux environments directly on Windows in a native format. Yes native format, WSL is not a UNIX-like environment like Cygwin, which wraps non-Windows functionality in Win32 system calls but it serves Linux programs as special, isolated minimal processes (pico-processes) attached to kernel-mode pico-providers. If you want to read all the “gory” details about WSL: Windows Subsystem for Linux Overview gives you an excellent introduction.
Installing WSL is very easy; you first enable WSL either via a Powershell command: Enable-WindowsOptionalFeature -Online -FeatureName Microsoft-Windows-Subsystem-Linux or by switching it on from “Turn Windows features on or off” via “Control Panel | Programs and Features”:
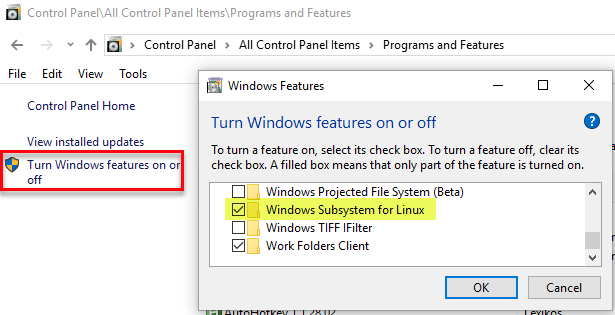
Figure 1: Enable WSL
You should restart the machine after enabling WSL.
NOTE: So I have enabled WSL a few times now, and some of the times I have not had to restart.
When WSL is enabled you need to download and install a distro from the Windows Store. When WSL first was introduced the only distro available was Ubuntu, since then quite a few have been added, and now the distro list looks like so:
- Ubuntu
- OpenSUSE
- SLES
- Kali Linux
- Debian GNU/Linux
I started with WSL when Ubuntu was the only distro available, so I have “stuck” with it, but I do not think the distros are that different. To continue, you choose a distro and let it install. Finally, you start the command shell for the distro from the Windows “Start” menu:
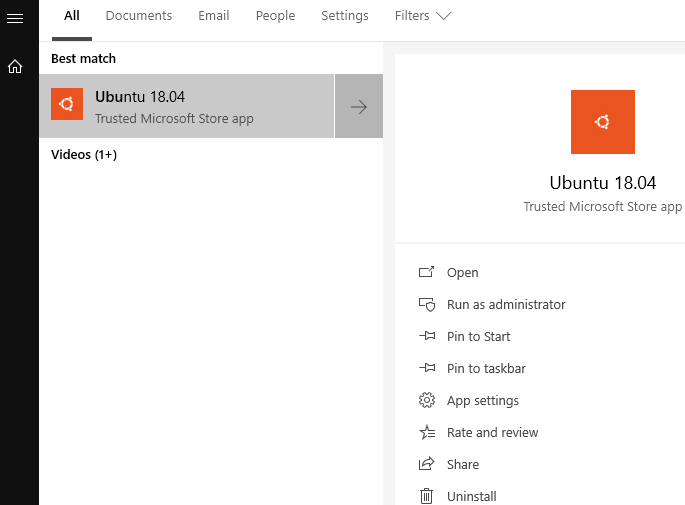
Figure 2: Start the Distro
When you start up the distro for the first time the setup finishes, and you are prompted to enter a root password. Now is probably a good time to run sudo apt-get update -y && sudo apt-get upgrade -y where sudo apt-get update -y updates the list of all current program packages in the repositories to determine which packages are candidates for upgrading. The command sudo apt-get upgrade -y upgrades all current program packages in the operating system.
NOTE: The above commands are for Ubuntu, so if you have another distro installed check the commands for that particular distro.
Java
When your distro is up and running, you can now install Java. When reading the documentation about supported Java versions, you see that Confluent Platform 4.1 is the last version with support for Java 1.7. The Confluent Platform version I use is the latest preview (version 5.x), so I install 1.8. Oh, and do not try with 1.9 - it does not work.
The docs mention the JDK, but I have found that the JRE works as well (since I am not writing any Java code) and I use the open source version of Java - OpenJDK. So to install you run the following from the bash shell:
|
|
Code Snippet 1: Install JRE
As WSL has no GUI, I choose to install the headless version of the JRE as we see in Code Snippet 1. Finally, to check that it installed correctly I do > java -version and the result is like so:
|
|
Code Snippet 2: Java Version Output*.
In Code Snippet 2 everything looks OK, so we can now go ahead with the main attraction.
Confluent Platform
By now you may ask yourself what is this thing Confluent Platform? Well, Confluent is a company founded by the guys (and girls) that originally built Kafka back at LinkedIn. The company is now focusing on building a streaming platform to help other companies get easy access to enterprise data as real-time streams.
The Confluent Platform improves Apache Kafka by expanding its integration capabilities, adding tools to optimise and manage Kafka clusters, and methods to ensure the streams are secure. Confluent Platform makes Kafka easier to build and easier to operate. The Confluent Platform comes in two flavours:
- Confluent Open Source is freely downloadable.
- Confluent Enterprise is available on a subscription basis.
Back in April Confluent started releasing preview versions of the Confluent Platform with the latest and the greatest and that is what I am using. At the time I write this the June preview has just been released, and that is what I am installing here.
Installation
Before we can install, we need to download the install media which you do from
here. When clicking the “Download …” button, a form “pops up” where you choose your download format and enter your details. I usually choose tar.gz, and that is what I base the following instructions on. Download the file to your PC and then in the bash shell:
- Create a directory where to extract the files to.
cdto the download directory:

Figure 3: Make Kafka Directory
In Figure 3 we see how I create the /opt/kafka directory, and how I cd to the Windows directory where my downloaded files are. One of the cool things with WSL is that the local Windows drives gets automatically mounted under the /mnt folder. I can now extract the files:
NOTE: The only reason I chose to create the
kafkadirectory under/optis that traditionally/optis for third-party applications.

Figure 4: Extract Files
So I tar the files, and we see in Figure 4 how the files are extracted. To extract the files takes a couple of minutes and when done we can drill down into the extracted directories and files:
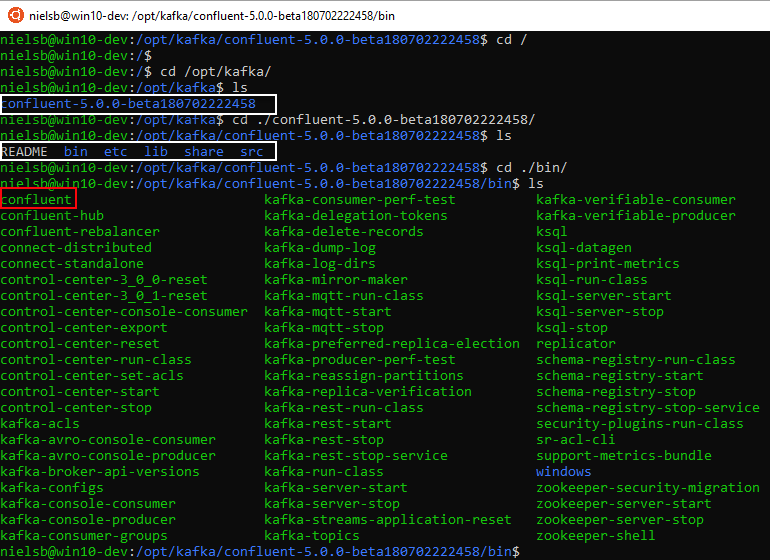
Figure 5: Directory and File Structure
In Figure 5 we see how directories and files ended up under a confluent-version... directory (outlined in white) and when we ls into that directory we see sub-directories (also outlined in white), and amongst them a bin directory.
When we drill down into the bin directory and list the content we see a file named confluent. This is an executable file, and we use this file to start and stop all the Confluent components. The bin directory also contains executable files to start and stop individual components, such as kafka-server-start, kafka-server-stop and zookeeper-server-start, and so forth.
Right, enough of this - let us see if we can get the show on the road and spin up all components:
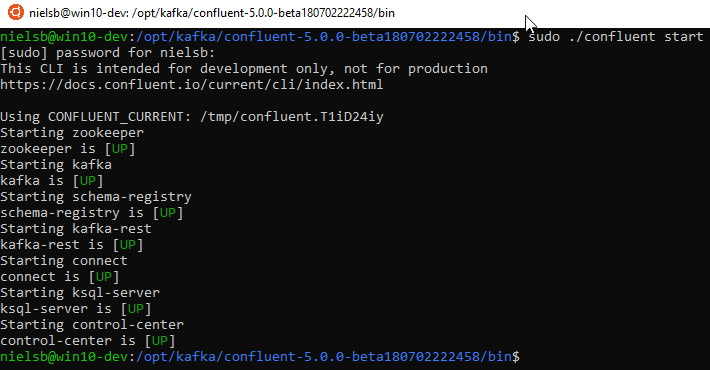
Figure 6: Start Confluent
To start all the Confluent components, we use the command sudo ./confluent start (from the bin` directory) and in Figure 6 we see how the various components startup, awesome!
Control Center
Part of the Confluent Platform installation (Enterprise version) is the Control Center. The Control Center (I copied the text from the
Control Center site) “gives the administrator monitoring and management capabilities, delivering automated, curated dashboards so that Kafka experts can easily understand what is happening without tweaking dashboards”. So let us see if we can connect with the Control Center. If we connect from the same machine as we installed Confluent Platform on, the address is http://localhost:9021:
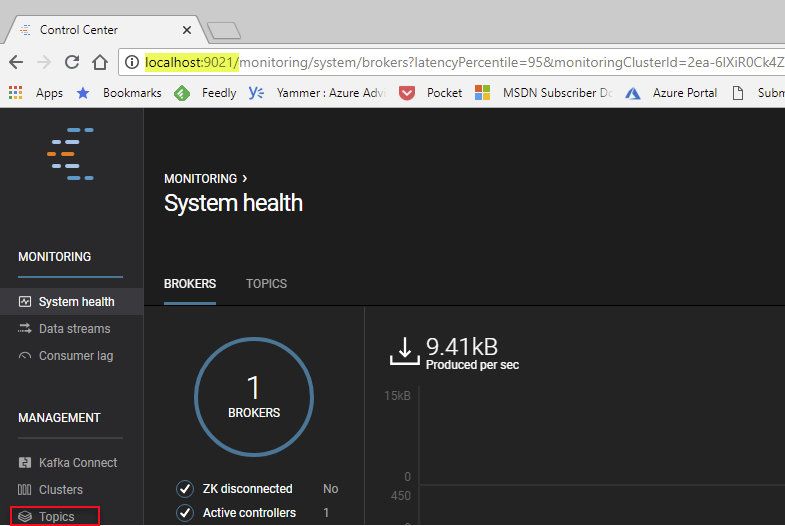
Figure 7: Confluent Control Center
Cool, Control Center seems to be up and running, let us now use it to create a Topic so we can do a final test.
Topics
When you send messages to a Kafka broker, you typically send it to a “Topic”, which is like a collection point in the broker for “like-minded” messages. If you are a database dude like me, you can see it as a table in a database where you keep records of the same type.
Typically you create multiple topics in you Kafka cluster to cater for multiple message types, and Control Center can help you with that. In Figure 7 we see at the bottom left corner, outlined in red, “Topics”. Click on that, and you see existing default topics. Click on, in the far right corner, the “Create topic” button and you see something like so:
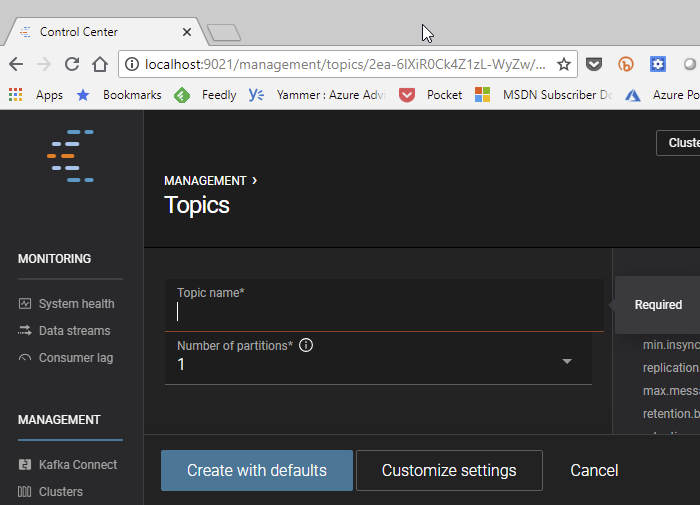
Figure 8: Topics
In the topic name box enter “testing” and then click “Create with defaults” and we are back seeing the existing topics as well as the newly created “testing” topic:
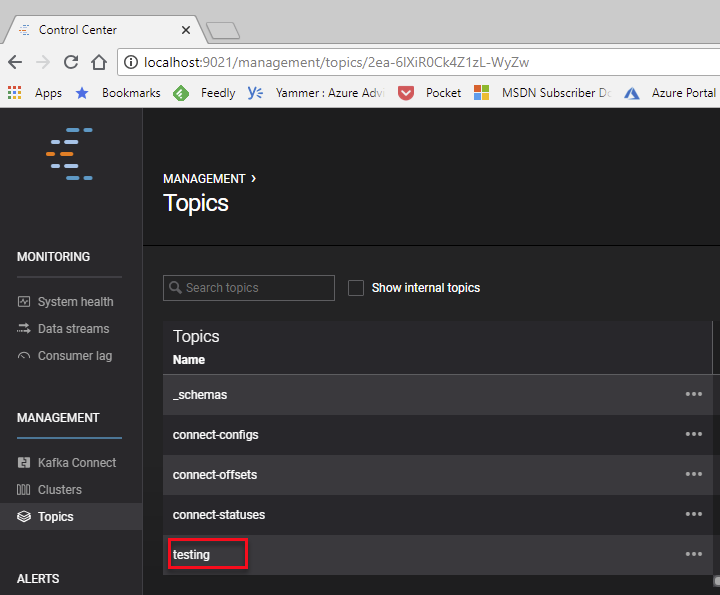
Figure 9: New Topic
When we have a topic, we can now see whether we can publish and consume messages.
Test Send & Receive
Confluent Platform is now up and running, and you can now start doing “cool” stuff. However, to make sure everything works let us use the built-in command line clients to send and receive some test messages.
What we do is that in the open bash shell we cd to the /opt/kafka/confluent-xxx/bin/ directory. We use the command line producer kafka-console-producer to send messages:
|
|
Code Snippet 3: Publishing Messages
We see in Code Snippet 3 how we target the local broker on port 9092, and the topic we send to is the “testing” topic we created above. After hitting enter, we create one message after each other (hit enter in between).
To consume messages we open a second bash shell and cd into the /bin directory as before, and to receive messages we use the kafka-console-consumer command line client:
|
|
Code Snippet 4: Consume Messages
When running the consumer we see in Code Snippet 4 how we receive the messages we just sent. If we were to go back to the publisher and create some more messages we immediately see them in the consumer bash shell. It works! So now we can start creating streaming applications using proper clients. If you write .NET applications, I suggest you look at the Confluent client which is very feature rich.
When we are done with the Confluent Platform, we stop it from the /bin directory:
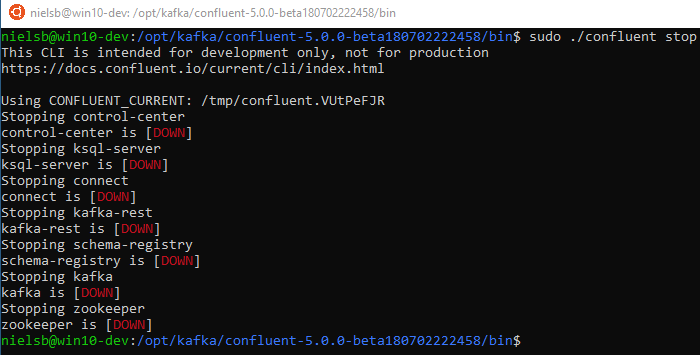
Figure 10: Stopping Kafka
We stop Kafka by calling sudo ./confluent stop and then as Figure 10 shows, all components shut down in an orderly fashion.
We have installed Confluent Platform on WSL, started it, published and consumed some messages and stopped it. All is good! Or is it?
ISSUE
So what happens when you try to start the platform again:
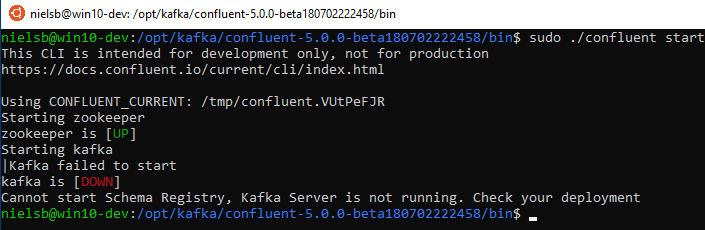
Figure 11: Error at Start Up
That is not good! We get an error when we try to start the platform after a shutdown. What we see here is a “half” known issue which is most prevalent on Windows machines, and it has to do with Kafka trying to clean up old log files. If you drill down in the Kafka log files you see an error looking something like this: FATAL Shutdown broker because all log dirs in <path_to_logs> have failed (kafka.log.LogManager).
At the moment I do not have a solution for it other than that before each startup run something like so: sudo rm -fr /tmp/confl* which removes all Kafka related log directories. This is obviously not a solution in a production environment or a “proper” test/dev environment but for us just wanting to do some “quick and dirty” testing on WSL it is sufficient.
Summary
In this post, we discussed a little bit what WSL is and how we can install Confluent Platform on WSL. We looked at we can test the installation by creating a topic and then publish and consume messages using the command line publish and consume clients.
Having Confluent Platform installed we can now use a client of choice to start doing “cool” stuff. Keep an eye on my blog for future Confluent Platform and Kafka posts!
~ Finally
If you have comments, questions etc., please comment on this post or ping me.