As you know, SQL Server 2019 introduces the Java language extensions as part of the SQL Server Extensibility Framework. The Java language extensions make it possible to execute Java code from inside SQL Server, the same way we can run R/Python code. Seeing that I am “somewhat” interested in the SQL Server Extensibility Framework I wrote some posts about the Java language extensions: SQL Server 2019 Extensibility Framework & Java.
The code in the posts is very, very simplistic where I was just trying to get the ideas across how and what to do. Another reason the code is simplistic is that I am not a Java “person”; in fact, the only Java code I have ever written is what is in those posts. Me not being a Java “person” I do not have a Java IDE, (for the code I wrote I did not need one either), so I used my regular text editor
Sublime Text 3, and I compiled the code from command line ($ javac ...).
I then started on a new Java post (which I have not finished yet), and it became clear I needed an IDE, (intelli-sense, debug, etc.), but which IDE?
As you, my readers, probably know by now, I am a Microsoft and Windows guy at heart, so for me, the natural choice for an IDE has always been Visual Studio. However, even though it might be possible, writing Java code in Visual Studio is not straightforward. So, I thought; “I have heard a lot of Visual Studio Code, why not see what that can do”. I know that VS Code does support Java, so why not “kill two birds with one stone”:
- Get to know VS Code.
- Write some Java code.
So, in the rest of this post, we see what I did to be able to write, debug, and compile Java code in VS Code for use in SQL Server 2019.
NOTE: Even though the title says SQL 2019 and I mention SQL 2019 above, there is very little in the post that is SQL Server 2019 specific. So, this post should be useful as well for you who are only interested in using VS Code for writing and debugging Java applications, no SQL Server at all.
Pre-reqs & Enable Java in VS Code
Let us start with looking at what we need to have installed for Java in VS Code to work:
Visual Studio Code
Well duh - this is kind of obvious, and you can download it from here. Below we discuss some more about what we need to do to enable VS Code for Java.
Java
As obvious as VS Code from above. When installing Java, there are a couple of things to think about:
- Version - personally I use Java 1.8.x, as that works across platforms, and works with SQL Server on both Windows as well as Linux.
- Paths - ensure that the directory where
javaandjavacexists is on thePATH. JAVA_HOME- you need an environment variable -JAVA_HOME- pointing to where the JDK directory is.
Maven
Maven is a build automation tool for primarily Java projects. Maven manages a project’s build, dependencies, reporting and documentation from a central piece of information, the project object model (POM) file. Maven is not absolutely required, but since it is, today, the de-facto standard for Java-based projects, it is a good idea to use it.
You download Maven from
here and install instructions are
here. After installation, make sure that the directory where the mvn command is, exists on the PATH.
VS Code Extensions
VS Code is a lightweight cross-platform (Windows, Mac, Linux) source code editor, and it comes with built-in support for JavaScript, TypeScript and Node.js. Hmm, this is a Microsoft product, and it has its roots in Visual Studio, and no support for .NET? It is not as bad as it may sound, to add other languages you do it by installing extensions.
Installation
So, in our case, we should add some Java extensions. Open VS Code, and you see something like this:
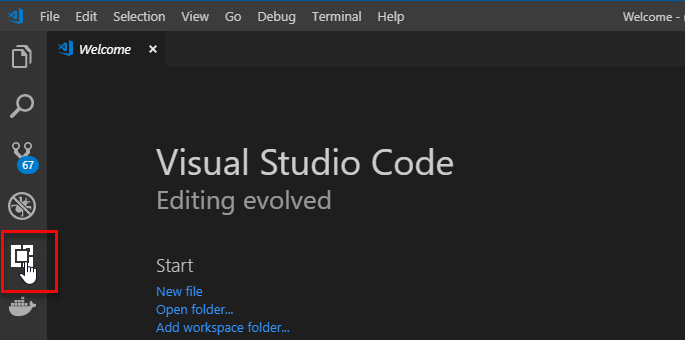
Figure 1: VS Code Start
What you see may not exactly match Figure 1 as it opens up in the same state it was in when you last closed it. The important part is what is outlined in red on the Activity bar at the left and towards the bottom of the picture: the context menu for extensions. When you click on that, the result is something like so:
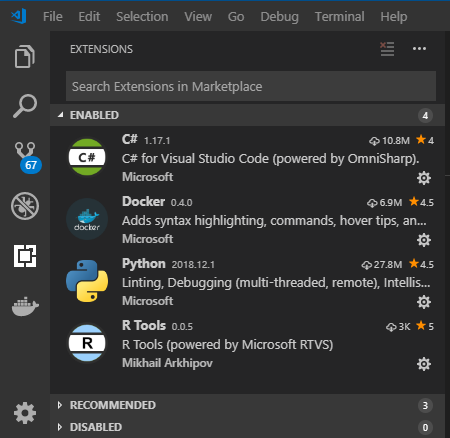
Figure 2: Enabled VS Code Extensions
In Figure 2 we see that I have, (on my development box), enabled extensions for C#, Docker, Python and R, and we also see expandable labels for RECOMMENDED and DISABLED extensions, as well as a search box. To find Java extension we enter Java in the search box and hit enter:
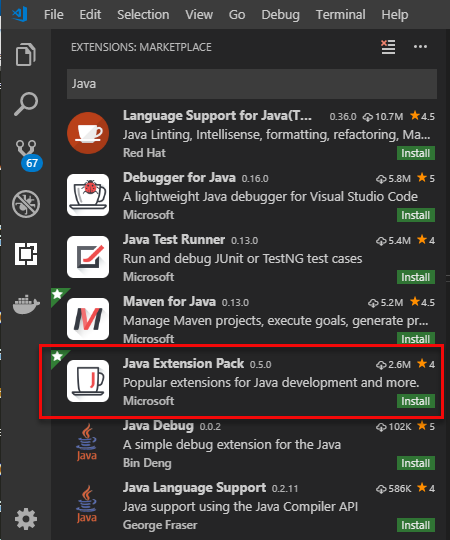
Figure 3: VS Code Java Extensions
We see quite a few extensions for Java in Figure 3, and I do not know which is best, but I have used the one outlined in red before: Java Extension Pack, so I click on the green Install button:
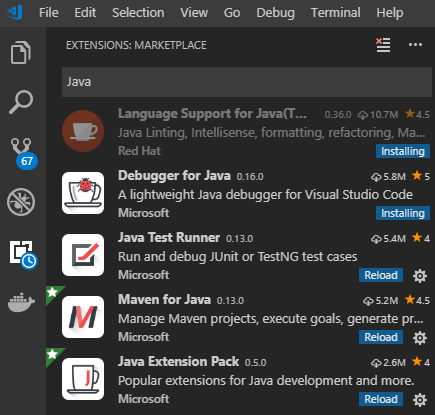
Figure 4: VS Code Install Java Extension
What we see in Figure 4 is that not only the Java Extension Pack gets installed but a few other extensions as well. What is interesting is that among the extensions installed is an extension for Maven. Restart VS Code after the installation of the extensions, and we are ready to go.
NOTE: You can read more about the Java Extension Pack here.
Un-install & Remove
If you do not need an extension any more, you can uninstall it by right-clicking on it and choose Uninstall. In the case of an extension containing other extensions (like the Java Extension Pack), those will be uninstalled as well.
Notice that uninstalling an extension does not remove it, so you still see it among your installed extensions. To completely remove an extension you delete it from the filesystem. You find the extensions at:
- Windows:
%USERPROFILE%\.vscode\extensions. - Mac:
~/.vscode/extensions. - Linux:
~/.vscode/extensions.
Java in VS Code
We are now ready to write some Java code, so let us open VS Code (if it is not open yet). If you are used to Visual Studio, you would now probably go File | New Project, however that is not how you do it in VS Code: create a directory which will be the root of your “project”, and in VS Code open the directory: File | Open Folder:
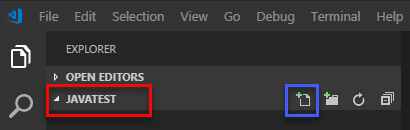
Figure 5: VS Code Open Folder
In Figure 5 we see how the directory I created, (javatest - outlined in red), is open in the VS Code Explorer. We now go ahead and add a source file to the directory by clicking on the New File icon outlined in blue:
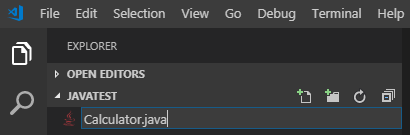
Figure 6: VS Code New File in Folder
After I click on the New File icon we see in Figure 6 how a text box opens under the folder name, and how I name the file: Calculator.java. When I do that the file opens in the VS Code Editor area and I can start editing the file:
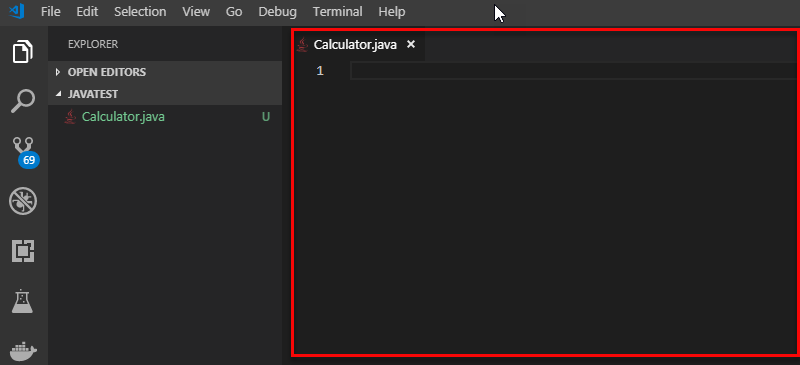
Figure 7: VS Code Source File
The, in red, outlined area in Figure 7 is the source file in VS Code’s Editor.
The code we want to write is a variant of some code we wrote in SQL Server 2019 Extensibility Framework & Java - Misc. “Stuff”:
|
|
Code Snippet 1: Calculator
There are two differences between the code in Code Snippet 1, and the code in SQL Server 2019 Extensibility Framework & Java - Misc. “Stuff”:
- In Code Snippet 1 we have a
mainmethod. - The
addermethod in Code Snippet 1 is doing aSystem.out.printf.
The main method in Code Snippet 1 is there so we can run the code as an application in VS Code and debug the code. The System.out.printf is there just to get an output during debugging:
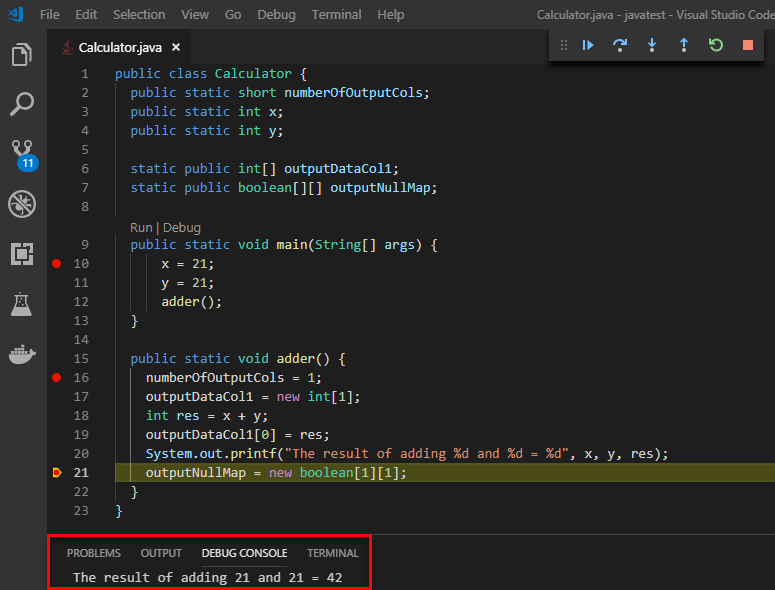
Figure 8: Debugging Java in VS Code
So, we see in Figure 8 how I have set three breakpoints in my Calculator.java code: at line 8, 16 and 21. I have then hit F5 to run the code in debug mode, and I eventually hit the breakpoint at line 21. We see, outlined in red, the output of the adder method. Cool, it looks like our code is working, but how do we compile the code into a .class file?
Well, that is the thing, there is no built-in way to compile as we have not (or been able to) treat the code as a project, we just opened a directory and added a file to that directory. If we now want to compile we need to do it from command-line:
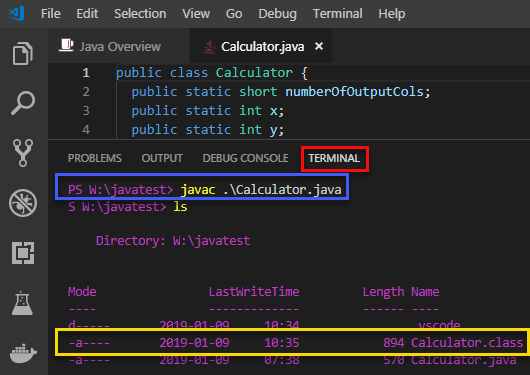
Figure 9: Compile Java in VS Code
We open the terminal in VS Code by View | Terminal, and in Figure 9 we see how we:
- are in the terminal (the terminal tab, outlined in red).
- compile the
Calculator.javasource file by calling:javac .\Calculator.java(outlined in blue). - see the compiled
Calculator.classfile (outlined in yellow).
When we have the compiled .class file we copy that to the CLASSPATH location and execute against it from SQL Server like so:
|
|
Code Snippet 2: Execute from SQL Server
What we see in Code Snippet 2 is nothing different from what we have done in the posts in the SQL Server 2019 Extensibility Framework & Java series.
We have now seen how we use VS Code to write and debug Java code. However, the code we wrote and debugged was very simple. The question is, how do we handle more complex scenarios - dependencies on external JAR files, compile without having to do it from the command prompt, etc.? That is where Maven enters the picture.
Maven Projects
I mentioned above how Maven is a build automation tool for primarily Java projects. There are other build tools as well, but in this post, I use Maven as it is - which I mentioned above - the de-facto standard for Java-based projects.
Above we saw how we installed Maven as well as the VS Code Maven extension, however before we start to use it let us talk a little about Maven archetypes and naming conventions.
Maven Archetypes
A Maven archetype is like a template for a project. Templates can be:
- Internal: part of the Maven install.
- Local: you create archetypes and install them locally.
- Remote: archetypes are uploaded to, and exists in repositories.
To see what internal archetypes you have installed you run following Maven command: $ mvn archetype:generate -DarchetypeCatalog=internal:
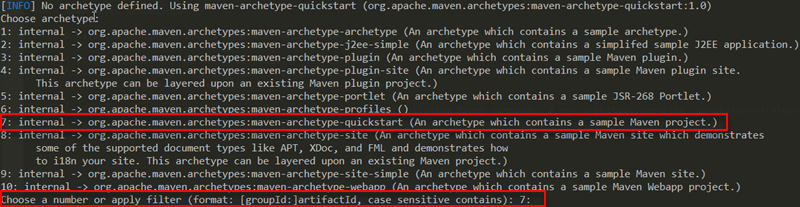
Figure 10: Maven Internal Archetypes
In Figure 10 we see the internal archetypes and we see (outlined in red) a default archetype, the maven-archetype-quickstart. Oh, the command mvn archetype:generate creates a new Maven project. The command allows you to define what archetype to use, plus properties of the project.
Naming Conventions
As mentioned above, when we create a Maven project based on an archetype, we need to define some properties of the project:
groupId: uniquely identifies a project across all projects. Typically it follows Java’s package name rules, (org.apache.mavenfor example), but it is not required to follow those rules.artifactId: this is like a .NET project name.version: version number (1.0,1.1, etc.).packageName: this is optional. If you do not define a package name, thegroupIdis used as package name.
Now, let us see how we use Maven together with VS Code.
VS Code & Maven
When you click in the Activity pane to view the Explorer (or View | Explorer), you should see a new tab for MAVEN PROJECTS:
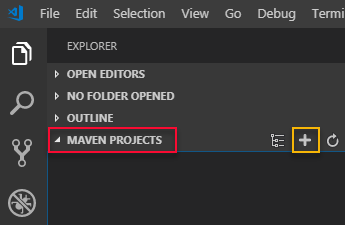
Figure 11: Maven Projects - I
We see, outlined in red, the Maven Projects tab in Figure 11. To create a new Maven project we use the plus icon, outlined in yellow, also in Figure 11, and when we click on the icon we get:
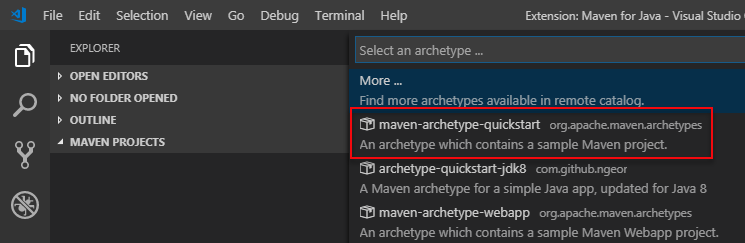
Figure 12: Select Archetype
We see in Figure 12 an archetype search box, together with some internally installed archetypes, and we see how we can look for more archetypes in remote repositories. For now, we use the archetype outlined in red: maven-archetype-quickstart. When we choose the quickstart archetype, a file dialog pops up for us to choose a directory for the project. After we have chosen a directory Maven starts to download jar files etc.:
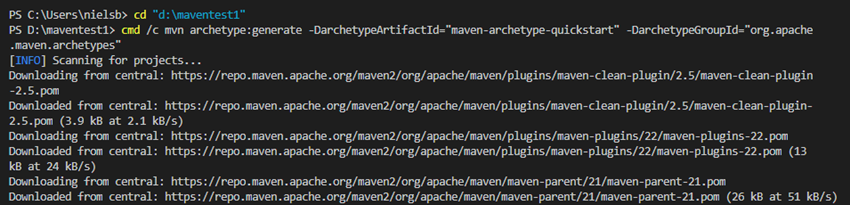
Figure 13: Maven Downloads
When the download finishes (it can take a while), we are asked for some information about the project:
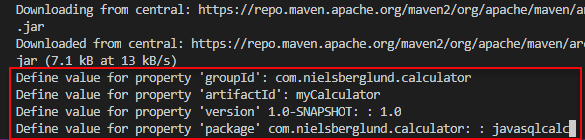
Figure 14: Project Properties
We see in Figure 14 how we define the Maven properties:
groupId:com.nielsberglund.calculator.artifactId:myCalculator.version:1.0.package:javasqlcalc.
In Figure 14 we see how the package name defaulted to the value of the groupId, but I decided to override and set a shorter package name, as it is preferred not to have multiple levels of package names in the SQL Server Java extension. After we confirmed the properties Maven created the project:
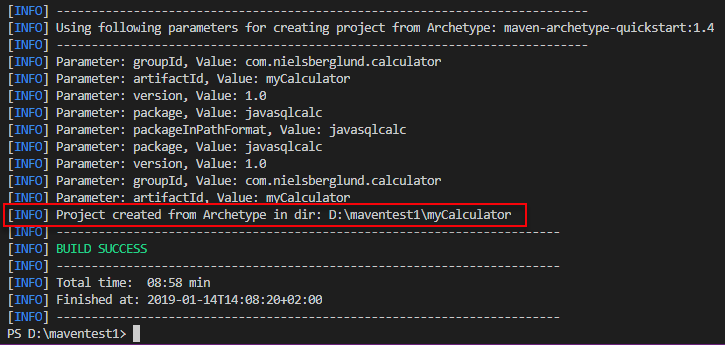
Figure 15: Project Properties
Maven created the project in, (as we see outlined in red in Figure 15), D:\maventest1\myCalculator. When navigating to D:\maventest1 in File Explorer we see the directory hierarchy:
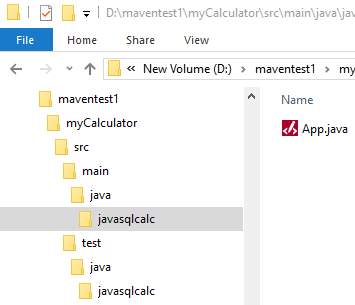
Figure 16: Project Directory Hierarchy
The projects directory/file hierarchy, as we see in Figure 16, is your typical Java project hierarchy with the package name as a directory. If the package name had been something like: com.nielsberglund.calculator, we would see three directories: com, nielsberglund, and calculator.
Ok, so now what - we have a Maven project, but when we look in VS Code, we do not see anything different from when we created the project. We need to, from the File menu open the folder Maven created, in our case the myCalculator folder:
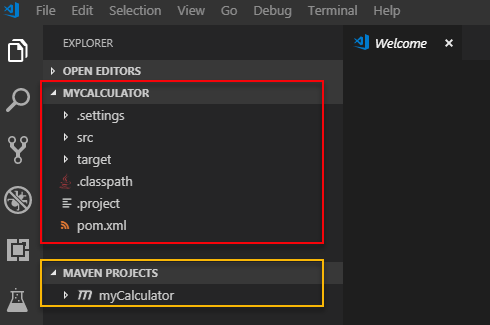
Figure 17: Open Project Folder in VS Code
We opened the myCalculator folder in VS Code as we see in Figure 17, and what is somewhat strange is that we see more folders and files in Figure 17, (outlined in red), than what we do in Figure 16. Those directories/files get created by one of the installed Java extensions when we open the folder. We also see in Figure 17 the pom.xml file which defines project dependencies etc.
When we drill down in the directory structure we arrive at a source file:
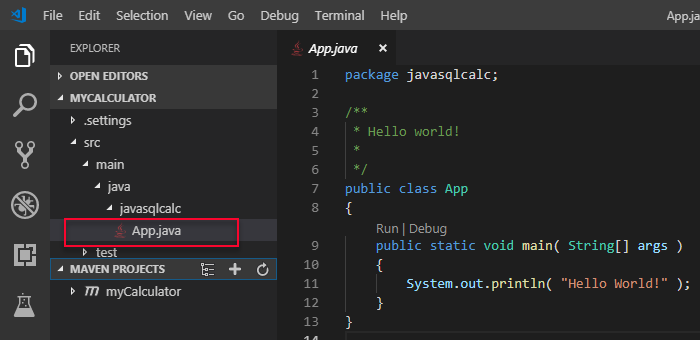
Figure 18: Source File
When Maven created the project, it also added the file we see in Figure 18, and this is now our “starter” file for the project. In this project, we will have multiple source files and to start with we rename the App.java to MyCalculator.java, and also change the class name to MyCalculator. We then add a second source file in the javasqlcalc folder, as we did in Figure 6, we name the file Calculator.java, and in that file create a class named `Calculator. Let us not forget to add the definition at the top of the file.
We want the Calculator class to have an adder instance method, taking two parameters as input, and returning the result of the addition of those two parameters:
|
|
Code Snippet 3: Calculator Class
Nothing strange with the Calculator class as we see in Code Snippet 3.
The MyCalculator class should have a static method looking something like the method in Code Snippet 1, but instead of doing the addition in the method, it creates a new instance of the Calculator class and calls the adder method in that class:
|
|
Code Snippet 4: The adder method in MyCalculator Class
In Code Snippet 4 we see the changed, (from what we see in Code Snippet 1), adder method. Copy the code in the main method as we see in Code Snippet 1 into the MyCalculator class, and we are now ready to test the code. Set a couple of breakpoints in the code, similar to what we did in Figure 8, and then hit F5 to debug. The code should now run without any issues.
Maven Compile
We are now at the same stage we were after Figure 8 above when we compiled the code from the command line as in Figure 9. The question is how do we compile when we use Maven? That’s easy:
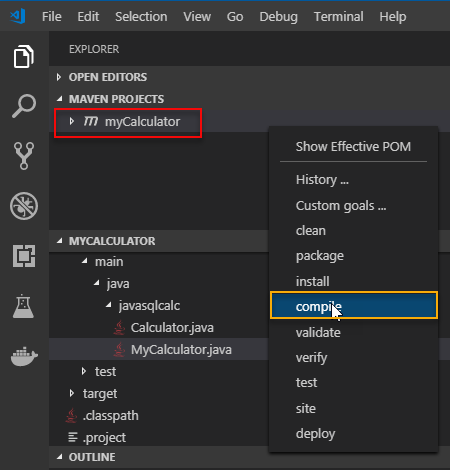
Figure 19: Maven Compile Menu
To compile using Maven we:
- Right-click on our project under the Maven tab as in Figure 19 (outlined in red).
- That brings up a menu.
We click on the compile menu entry, outlined in yellow in Figure 19, which calls mvn compile ... from VS Code’s built-in terminal:
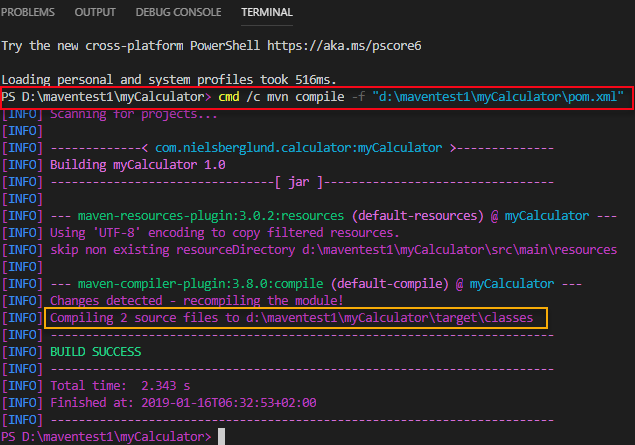
Figure 20: Maven Compile
We see in Figure 20 the compile command, (outlined in red), and how Maven compiles it into the target\classes directory (outlined in yellow). When we, in File Explorer, navigate to target\classes, we see something like so:
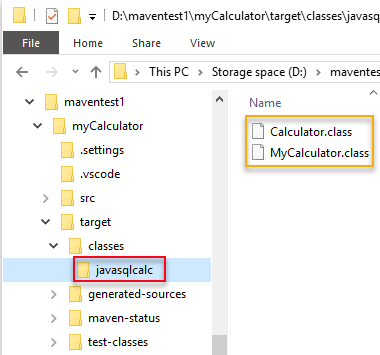
Figure 21: Output After Compile
As we see in Figure 21 the compilation created a directory with the same name as the package, (outlined in red), and put the two .class files in that directory, (the class files are outlined in yellow). To use this from SQL we now copy the javasqlcalc directory to the CLASSPATH location, and we call it like so:
|
|
Code Snippet 5: Execute from SQL Server
In Code Snippet 5, in the @script parameter, we see what we discussed in
SQL Server 2019 Extensibility Framework & Java - Misc. “Stuff”; how to call into a method inside a Java package. Once again, do not forget to copy the directory together with the .class files to the location of CLASSPATH.
Maven & JAR Files
We have now seen how we compile Java projects with Maven, and how that generates .class files. In
SQL Server 2019 Extensibility Framework & Java - Misc. “Stuff”, we said, however, that in a production environment you do not usually call into .class files directly, but you use JAR files. So, the question is then whether we can compile and create JAR files in VS Code using Maven?
Of course we can, and we do it in almost the same way we compiled in Figure 19:
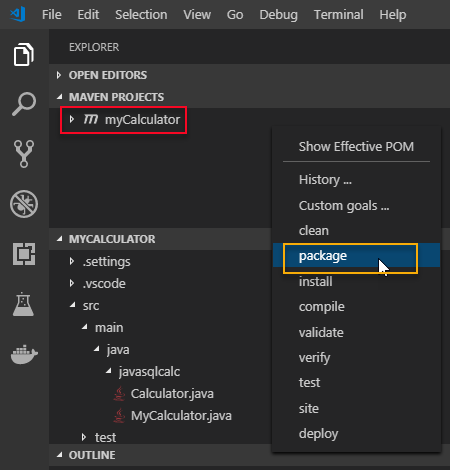
Figure 22: Package Java Application
To create a JAR file using the VS Code Maven extension we, as we see in Figure 22, right click on our project, (outlined in red), and then in the menu, we click on the package menu item which is outlined in yellow. The result of this is like so:
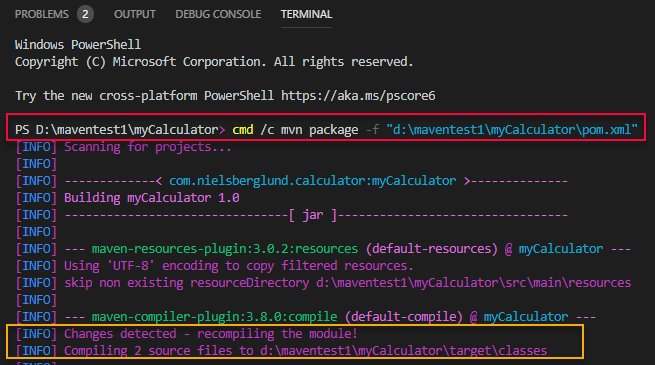
Figure 23: Create JAR - I
What happens, as we see in Figure 23, is that - in VS Code’s built-in terminal the command mvn package ... executes, (outlined in red). Part of the package command is a recompilation, which we see outlined in yellow. The recompilation only happens if necessary, e.g. if there has been code changes between last compilation/packaging and now. After potential recompilation Maven builds the JAR file:
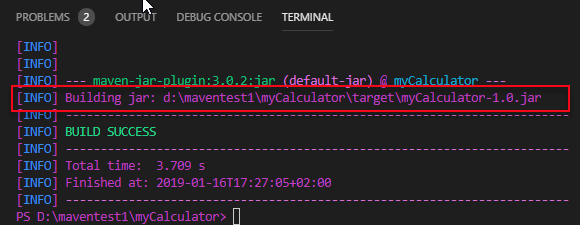
Figure 24: Create JAR - II
Finally, Maven builds the JAR file as we see in Figure 24 and places it in the target directory. We see how Maven names the JAR file: artifactId-version by default. To use it from SQL Server we copy the JAR file to the CLASSPATH location, as discussed in
SQL Server 2019 Extensibility Framework & Java - Misc. “Stuff”, and we call it like so:
|
|
Code Snippet 6: SQL Call to JAR
As we call into a method packaged in a JAR file, we need to set the @CLASSPATH parameter - as we do in Code Snippet 6 - and include the JAR file name. The location to where the @CLASSPATH parameter points to, does not need to be the location of the CLASSPATH environment variable, but it is important that the ALL APPLICATION PACKAGES group has READ permissions on the location. See
SQL Server 2019 Extensibility Framework & Java - Misc. “Stuff” for more about this.
Summary
As I mentioned i the beginning, this post came about because I needed an IDE to help when writing Java code.
In this post we covered VS Code and its Java extensions, and we also saw how to use Maven to compile Java code and/or package it into JAR files.
~ Finally
If you have comments, questions etc., please comment on this post or ping me.