I have been doing a couple of conference talks lately (virtual, of course) about streaming data from SQL Server to Kafka. The title of the presentation is Free Your SQL Server Data With Kafka.
In the presentation, I talk (and show) various ways of getting data from SQL Server to Kafka. One of the ways I cover is Microsoft CDC, together with Debezium.
When I do the presentation, I always have a SQL Server installed locally, and I run Kafka in Docker. Without fail, every time I set up the environment, I cannot remember how to deploy the Debezium SQL Server Connector into Docker. Therefore I decided to write this post to have something to go back to for next time.
NOTE: This post does not cover the intricacies of how to configure Debezium for SQL Server. I leave that for a future post.
Background
Before diving into how to do this, let us look at the moving parts of this.
Kafka Connect
Kafka Connect is a tool for streaming data between Apache Kafka and other systems in a scalable and reliable way. The way you move data between systems and Kafka is using connectors, and there are two flavors of connectors:
- Source connectors which understand how to interact with the source system send records into Kafka
- Sink connectors that propagate records from Kafka topics to other systems.
Kafka Connect is a JVM process, and it operates separately from the Kafka Broker. Connectors are .jar files loaded by the connect process. The diagram below shows a high-level overview of what it looks like:
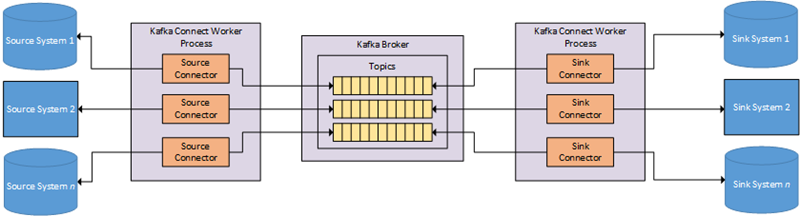
Figure 1: Kafka Connect Overview
In Figure 1 we see, (from left to right):
- Source systems, i.e. systems we want to get data from. These systems can be databases, Hadoop, files, etc.
- The Kafka Connect worker with source connectors. The connectors know how to interact with the source system, whether querying a database, using CDC, reading from a filesystem, etc. The connectors publish data to Kafka topics.
- The Kafka broker(s). The broker(s) contain topics that are the “sinks” for the source connectors.
- Kafka Connect worker with sink connectors. Source and sink connectors can be in the same Kafka Connect worker. The sink connectors know how to consume events from Kafka topics and ingest them into sink systems.
- Sink systems. These are systems we ingest data into. As with source systems, these can be databases, Hadoop, files, etc.
Debezium
Debezium is an open source distributed platform for change data capture, (I “stole” the preceding shamelessly from here). It captures changes in your database(s) and publishes those changes to topics in Kafka.
NOTE: Debezium can work without a Kafka cluster, in which case it is embedded in your application, and the application receives the change notifications. Read more about that here.
Debezium has Kafka Connect connectors for a multitude of source systems. When interacting with Kafka, the connector(s) is deployed to Kafka Connect.
With the above in mind, let us look at how this works with SQL Server.
SQL Server, Debezium, and Kafka
As I mentioned at the beginning of this post, the aim is to get data out of some table(s) in a database(s) and stream it to a topic(s) in Kafka.
We do not necessarily need to use Debezium as there are other Kafka Connect connectors. We could, for example, use the Confluent SQL Server connector. However, as we want to stream the data in near real-time, with the least amount of work on our side, the Debezium connector is our choice. Coming back to Figure 1 it would look something like so:
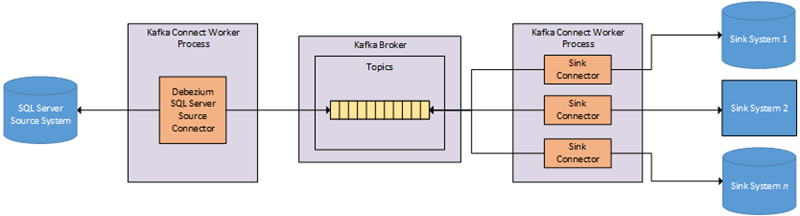
Figure 2: Kafka Connect SQL Server & Debezium
We see in Figure 2 how the source system is SQL Server and how the source connector is the Debezium SQL Server connector. In the diagram we publish to one topic as we only retrieve data from one table. If we were to retrieve data from multiple tables, we’d publish to multiple topics.
We have several sink connectors reading from our topic and ingest into various sink systems.
Ok, enough background; before we get into the “nitty-gritty”, let’s see what you need if you want to follow along.
Pre-reqs & Code
There are not many pre-reqs, but here goes:
- SQL Server: well, duh - as we want to set up CDC and Debezium to stream data from SQL Server, we would need SQL Server installed somewhere. I have SQL Server 2019 installed on my local dev machine.
- Docker Desktop: another duh - this post is all about how to set up Kafka Connect and Debezium in Docker, so yes - we need Docker Desktop.
Test Code
I mentioned in the beginning that this post is not about configuring Debezium to read data from SQL Server, so I won’t discuss CDC in any detail. However, we need something to test that what we are doing works, so here’s some code to set up a database on SQL Server:
|
|
Code Snippet 1: DB Objects Creation Script
The code in Code Snippet 1 creates a database, DebeziumTest and a table, dbo.tb_CDCTab1 in the database. Later in the post, we enable the table for CDC. Enabling it allows us to check that our Kafka Connect/Debezium “stuff” works as expected. So, if you want to follow along, run the script, and after you have run it, ensure you have the database and the table.
Now, let us get into what we are supposed to do; to set this up in Docker.
Docker
Let us start with getting the necessary Docker images and compose files.
Docker Kafka Image
There are quite a few Docker images, and Docker composes files around for setting up Kafka and Kafka Connect. The ones I usually use are from Confluent’s
cp-all-in-one repository.
Let us get started:
|
|
Code Snippet 2: Clone the Repo
In Code Snippet 2, we create a directory for the repo files and clone the
cp-all-in-one. After cloning, we have a directory named cp-all-in-one under the kafka directory. The cp-all-in-one directory looks like so:
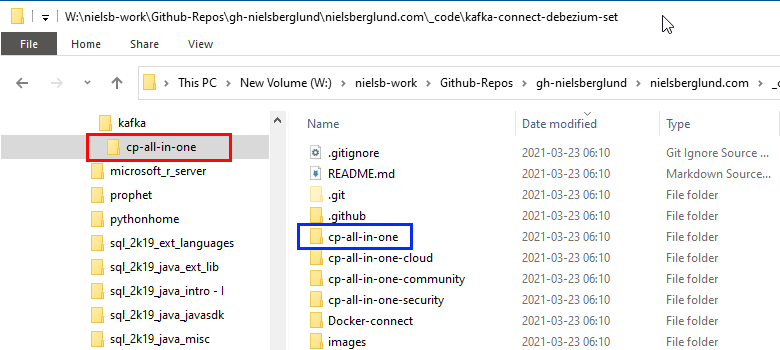
Figure 3: Kafka Connect SQL Server & Debezium
In Figure 3, we see that cp-all-in-one (outlined in red) has some sub-directories. These directories contain Docker Compose files for various setups of Kafka. We are interested in the directory outlined in blue: cp-all-in-one, (yeah I know - the same name as the parent directory).
A quick side note here about cp-all-in-one. This directory contain the image for Confluent Platform, which is the enterprise edition of Confluent. As with most enterprise editions this requires a licennse. However, with the introduction of Confluent Platform 5.2 “back in the day”, Confluent
announced that Confluent Platform is “free forever” on a single Kafka broker! In other words, it is like a “Developer Edition” of Confluent Platform. The benefit of using Confluent Platform is that you get ALL the goodies, including Control Center, which is the WEB UI for Confluent Platform.
When going into that directory, we see a docker-compose.yml. Opening it in an editor, we see the various images deployed as services when running the docker-compose command. From a Kafka Connect perspective, we are interested in the connect service (and image):
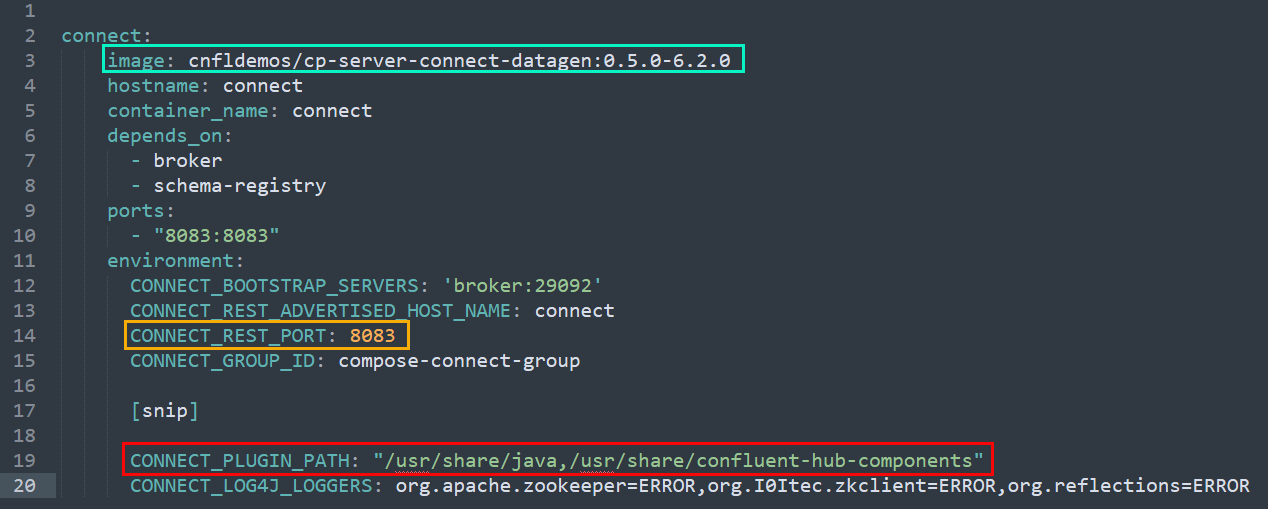
Figure 3: Docker Compose - Connect Service
What Figure 3 shows is a “condensed” part of the yml for the Kafka Connect image. There are three outlined section in the figure:
- Outlined in green:
image, the image the service is built on. - Yellow:
CONNECT_REST_PORT, the port to access the service on. - Red:
CONNECT_PLUGIN_PATH, the path from where the service loads plugins (connectors).
We see in Figure 3 how the image is cp-server-connect-datagen. That image is an image containing some “base” connectors and also tools for generating data. There are other Connect images, and we see one other later in this post. But for now, let us use this image.
Run Kafka & Connect
Having retrieved the required files as in Code Snippet 2 it is time to “spin up” the Kafka cluster, including Kafka Connect. We do that by cd:ing into the directory where the docker-compose.yml file is and execute: docker-compose up -d.
When running the code you see how Docker is pulling images, starts up the various services, and finally:
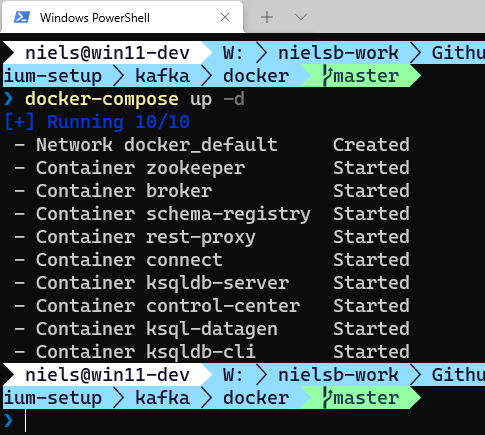
Figure 4: Kafka Started
We see in Figure 4 how all services have started. Well, that is not exactly true - some services are still “spinning” up, but after a minute or two, you can browse to the Confluent Control Center and see your Kafka cluster in all its “glory”:
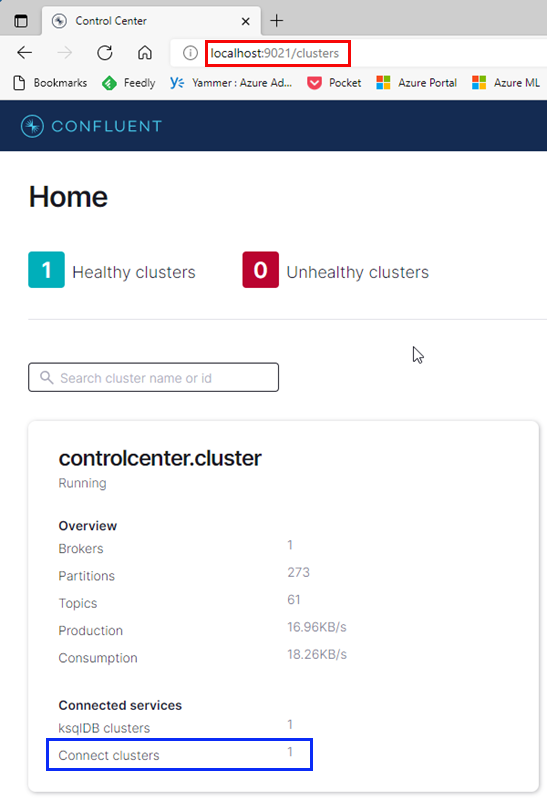
Figure 5: Confluent Control Center
In Figure 5, we see the overview page for the Kafka cluster. Outlined in red at the top, we see how we access it from port 9021 on the box where Docker runs. Outlined in blue, we see that we have one Connect cluster.
Installed Connectors
I mentioned above that the Connect image has some connectors installed by default. To see what connectors are pre-installed, we use the Kafka REST API:
|
|
Code Snippet 3: GET Connectors
We can use whatever tool we are comfortable with to call the REST API (curl, Postman, etc.). Personally, I prefer Postman, and in Code Snippet 3 we see how we call into the connector-plugins endpoint and how we use the port I mentioned above: 8083:
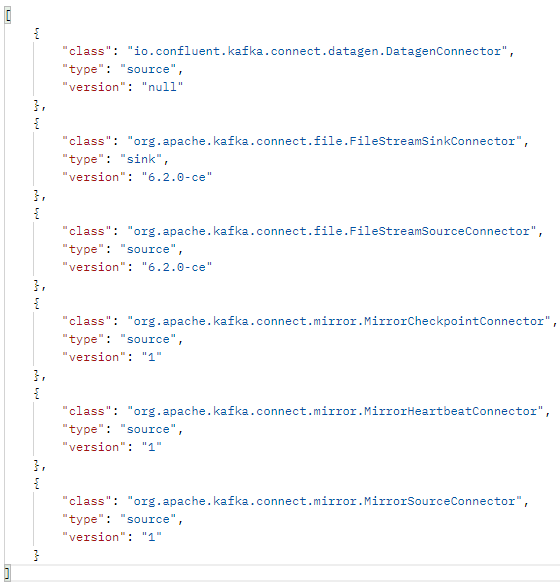
Figure 6: Installed Connectors
Executing the code in Code Snippet 3 I get the result we see in Figure 6. We see various Connect connectors, but nothing for SQL Server. So, we need to install it somehow.
Installing Debezium SQL Server Connector
How do we go about installing a connector into the Connect service? Above I mentioned how a connector is a .jar file, which the service (JVM process) loads. I also mentioned the CONNECT_PLUGIN_PATH, which indicates where the service loads connectors from. So, with that in mind, we can imagine the process to install a connector being:
- Get the specific connector from “somewhere”.
- Copy it into the path where the service loads connectors from.
- Restart the service.
If we ran the Kafka cluster as a local install, installing a connector would be as easy as above, but what about installing it when running Kafka in Docker containers?
Well, we could do something similar:
- Download the connector we want to install (the file is most likely “tar”:ed).
- “spin up” the Kafka cluster.
- Use
docker cpto copy the connector into the connect container. - Use
docker execto get to the bash shell in the connect container. - Un-tar the file to the plugin load path.
- Back out from the container and
docker committhe changes to a new image name. - Tear down the running Kafka cluster:
docker-compose down. - Use that image in the docker compose file in place of the “original” connect image.
Yes, we could do something like that, and that is how I did it initially (yeah I know - I am a “noob”, so sue me). There are however better ways of doing it:
- Confluent Hub
- Create a new image from a
Dockerfile.
Let us look at the two options.
Confluent Hub
Confluent is like the App Store (or NuGet), but for Kafka. The home page expresses it a lot better than what I can do:
Confluent Hub is an online library of pre-packaged and ready-to-install extensions or add-ons for Confluent Platform and Apache Kafka. You can browse the large ecosystem of connectors, transforms, and converters to find the components that suit your needs and easily install them into your local Confluent Platform environment.
Using Confluent Hub, you can install Kafka Connect connectors, whether you do it locally or in Docker. This is made possible via the
Confluent Hub Client. The client is part of the Confluent Platform and is located in the /bin directory. If you are not using the Confluent Platform, you can download and install the client locally. Since I am using Confluent Platform, all is good.
Right, so we want to install the Debezium SQL Server connector. Let us go to the hub and look for it. Browse to here, and in the search box, enter “SQL Server”, followed by a carriage return:
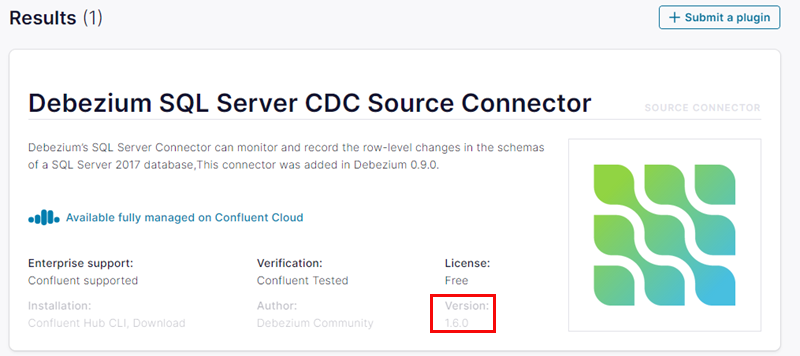
Figure 7: Debezium SQL Server Connector
The result coming back from the search looks like what we see in Figure 7; one entry: Debezium SQL Server CDC Source Connector. When you click on the result, you end up at a page with some more information about the connector, and more importantly, the syntax of how to install the connector:
|
|
Code Snippet 4: Install SQL Server Connector
Ok, cool - so we see the syntax to install a connector in Code Snippet 4, but this looks suspiciously like how we do it from a bash shell. How do I do it for a Docker container without resorting to the “hack” I mentioned at the beginning of this section?
Ah, that’s where the “magic” of Docker compose files comes in. It turns out that when you define a container, you can also specify configuration options. One such option is the command option, which allows you to execute arbitrary commands.
Let us edit our docker-compose.yml file and add the command configuration:
|
|
Code Snippet 5: Installing Connector from Confluent Hub in Container
In Code Snippet 5, we see how we use the docker-compose.yml file from before (heavily “snipped”), but we have added the command configuration option.
In the code, we see how we:
- “spin up” the bash shell.
- set some options,
-cand|. - executing the
installcommand. - making sure we start up the worker process
- we finally do
sleep infinityto keep the container alive.
It is worth noting that instead of a version number of the connector, I say latest to always get the latest release. Having edited the docker-compose.yml file, we now start the cluster: docker-compose up -d.
NOTE: Above I say … get the latest release …. What to be aware of is that the Confluent Hub only contains released versions of connectors (AFAIK).
Wait a little while for the cluster to start up, and then use Postman to retrieve the installed connectors as in Code Snippet 3. Executing the Postman GET command, we see:
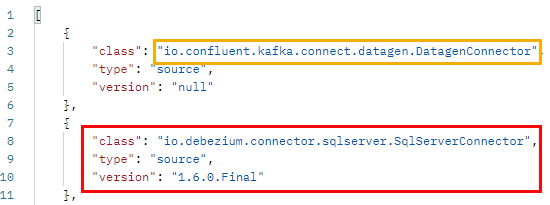
Figure 8: Installed Debezium SQL Server Connector
Yay, the Debezium SQL Server Connector is now deployed to Kafka Connect, as we see in Figure 8 (outlined in red). What you see outlined in yellow is the datagen connector which is one of the extra parts of the cp-server-connect-datagen image.
Dockerfile
Ok, so we have seen how we can install a connector using confluent-hub install in the command option in the docker-compose.yml. That is awesome; however, this requires you to have an internet connection every time you “spin up” the Kafka cluster.
So, what you can do instead is build your own connect worker image, include the connector(s) you want and use that image in your compose file. To do this we need a base image and a file that tells Docker what to do to build our own image. For the base image, we can definitely use the image we have seen so far, the cp-server-connect-datagen image, but in reality, you want an image containing the bare minimum as the base. For that, we use the cp-server-connect-base image.
I mentioned above that we need a file telling Docker what to do. This file is essentially a build file. It is common practice to name that file Dockerfile. To achieve what we did above in Code Snippet 5, we create an empty file, name it Dockerfile and add the following:
|
|
Code Snippet 6: File to Create Image
In Code Snippet 6, we see how we first define what image to use, and then we tell Docker we want to run the command to add the connector. Having saved the Dockerfile, we now build the image:
|
|
Code Snippet 7: Docker Build
The code in Code Snippet 7 shows the syntax to build the image, where:
docker buildis the build command.- the
.tells docker to pick the file namedDockerfile. - the
-t dbz-sql-conntags the image with a name. Here we can also assign a version number.
After having run the code in Code Snippet 7, you can execute docker images, and in the list of images being returned, you should now see the dbz-sql-conn. Notice how it automatically has been assigned the latest tag, as we did not give it a version.
If the Kafka cluster is still up bring it down. Edit the docker-compose.yml file and replace the cnfldemos/cp-server-connect-datagen:0.5.0-6.2.0 image with the image we just built: dbz-sql-conn, and bring up the cluster again. We do as we did before; wait a while for the cluster to come up and then use Postman to see the installed connectors. If everything has gone according to plan you now - once again - see the SQL Server connector. This time though, you will not see the datagen connector as it is not part of the cp-server-connect-base image.
Pre-Release Connector Versions
I mentioned previously that Confluent Hub contains released versions of connectors. What if you want to use an Alpha/Beta version of a connector? For example, the latest release of the Debezium SQL Server connector is version 1.6.0, but there is a version 1.7.0 in testing, and I would like to test that version.
First of all, how do you know what versions there are? Well, browse to Debezium Releases Overview, where you see what version is in development and what version is released:
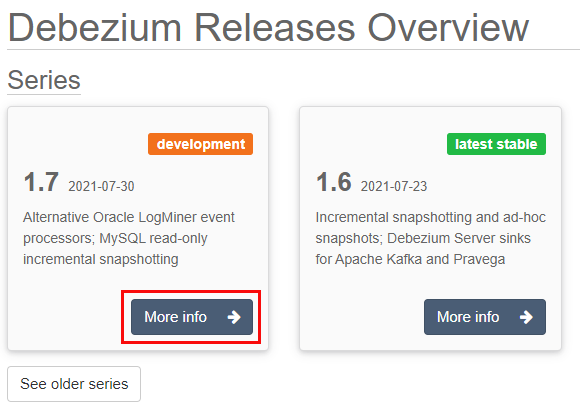
Figure 9: Installed Debezium SQL Server Connector
Click on the More Info button, which you see outlined in red in Figure 9. That takes you to the Debezium Release Series page, where you at the bottom of the page have a Downloads button. Click on that button and then right-click on the connector for the product you want (SQL Server Connector Plug-in), and copy the link. The link for the latest development release for the SQL Server Connector Plug-in at the time of me writing this post (August 2021) is:
|
|
Code Snippet 8: Link to Connector Plugin
When you look at Code Snippet 8 beware of the line continuations \. As the connector is not available via Confluent Hub, how do we get it?
The answer to that is that nothing much changes. We can either install it via the docker-compose.yml file similar to what we did in Code Snippet 5 or what we did in Code Snippet 6. The only difference is that we cannot use confluent-hub install, but we have to:
- download it using
wget. - un-tar it into the plugin path.
I will do it by building a new image, and the code in Dockerfile for this looks like so:
|
|
Code Snippet 9: Dockerfile Downloading Connector
As with Code Snippet 8, beware of the line continuations in Code Snippet 9. In Code Snippet 9, we see how we download it using wget and then un-tar it into the plugin path. Having edited and saved the Dockerfile, we build it like so:
|
|
Code Snippet 10: Building Alpha Release
As we see in Code Snippet 10, I have given the image a tag of 1.7.Alpha1. To ensure that it works we:
- replace the
dbz-sql-connimage in thedocker-compose.ymlfile with dbz-sql-conn:1.7.Alpha1 - tear down the Kafka cluster
- spin up the Kafka cluster again.
When we use Postman to get installed connectors, we see the following:
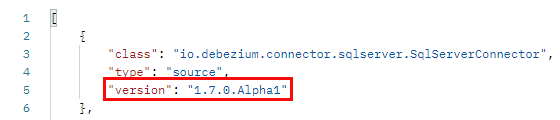
Figure 10: Installed Debezium SQL Server Connector 1.7.0
We see in Figure 10 how we indeed have installed a pre-release version of the connector - yay!
Test
So far, we have seen that the SQL Server connector is installed, but we have not made sure it does what it is supposed to do, i.e. retrieve data into a Kafka topic.
As I mentioned initially, this post is not about SQL Server CDC or configuring the Debezium connector. In any case, let us quickly go over how to test it works. We start with enabling SQL Server, and we use the database and table we created above:
|
|
Code Snippet 11: Enabling Database and Table for CDC
The code comments in Code Snippet 10 should be pretty self-explanatory. The only thing to think about is that the SQL Server Agent needs to be started for this to work.
Having enabled CDC, we now configure and create the connector instance. We do it using Postman, POST:ing to the connectors endpoint:
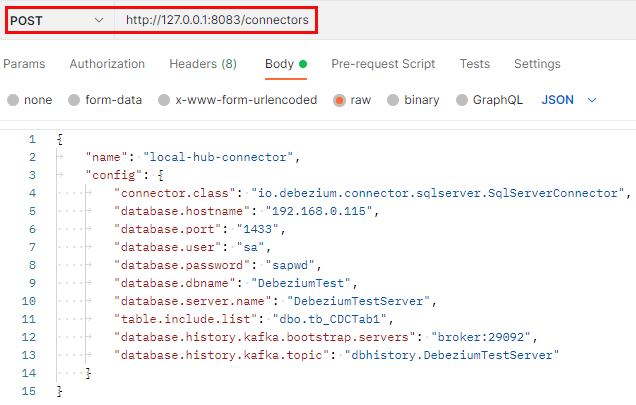
Figure 11: Create Connector
In Figure 11, we see a straightforward connector configuration. You can find out more about the various configuration properties
here. When looking at the Kafka topics in Control Center after sending the POST request, you see something like so:

Figure 12: Debezium Topics
We see in Figure 12 how two new topics were automatically created when we created the connector. These topics are Debezium specific topics, and you as a user would not do much with them. When you look at the topics in Kafka at this stage, you do not see any topic related to the table we want to stream data from. That changes as soon as you insert some data into the table:
|
|
Code Snippet 12: Ingest Data
When you refresh the Topics page in Control Center after executing the code in Code Snippet 12, you see this:
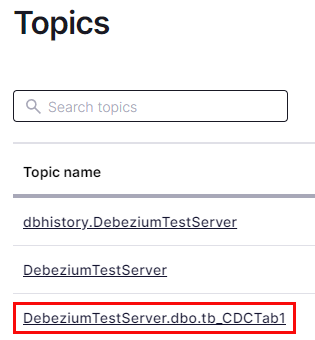
Figure 13: Table Topic
Cool, in Figure 13, outlined in red, we see a new topic. This is the topic for the table we want to stream data from into Kafka. If you now were to look at the messages in the topic, you would see the data we just inserted. I leave that for you, my dear readers, to do on your own. We have now confirmed that everything works!
Summary
In this post, I describe what to do if you want to run the Debezium SQL Server connector in a Docker environment.
We started by looking at what Kafka Connect and Debezium is. We said that:
- Kafka Connect is a JVM process allowing us to stream data between Apache Kafka and other systems. It works by the use of connectors which are
.jarfiles. There are two types of connectors:- source connectors that understand how to retrieve data from a system and publish it to Kafka.
- sink connectors that read data from Kafka topics and ingests that data into target systems.
- Debezium is a distributed platform with connectors for a multitude of database systems. It uses the underlying system’s CDC functionality to capture database changes and publish those changes to topics in Kafka.
We then looked at how to deploy a Debezium connector, more specifically the SQL Server connector, to a Kafka Connect Docker container. We saw there are two main ways to get a connector into the Kafka Connect container, and both ways use the Confluent Hub client:
- In the
commandoption for the Kafka Connect container, run the install command. - Create your own image, and in the
Dockerfilefile, run the install command.
That was about it. Once again, this post was not about how CDC works or the various Debezium configuration options. That may be covered in a future post.
~ Finally
If you have comments, questions etc., please comment on this post or ping me.