For readers of my blog, it should not come as a surprise that I think Apache Kafka is “the greatest thing since sliced bread”, and I have written some posts about it. The posts I have written has been geared towards the setup/deployment of Kafka, with a Windows/.NET slant to it. This post is in the same vein; how to set up Kafka but in the cloud.
The “conference season” is upon us, and I have some conference talks coming up. This year quite a lot of what I am talking about is in the cloud, specifically Azure. As some of the talks involve Apache Kafka, I thought it would be good if Kafka also ran in the cloud. Sure, I could always run Kafka on Docker on a VM in the cloud, but “they” say serverless is the new “in” thing, as well as managed services, so why not try that out.
So, this post is about how to deploy Confluent Cloud on Azure!
Background
Let us start with what Confluent Cloud is. I shamelessly stole the following paragraph from here:
Confluent Cloud is a resilient, scalable streaming data service based on Apache Kafka, delivered as a fully managed service. Confluent Cloud has a web interface and local command line interface. You can manage cluster resources, settings, and billing with the web interface.
OK, enough of marketing talk; Confluent Cloud is the Confluent Platform running as a managed service in the cloud, and you can run it on Azure, AWS, and Google Cloud. It was introduced in 2017, and - if I remember correctly - it initially ran on the Google Cloud Platform (GCP). Shortly after the introduction on GCP, it also became available on AWS.
Towards the end of 2019, Confluent and Microsoft released Confluent Cloud on Azure, but it was like a separate service; you did not provision it from the Azure Portal. You provisioned it from Confluent and chose Azure as your platform. One of the drawbacks with this was that you had to sign up specifically for Confluent Cloud and provide a credit card, as the billing was separate. This changed at the beginning of 2020 when Confluent Cloud became wholly integrated with Azure.
The cost for Confluent Cloud is now billed to your Azure subscription, and you provision a Confluent Cloud cluster from the Azure Marketplace! In the rest of this post, we see how that is done!
Pre-Reqs
This post would not be a “Niels post” if there were no pre-reqs section. So, the pre-reqs - if you want to follow along - are:
- An Azure account. If you don’t have an Azure subscription, sign up for a free account.
That was not so bad, was it? Oh, one more thing; in your Azure subscription, you need to have the role of Owner or Contributor.
Provision Confluent Cloud
When we provision Confluent Cloud on Azure, what we do is we are creating a Confluent Cloud organization inside Azure. A Confluent Cloud organization is a resource that provides the mapping between the Azure and Confluent Cloud resources. It’s the parent resource for other Confluent Cloud resources.
Within a Confluent organization, you can create multiple environments, clusters, topics, and connectors. The environments, clusters, etc., are created from within Confluent Cloud Software as a Service (SaaS) resources.
Create Confluent Cloud Organization
To create a Confluent organization, we must be signed in to your subscription in the Azure Portal.
What you see after you have signed in my vary, but what you want to do is to Create a resource:
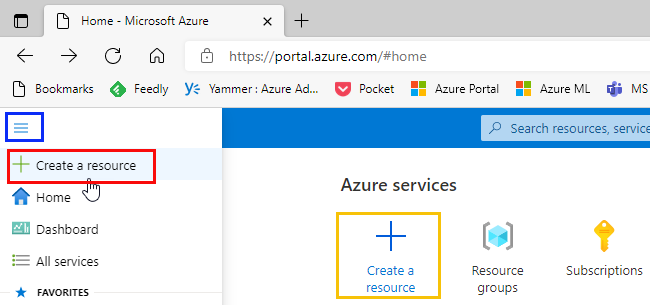
Figure 1: Create Resource
I create a resource in Azure by expanding the hamburger menu in the upper left-hand corner of the portal (outlined in blue in Figure 1), and then click on Create a resource (outlined in red in Figure 1). You may see Azure Services in the portal, and underneath Azure Services, you can click on Create a resource, outlined in yellow in Figure 1. Clicking on Create a resource takes you to a page with a search box:
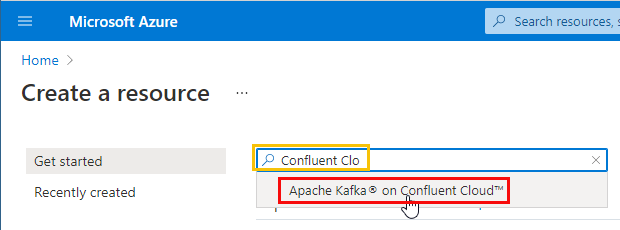
Figure 2: Search for Confluent Cloud
You start to write Confluent Clo … in the search box as you see in Figure 2. Text completion “pops up” some options where Apache Kafka on Confluent Cloud is one (outlined in red). You choose that one, you hit enter and you see:
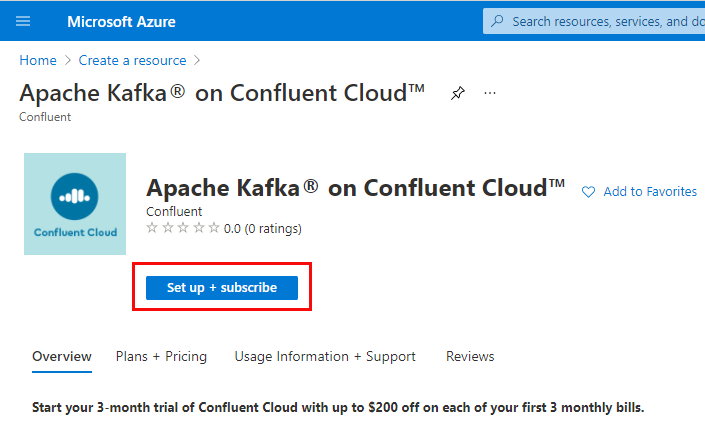
Figure 3: Setup and Subscribe
Choosing Apache Kafka on Confluent Cloud as in Figure 2 takes you to the page where you start the process of setting up Apache Kafka on Confluent Cloud. When you click on the Setup + subscribe button outlined in red in Figure 3 you see something like so:
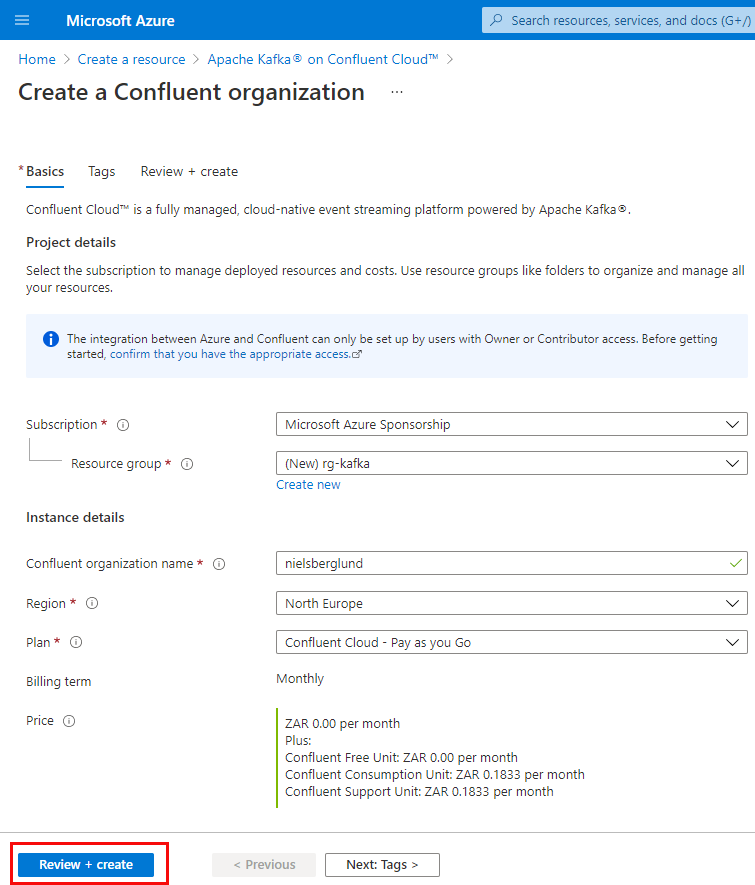
Figure 4: Create Organization
I mentioned above about Confluent Cloud organizations, and we see in Figure 4 the first step in creating an organization. You provide values for the following properties:
- Subscription: the Azure subscription to deploy to.
- Resource group: here, you choose an existing resource group. There is the option to create a new resource group, but I got an error when the deployment started when I had chosen to create a new group. The error was along the lines of that the resource group needed a location. So what I do now is to first create a resource group (and define a region) and use that resource group.
- Confluent organization name: This is the name of the Software as a Service resource.
- Region: in what Azure region that you want to place this deployment.
- Plan: the billing plan. I most instances, this is Pay as you Go.
- Billing term: prefilled based on your chosen Plan.
- Price: as with Billing term, it is prefilled.
Having filled in the values for the properties above, you can now click the Review + create button (outlined in red in Figure 4), and you see:
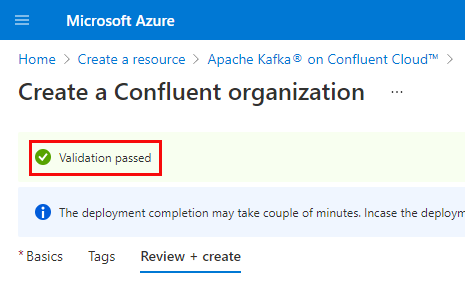
Figure 5: Validate Organization
Clicking the Review + create starts a validation of the values you have entered. In Figure 5 we see what it looks like when the validation has successfully passed.
We can now go ahead and create and deploy the organization. At the bottom of the page, we see in Figure 5 (we only see the top part in Figure 5) is a Create button. Clicking that button starts the deployment. After a while, you see:
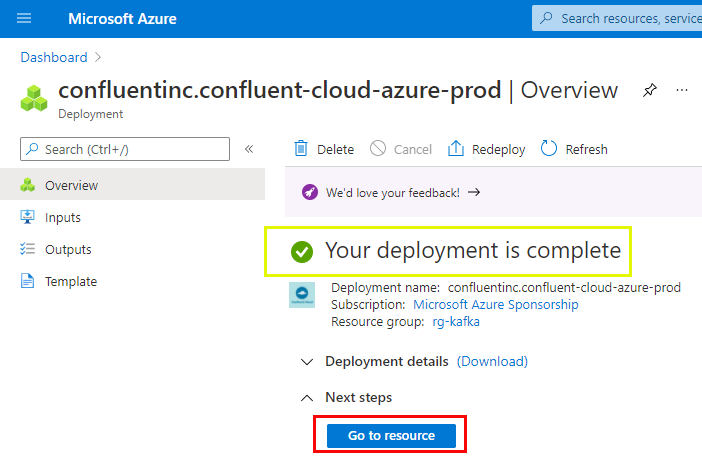
Figure 6: Deployment Complete
As we see in Figure 6, the deployment has now been completed, and everything should be set up. To see that everything is indeed set up, click on the Go to resource button outlined in red in Figure 6. Clicking on that button results in something like so:
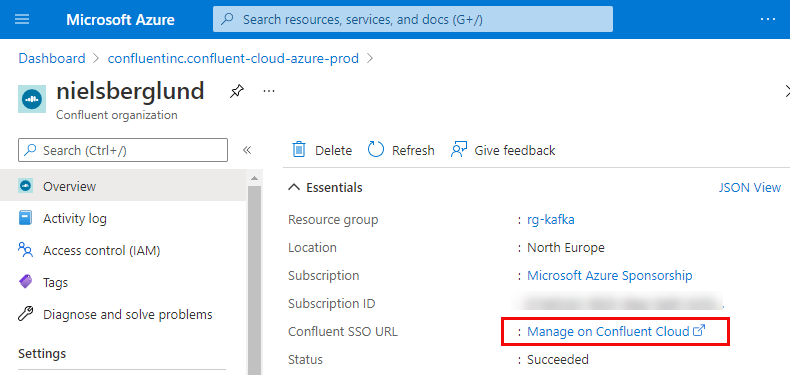
Figure 7: Manage on Confluent Cloud
In Figure 7, we see how we are inside the Confluent organization, and we are more or less done. However, remember how I above mentioned that the organization we just have created is the mapping between Azure and Confluent Cloud resources, and how we use Confluent Cloud resources to create Kafka clusters, Topics, etc. So, to seamlessly move between Azure and Confluent Cloud, we need to enable Single Sign-On (SSO).
Single Sign-On (SSO)
Enabling SSO allows us to transparently move from Azure to Confluent Cloud and directly login to Confluent Cloud with an SSO URL.
To enable SSO, we click on the link outlined in red in Figure 7. Clicking on that link gives us this:
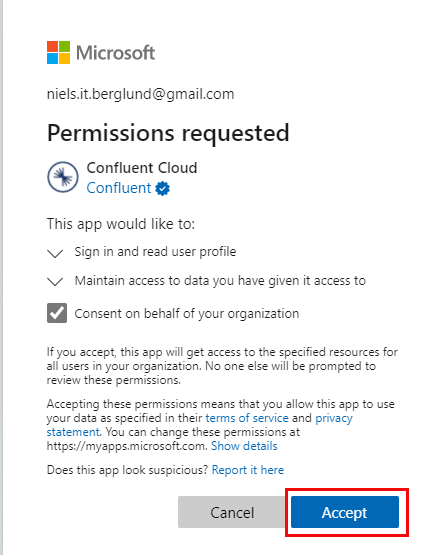
Figure 8: Permissions
In Figure 8, we see a request for permissions from Confluent Cloud to do what is outlined in Figure 8. That is the final thing we do in Azure because when we accept the request, we see something like so:
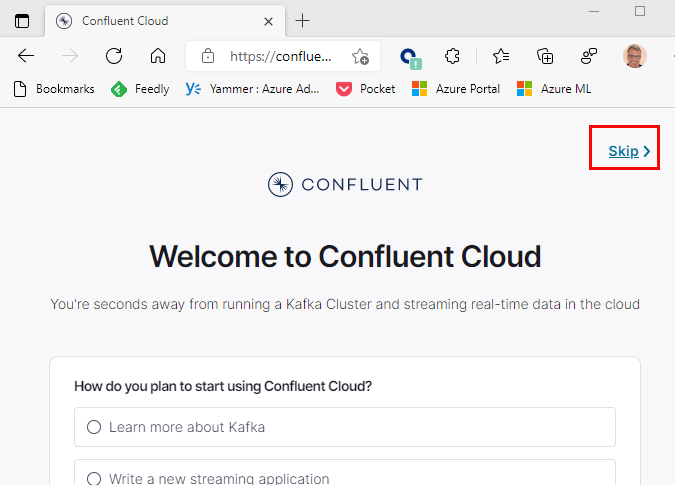
Figure 9: Welcome
We have now arrived at Confluent Cloud, and the Welcome page, as we see in Figure 9, asks us some questions about what we want to do with Kafka, our experience, etc. I am not that interested in answering those questions so I just hit the Skip link we see outlined in red in Figure 9, and I see this:
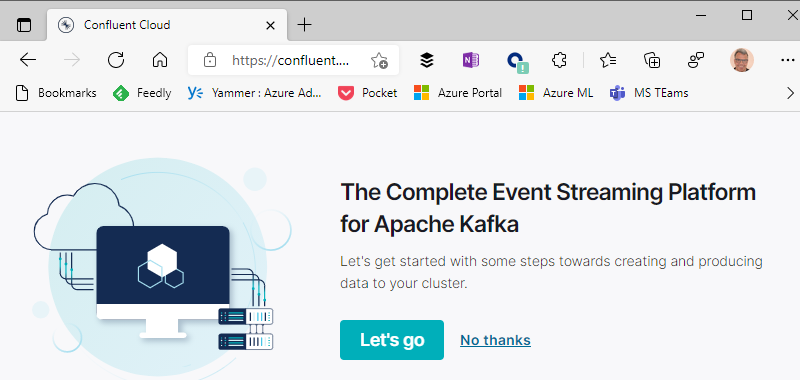
Figure 10: Ready to Roll
Right, we are done with creating the organization, and we have enabled SSO. As we see in Figure 10 we can now start doing the “cool stuff”! However, let us not click on any links on this page, but just close down the page and go back to Azure and our Confluent organization in Azure.
Having enabled SSO, we have three ways of logging into/signing-in to our Confluent Cloud SaaS resources:
- from inside Azure Portal: by clicking on the Manage on Confluent Cloud link in Figure 7 (the one we used to set up SSO).
- from the Confluent Cloud login page, where we use the email and password we use to authenticate against Azure.
- use the SSO login URL. You get the URL by right-clicking on the Manage on Confluent Cloud link and choose Copy link.
Up until now we have created a Confluent Cloud organization in Azure and registered that organization with Confluent Cloud. It is now time to do the interesting stuff: Kafka Clusters, Topics etc.
Create a Kafka Cluster
Login to Confluent Cloud by using one of the methods above. After having logged in we see something like so:

Figure 11: Default Environment
At the beginning of this post, I said how a Confluent Cloud organization was the parent resource for other Confluent Cloud resources. When we create an organization, an Environment is also created by default (named default), which we see in Figure 11.
NOTE: We can change the name of the environment by clicking on the link in Figure 11 outlined in yellow.
An environment is a container for Kafka clusters, and we see in Figure 11 a button (outlined in red) Create cluster on my own. When clicking that button we get:
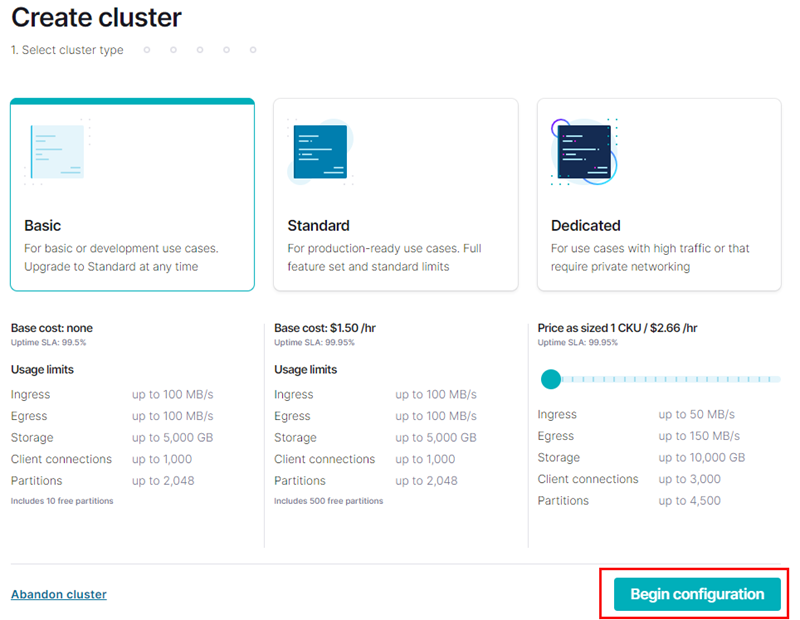
Figure 12: Create Cluster - I
In Figure 12, we see the Create cluster page we end up on after clicking the Create cluster on my own in Figure 11. We see how we can choose what cluster type to create, and for our purposes, the Basic type is more than enough. Having selected the cluster type, we are now ready to configure the cluster. Clicking on the button outlined in red in Figure 12: the Begin configuration button, we see this:
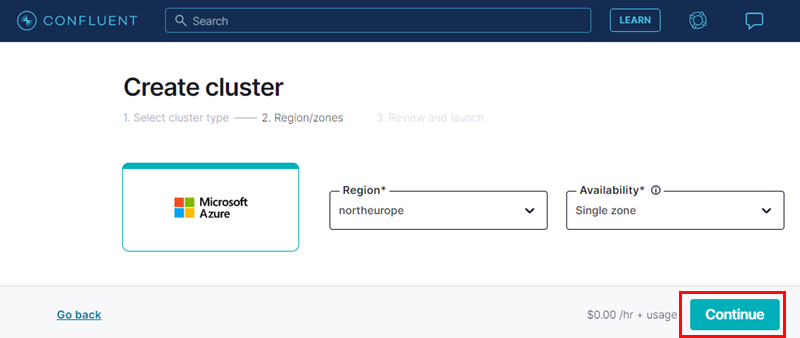
Figure 13: Create Cluster - II
The first thing to do when configuring a new cluster is what we see in Figure 13, we choose:
- the region we want the cluster in. A good practice is to choose the same region as our resource group and organization.
- the level of availability we want: single zone or multi. In our case, using the Basic cluster type, single-zone is our only choice.
Having decided on the Region we click Continue (outlined in red), and we get this:
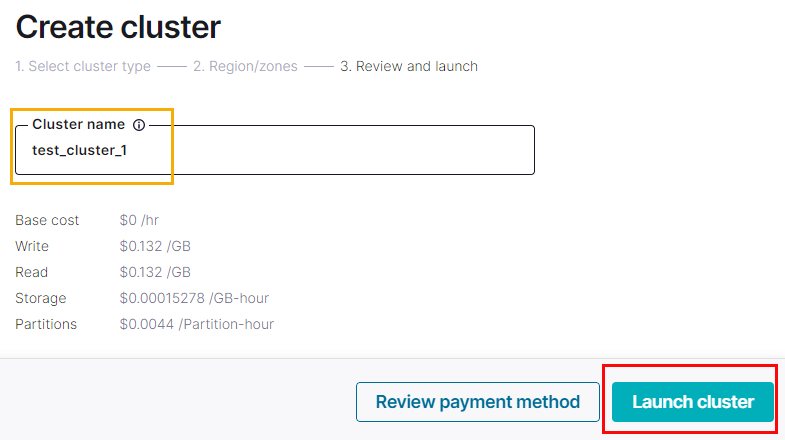
Figure 14: Create Cluster - III
What is left for us to do is to give the cluster a name. In Figure 14, we see how I named it test_cluster_1 (outlined in yellow). Then I click on the Launch cluster button, which in Figure 14 is outlined in red:
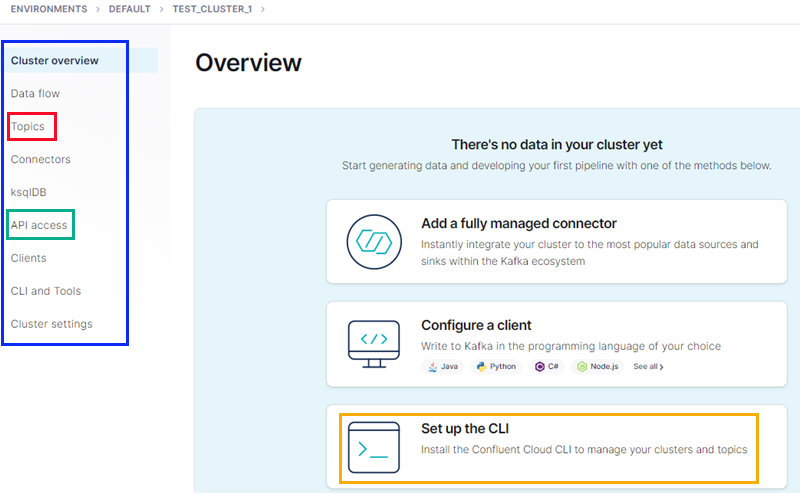
Figure 15: Cluster Created
The cluster is now created, and we are presented with an overview of the cluster as in Figure 15. For you who have used Confluent Platform, this looks almost like the overview page in Confluent Control Center (the Web UI for Confluent Platform). We see in Figure 15:
- outlined in blue: a menu covering the cluster’s main components; topics, ksqlDB, etc.
- red: the link to create and manage topics.
- green: to connect to the cluster from the outside world, we need an API key (and a secret). The link here allows us to create that.
- yellow: a link to instructions on downloading and installing the Confluent Cloud CLI (CCLI). You can definitely manage your cluster, topics, etc., using the Web UI, but to be more efficient, you want to use the Confluent Cloud CLI.
NOTE: Above the CCLI box is a link giving examples of how to configure clients. Very useful.
Speaking about clients: to access the cluster and publish to or consume from a topic you need the address of the cluster. If you click on the Cluster settings link we see in Figure 15 you get all sorts of information about the cluster, including the the value of bootstrap.servers that clients need.
OK, so we now have a cluster; let us create a topic.
Create Topic(s)
Click on the Topics link outlined in red in Figure 15:
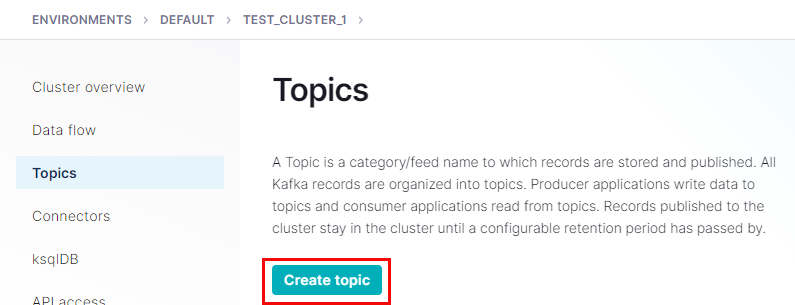
Figure 16: Topics
What we see in Figure 16 should be self-explanatory. It is the page for our topics in this cluster. We don’t have any topics yet, so we create one by clicking on the Create topic button outlined in red in Figure 16. Doing that, we see:
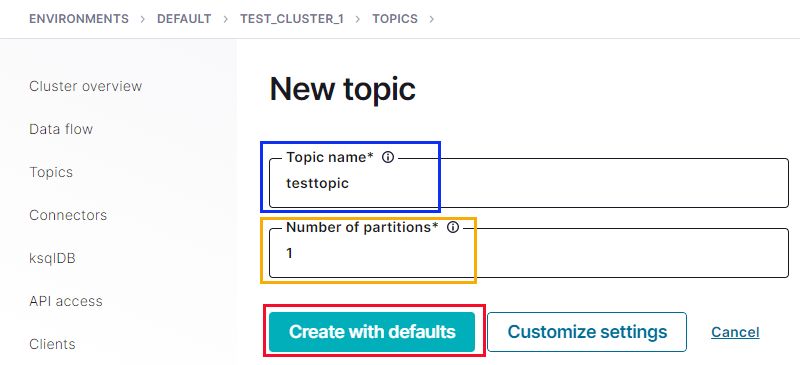
Figure 17: New Topic
In Figure 17, we see the form for creating a new topic. We fill in the Topic name field outlined in blue, we set the number of partitions we want in the field outlined in yellow, and then we are ready to click the Create with defaults button.
NOTE: By default number of partitions is set to 6.
When we click on the Create with defaults button, the result looks like so:
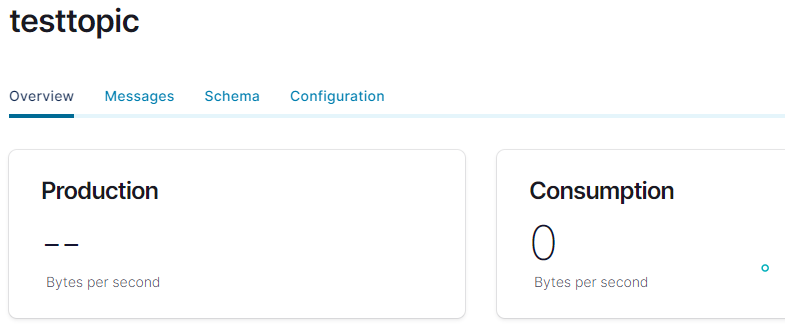
Figure 18: Topic Created
Yay - we have a topic! In Figure 18, we see an overview of the topic, and we see we have some tabs: Overview, Messages, Schema, and Configuration. I will not go into detail about the various tabs, but - nevertheless - let us have a brief look at the Messages tab
Messages
Click on the Messages tab and you see something like so:
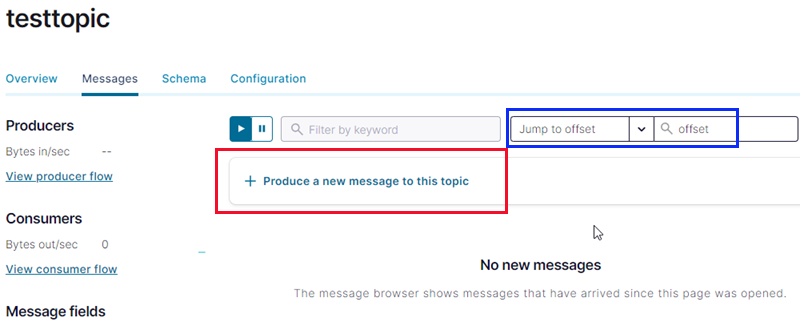
Figure 19: Messages
As we see in Figure 19, the Messages tab has to do with messages - duh! I mention this tab because it gives us the ability to quickly produce messages to the topic and view messages that have been published to the topic. Being able to publish messages gives us a quick and easy way to ensure the topic is set up correctly. Viewing messages is good because we can quickly ensure messages have arrived in the topic.
To publish, we click on what is outlined in red in Figure 19, and we see the following:
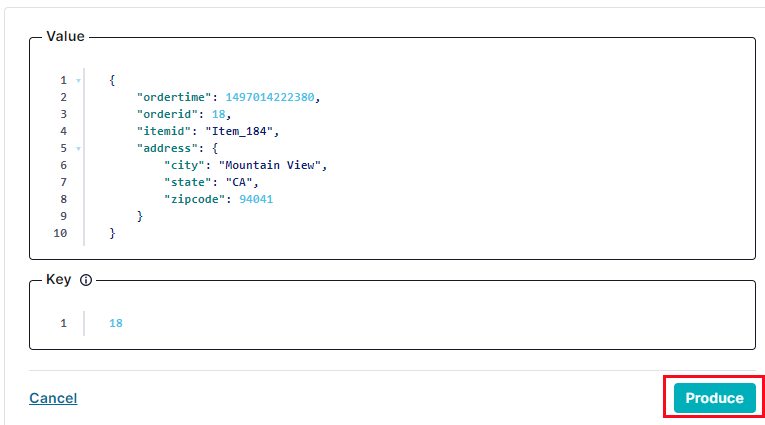
Figure 20: Publish
In Figure 20, we see how a message in JSON format has been generated (you can edit the message as you want), and we publish it by clicking on the Produce button outlined in red. Clicking on the button, you see a notification saying the message is being processed. When the notification disappears, you enter an offset in the field outlined in blue in Figure 19. Enter 0, hit return, and you see under the Produce button something like so:
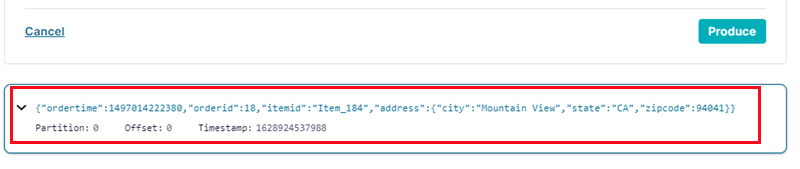
Figure 21: Published Message
Another Yay! We have a message in the topic, as we see in Figure 21.
NOTE: When you are
playing arounddoing tests, you may want to delete all messages from a topic. The only way to do it from the UI is to delete the topic. You then need to re-create it. To delete the topic, you go to the Configuration tab we see in Figure 18 (and 19) and click on the Delete topic link in the lower left-hand corner.
We are almost done. What is left is to create an API key and a secret. We use the API key and the secret to access the cluster from the outside world.
API Access
To enable API access, we use the API access link we see outlined in green in Figure 15. Clicking on that link results in this:
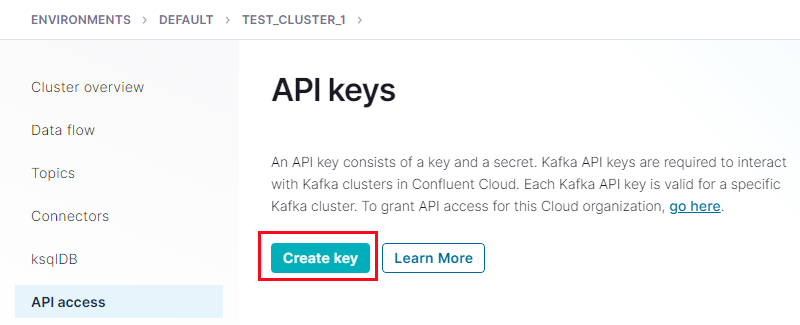
Figure 22: API Access
In Figure 22 we click on the Create Key button, which is outlined in red, and we get this:
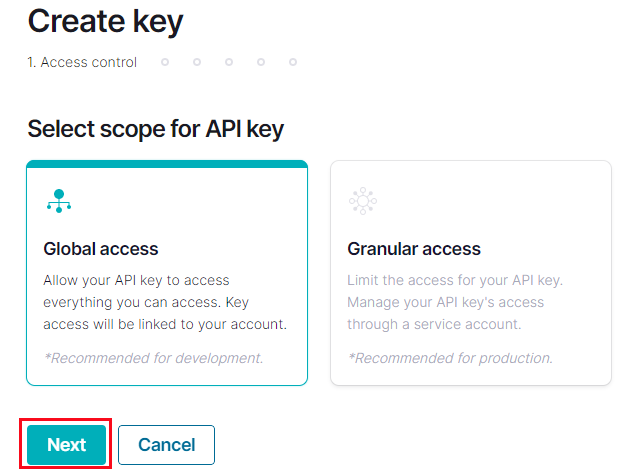
Figure 23: Create API Key
An API key can have different scope. In our case, we choose the create the with Global scope as we see in Figure 24 and having selected the scope, we click Next (outlined in red in Figure 23):
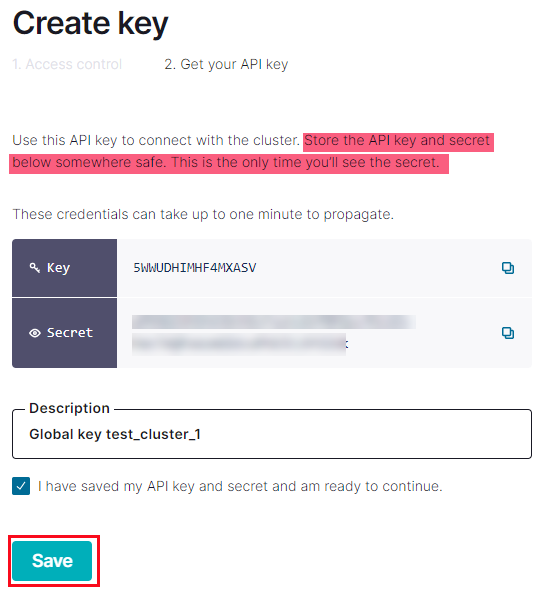
Figure 24: API Key Created
Please read the highlighted section, in Figure 24, carefully!
After creating the key, you see the key and the secret as in Figure 24. However, you will no longer see the secret after clicking the Save button outlined in red. So ensure you have written down the key and the secret somewhere (and remember where you saved it to).
Summary
This post looked at how to run Apache Kafka in Confluent Cloud, where Azure is our cloud environment.
We saw how we:
- Create a Confluent Cloud organization from within Azure.
- Enable SSO between Azure and Confluent Cloud.
The above creates the organization in Azure and “registers” it with Confluent Cloud. We then:
- Log into the Confluent Cloud.
- Create a Kafka cluster.
- In the Kafka cluster, we create one or more topics.
To connect to the cluster from the “outside” world, we let Confluent Cloud generate an API key with a corresponding secret.
That’s it!
~ Finally
If you have comments, questions etc., please comment on this post or ping me.