Claude Code Version: This post is based on Claude Code v2.x (December 2025). Installation methods may vary for earlier versions.
Welcome back to our Claude Code development series! In Part 1, we successfully installed Claude Code on both macOS and Windows (now much simpler with direct Windows support!) and created our first AI-assisted Node.js application. Today, we’re taking our development workflow to the next level by integrating Claude Code with popular IDEs and exploring advanced features that will significantly boost our productivity.
- To see all the posts in the series, go to: Building an Event Management System with Claude Code.
IDE integration represents a crucial step in adopting AI-assisted development. While the terminal interface is powerful, most developers spend their time in IDEs like VSCode or JetBrains products. By bringing Claude Code directly into our editor, we can leverage AI assistance without disrupting our established workflows.
At Derivco, where we’re implementing AI-assisted coding across development teams, IDE integration has proven to be where the most significant productivity gains occur. You’re not just writing code faster; you’re writing better, more maintainable code with a deeper understanding of your project’s architecture.
Recap: Part 1 Accomplishments
Before exploring IDE integration, let’s quickly review what we covered in our previous post:
🎯 Project Foundation: We established our motivation for building a custom event management system to replace Brevo for Data & AI Community Day Durban events, addressing limitations in generic event management platforms.
🛠️ Installation Process: We completed the full Claude Code installation on macOS/Windows, including:
Windows Subsystem for Linux (WSL) setup(no longer needed for Windows. Claude Code can now be installed directly on Windows)Node.jsinstallation using Node Version Manager (nvm)- Claude Code installation via scripts.
- Authentication and initial configuration
🚀 First Steps with Claude Code: We explored the interactive shell, learned about different usage modes (REPL vs. non-interactive), and discovered essential shortcuts and commands for efficient operation.
💻 Hands-On Development: We created a simple Node.js “Hello World” application with an HTML frontend, demonstrating Claude Code’s planning capabilities, file creation workflow, and collaborative development approach.
🔧 Core Features: We experienced Claude Code’s task breakdown into manageable to-dos, file creation confirmation process, and automatic dependency management capabilities.
With this foundation in place, we’re ready to explore more sophisticated development workflows.
IDE Integration: Bringing AI Into Your Editor
Claude Code works great with any Integrated Development Environment (IDE) that has a terminal. Just run claude, and you’re ready to go. However, while the terminal interface is powerful, whether in the Claude Code interactive shell or in the terminal window of your IDE, most developers prefer working within their IDE, seeing source files being created, file diffs, and more. Claude Code offers excellent integration with popular editors, allowing you to leverage AI assistance without leaving your familiar environment.
NOTE: In this post, we talk only about VSCode integration. The steps below work for all VSCode forks, such as Cursor, Windsurf, etc. For JetBrains IDEs, like IntelliJ, PyCharm, Android Studio, WebStorm, PhpStorm and GoLand, you can find detailed instructions in the Claude Code documentation.
Claude Code works directly within VSCode, providing contextual assistance right where you need it. Setting up Claude Code in VSCode is a straightforward process. However, if you are on Windows and using WSL, you need to enable VSCode for WSL. The following section discusses this.
If you are on macOS, or on Windows and not interested in a WSL integration, you can skip this step and go directly to Integrating Claude Code into VSCode.
VSCode Integration
Claude Code works directly within VSCode on all platforms, providing contextual assistance right where you need it.
For Windows Users
Note: In Part 1, we installed Claude Code directly on Windows. You can use Claude Code in VSCode either:
- Native Windows (Recommended for simplicity): Use VSCode on Windows with Claude Code
- WSL Environment (Optional, for Linux workflow preference): If you prefer Linux development environment
If you choose to use WSL, you need to set up VSCode to work seamlessly with WSL. The following steps guide you through the process of enabling VSCode for WSL.
To enable seamless integration between VSCode (which runs in Windows) and WSL, you need to install the Remote Development extension pack in your VSCode. The Remote Development extension pack is the “secret tunnel” that lets VSCode treat your Linux distro as if it were native. The bundle installs a tiny VSCode Server inside WSL (and also gives you Remote-SSH, Dev Containers and Remote Tunnels), so all the heavyweight work, IntelliSense, debugging, Git ops, and even running your test suite execute in Linux while the UI stays snappy on Windows. That means no duplicated tool-chains, no path-translation weirdness, and perfect environment parity with the Ubuntu box you’ll eventually deploy to.
Install the Remote Development Extension Pack
To install the Remote Development extension pack, in VSCode:
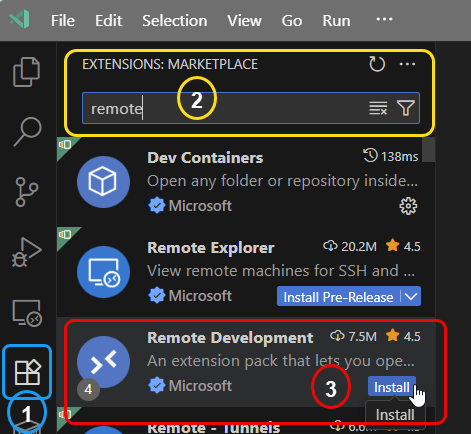
As you see in Figure 1 you:
- Go to the Extensions view by clicking on the Extensions icon in the Activity Bar on the side of the window (outlined in blue)
- Search for “remote” in the Extensions Marketplace (outlined in yellow).
- Click on the “Install” button for the Remote Development extension pack (outlined in red).
After the installation is complete, you should see in VSCode in the bottom left corner something like so:
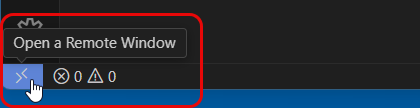
You see in Figure 2 the Open a Remote Window option, which allows you to connect to your WSL environment seamlessly:
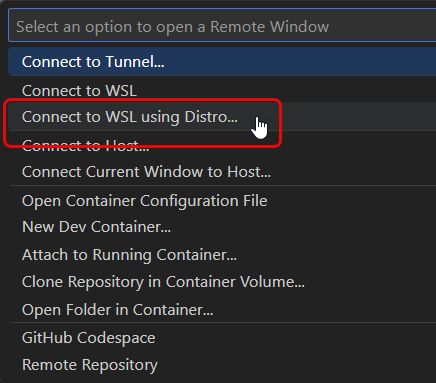
Clicking on Open a Remote Window in Figure 2 prompts you to select the WSL distribution you want to connect to, as shown in Figure 3. Choose your desired distribution, and VSCode will start to connect to the WSL environment:

In Figure 4, you see how VSCode connects to WSL, and after a short while, it is connected:
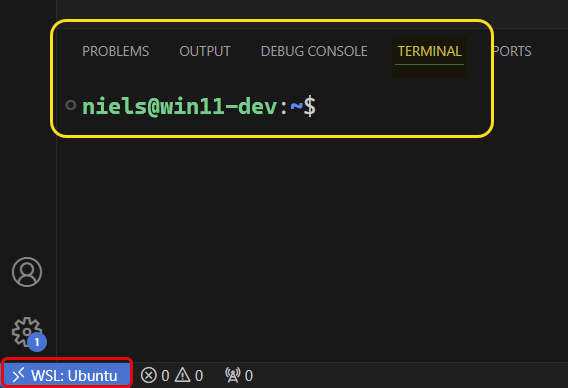
Once connected, you will see, as in Figure 5, the WSL distribution name in the bottom left corner of the VSCode window (outlined in red), and the terminal used by your distribution (outlined in yellow). You can now open any folder or workspace within WSL.
To verify this, let us go back to what we did in the previous post in the series. We created a folder called claude-test in our home directory. You can open this folder in VSCode by opening the Explorer view:
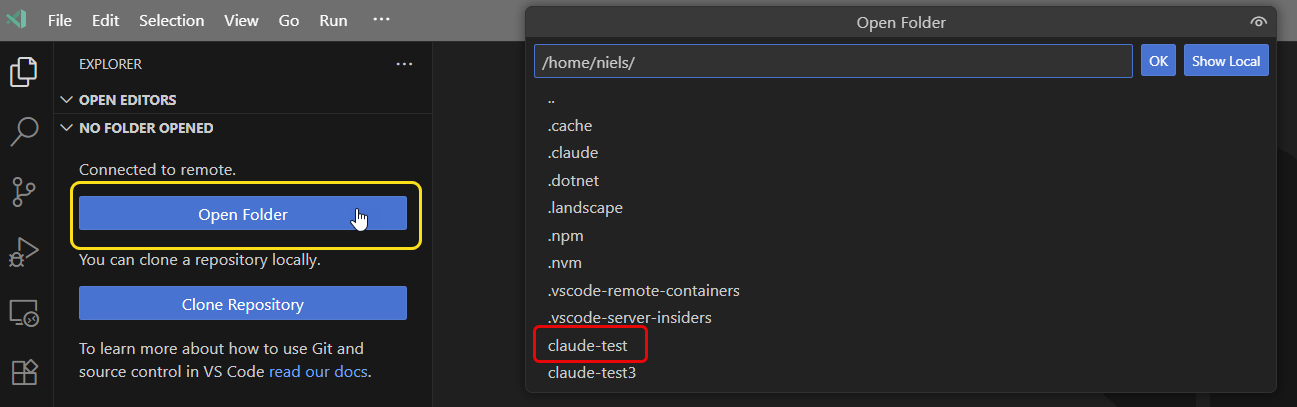
As in Figure 6, you open the folder by clicking on the Open Folder button (outlined in yellow), choose the folder (here outlined in red), and click OK:
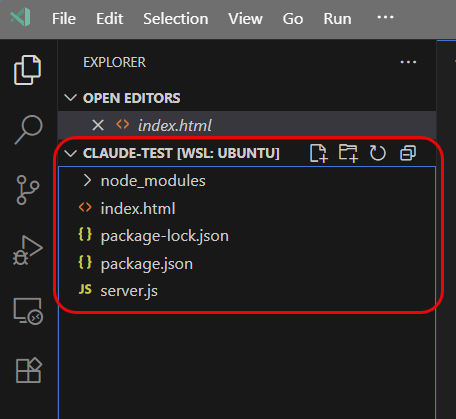
In Figure 7, you see the folder claude-test opened in VSCode, and you can now start working on your project directly in WSL.
Integrating Claude Code into VSCode
Now, whether you are a macOS, Windows, or Windows user using WSL, you are ready to integrate Claude Code into VSCode. The integration process is straightforward and allows you to leverage Claude Code’s AI capabilities directly within your IDE. To integrate Claude Code into VSCode, you need to have the Claude Code for VSCode extension installed. The extension provides a seamless experience for using Claude Code within your IDE.
You can install the extension as you would any other extension, go to the Extensions view in VSCode, search for “Claude Code”, and click on the Install button. Once the extension is installed, when you choose a source file in the Explorer view, you will see a new button in the top right corner of the editor window:
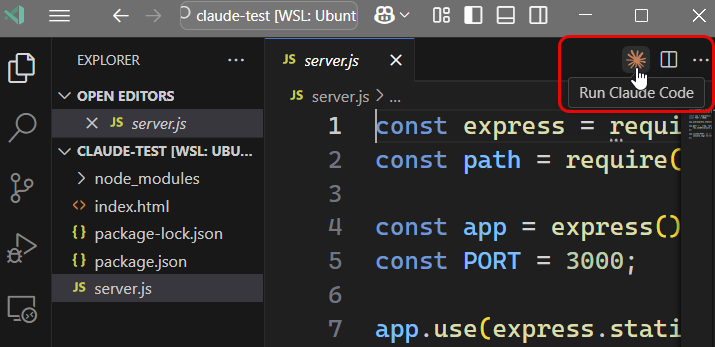
Clicking on the button, outlined in red in Figure 8, opens the Claude Code interactive shell within VSCode, allowing you to interact with Claude Code directly from your IDE:
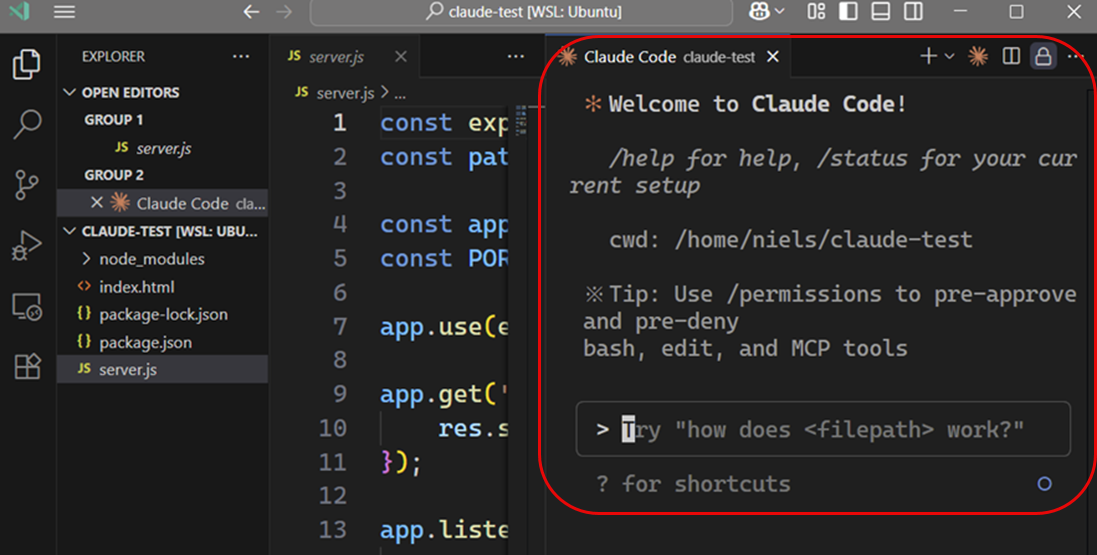
In Figure 9, you see the Claude Code interactive shell opened inside VSCode.You can now start typing commands and interacting with Claude Code just like you would in the terminal. Why is this good?
Context-Aware Development
IDE integration’s key advantage is context awareness. Claude Code doesn’t just see isolated code snippets; it understands your entire project structure, including:
- Project dependencies and their usage patterns
- Existing middleware and architectural decisions
- Database models and their relationships
- Error handling patterns and conventions
- Code style and naming conventions
Let us look at some of this, but before we do that, we need to look at one integral part of Claude Code: the CLAUDE.md file.
CLAUDE.md
The CLAUDE.md file is a crucial component of Claude Code. Think of it as a project README specifically for your AI assistant. It serves as a centralised knowledge base that contains essential information about your project, including:
- Project goals and objectives
- Key architectural decisions
- Important design patterns and best practices
- Common pitfalls and how to avoid them
- Any other information that would be helpful for developers working on the project
You can place CLAUDE.md files in several locations:
- The root of your repo, or wherever you run Claude Code from (the most common usage). Name it
CLAUDE.mdand check it into git so that you can share it across sessions and with your team (recommended), or name itCLAUDE.local.mdand .gitignore it - Any parent of the directory where you run Claude Code. This is most useful for monorepos, where you might run Claude Code from root/foo, and have
CLAUDE.mdfiles in bothroot/CLAUDE.mdandroot/foo/CLAUDE.md. Both of these will be pulled into context automatically - Any child of the directory where you run Claude Code. This is the inverse of the above, and in this case, Claude will pull in
CLAUDE.mdfiles on demand when you work with files in child directories - Your home folder (
~/.claude/CLAUDE.md), which applies it to all your Claude Code sessions
So, how do you create a CLAUDE.md file?
Create CLAUDE.md
There are a couple of ways you can create a CLAUDE.md file:
- Manually create the file: You can create a new file named
CLAUDE.mdin your project’s root directory (or any other appropriate location, as per above) and start adding content to it. This is the simplest method and gives you complete control over the file’s contents. This is probably what you’d do if you were to create an entirely new project from scratch. - Use Claude Code to create the file: You can ask Claude Code to make the
CLAUDE.mdfile for you. This is particularly useful if you want to ensure that the file contains all the necessary information and follows best practices. For example, you can run the/initcommand in the Claude Code shell in the root of your project directory.
The /init command in Claude Code is used to initialise a new project. When you run this command, it analyses your codebase and creates a CLAUDE.md file in the root directory of your project. The file contains, as mentioned before, essential context about your project, helping Claude Code to better understand and assist with your code.
Create CLAUDE.md in our project
In the previous post, when we used Claude Code to create the Hello World node.js application, we did not create a CLAUDE.md file. So, let us do it now. If you have followed along in the last post and this post up to now, you should be in the IDE with the Claude Code shell open as in Figure 9. In the input text box of the Claude Code shell, type /init:
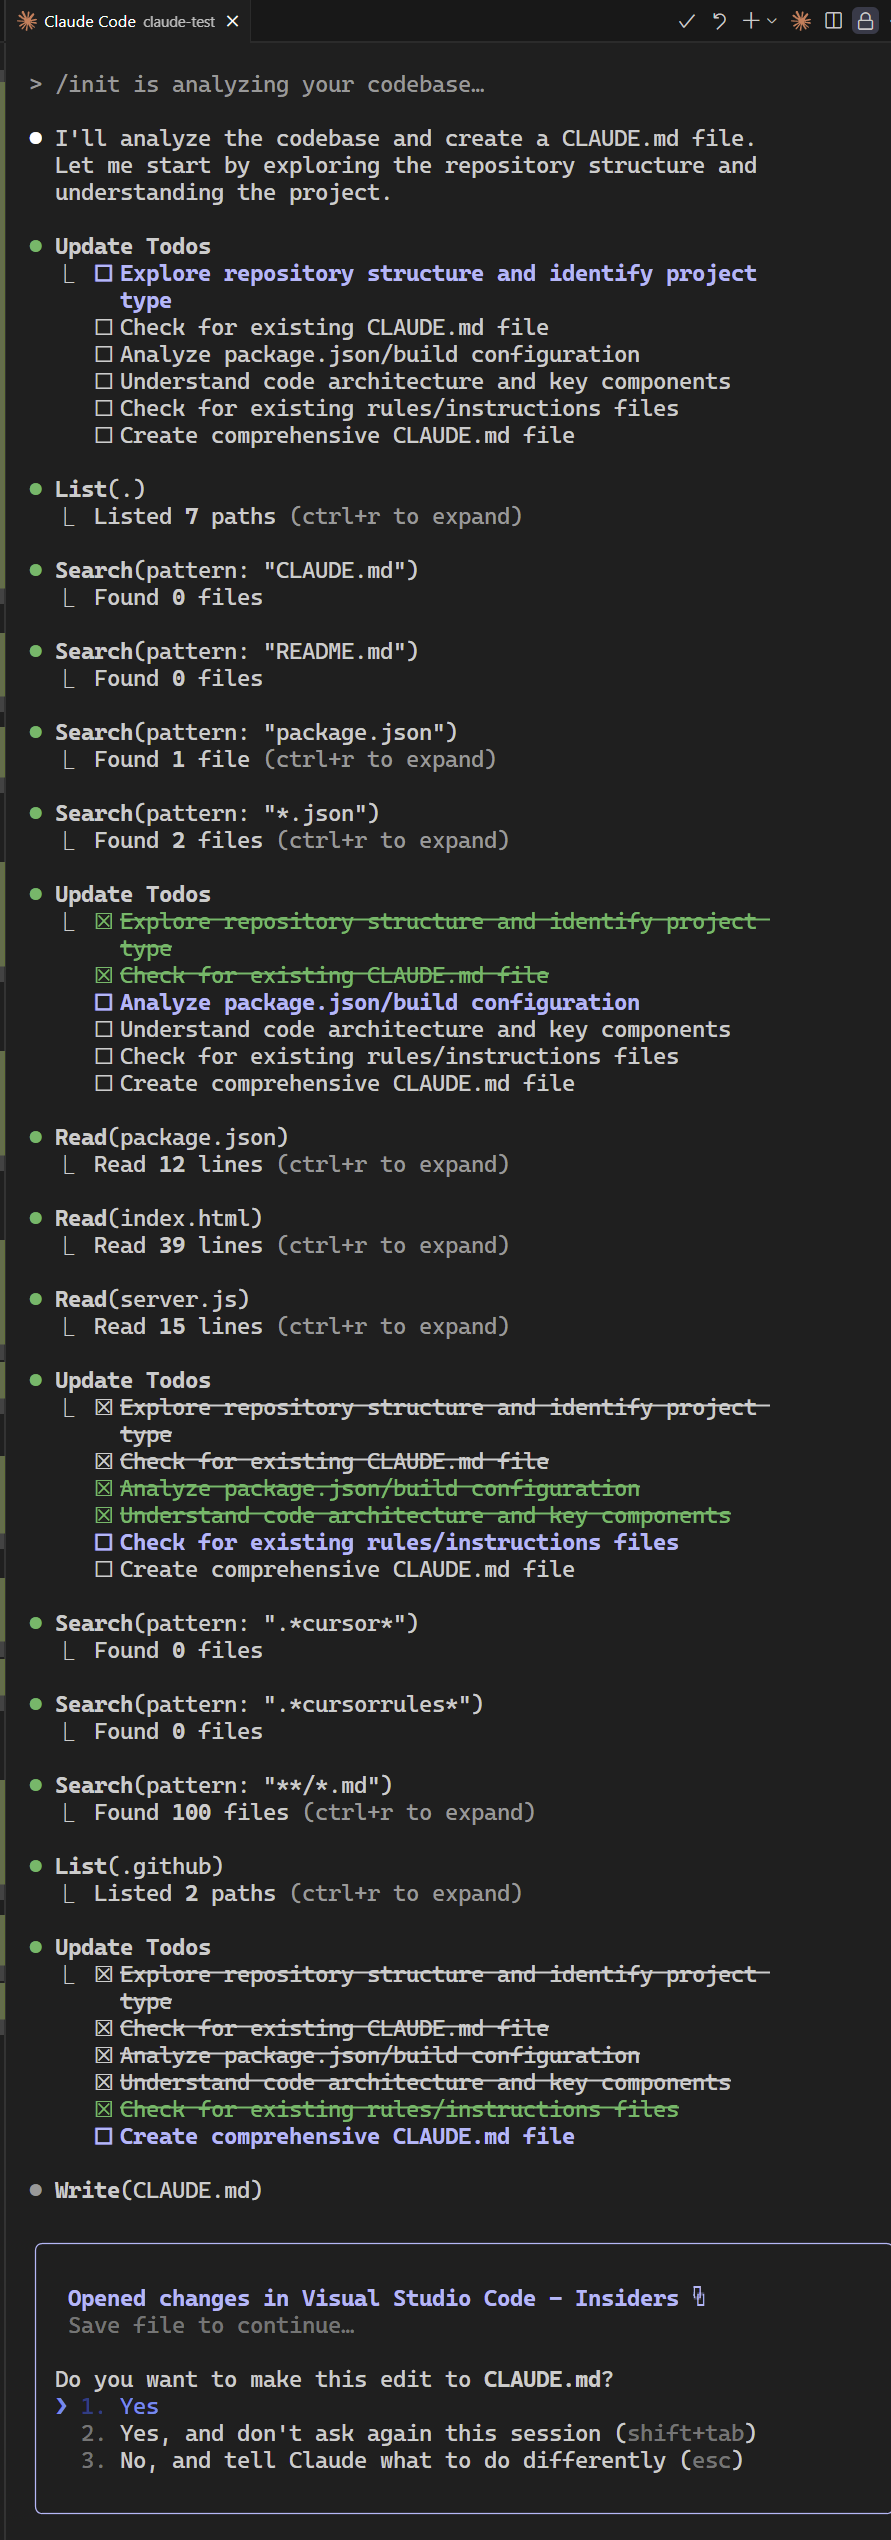
Clicking Enter will start the process of creating the CLAUDE.md file, as shown at the top of Figure 10 (click on the image to see the full image). After a while, you see that the process has come to an end and Claude Code is ready to create the CLAUDE.md file (outlined in blue in Figure 10). At this stage, you can see the file side-by-side with the Claude Code shell:
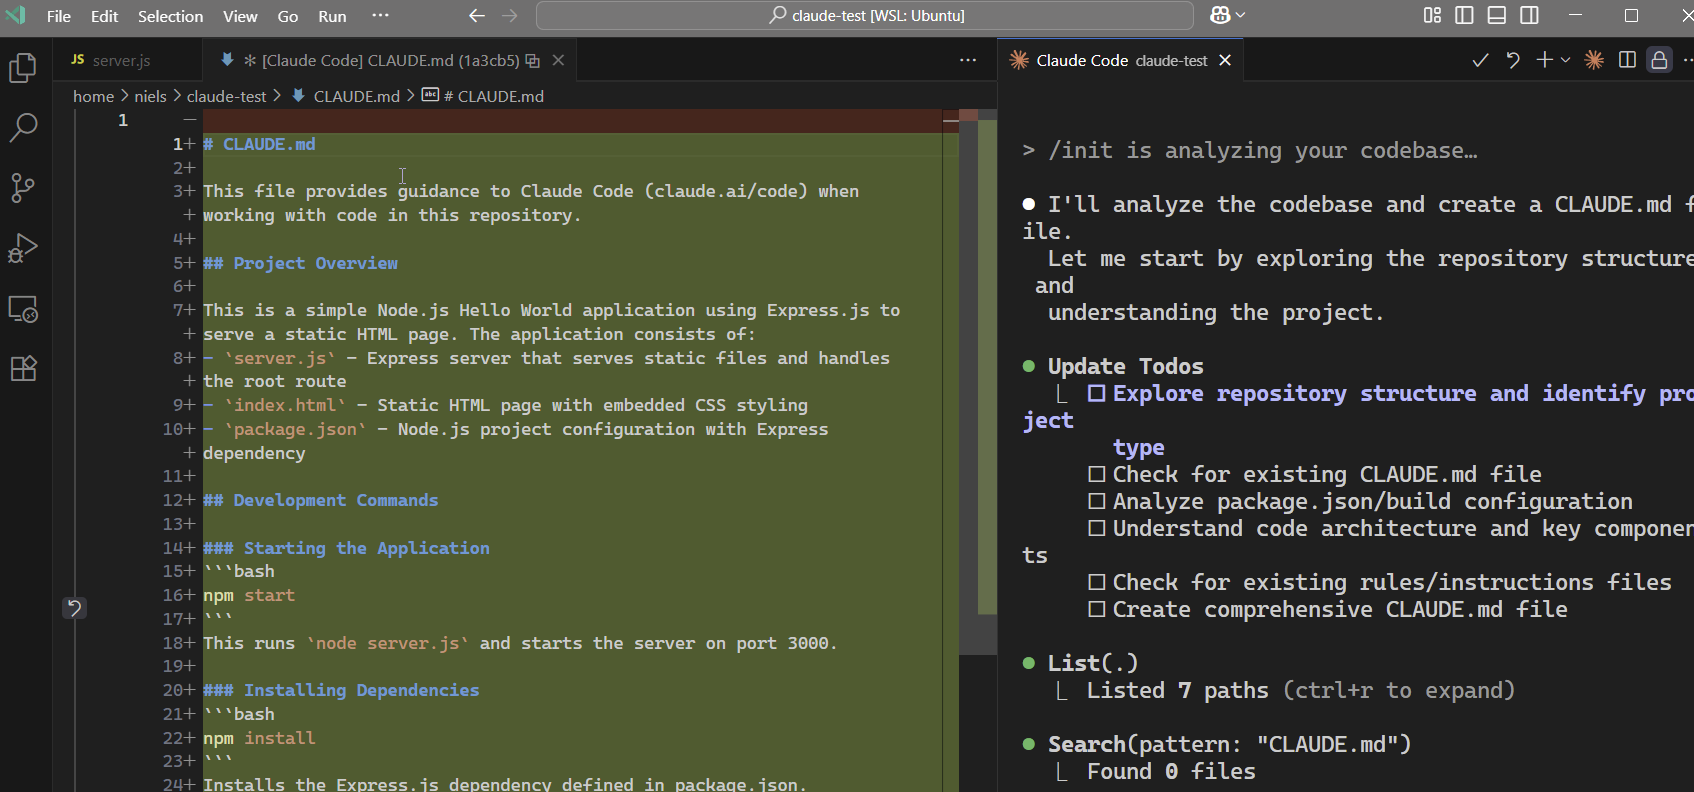
The CLAUDE.md file you see in Figure 11 has not been created yet in the filesystem. It exists only in the context of the Claude Code shell. To make the file in the filesystem, you need to accept the changes as outlined in Figure 10 (outlined in red and highlighted in yellow).
NOTE: If you want more information about
CLAUDE.md, the article What’s a Claude.md File? 5 Best Practices to Use Claude.md for Claude Code is definitely worth reading.
Now, let’s get onto “brass-tacks” and see how to use Claude Code in your IDE.
Using Claude Code in VSCode
Above, we said how IDE integration’s key advantage is context awareness. Claude Code doesn’t just see isolated code snippets; it understands your entire project structure, making it a powerful tool for developers. This means you can leverage Claude Code’s capabilities to get more relevant suggestions and insights based on the context of your project. Some use cases:
Understand Code Base
One of Claude Code’s most underappreciated superpowers is its ability to serve as an intelligent onboarding assistant for new team members. At Derivco, we’ve discovered that Claude Code can dramatically reduce the time it takes for new developers to become productive contributors, turning what used to be weeks of confusion into days of focused learning.
When a new developer joins a project, they often face an overwhelming amount of code and documentation. Claude Code can help them quickly understand the project’s architecture, key components, and how everything fits together. For example, you can ask Claude Code to explain the purpose of a specific module or function, and it will provide a concise summary based on the code and comments.
Let us see this in practice, based on what we have been doing so far. The assumption is that you are in VSCode in the claude-test project and Claude Code is loaded as in Figure 9. In Claude Code’s input text box, enter:
|
|
Code Snippet 1:Claude Code Command
When you run this command, Claude Code will analyse the entire repository and provide a detailed explanation of the architecture, key components, and their interactions. This can be incredibly helpful for new developers trying to understand the codebase:

In Figure 12, you see part of Claude Code processing the input command (click in the image to see the full output). This involves analysing the codebase, understanding the project structure, and generating a comprehensive response that addresses the user’s query. The result is a clear and concise explanation of the architecture, key components, and their interactions, which can be invaluable for onboarding new developers and helping them get up to speed quickly.
I am a bit upset with Claude Code at this stage, implying that the app is not very advanced: glorified static file server, (outlined in blue and red in Figure 12), humph! 😄
But I digress… Let us now look at another use case for Claude Code.
Use Claude Code to Add Functionality
Another powerful use case for Claude Code is to help developers add new functionality to their applications. By understanding the existing codebase and its architecture, Claude Code can provide valuable insights and suggestions for implementing new features.
At the moment, the application IS a glorified static file server, let us see if we can change that. Since this blog series is about building a contact and event management system, we should consider adding features to the application that support this functionality. For instance, we could implement a simple event management feature: retrieve a list of events.
Plan the Implementation
There are a couple of ways we can get Claude Code to implement this feature. One approach is to provide a high-level description of the desired functionality and ask Claude Code for guidance on how to implement it. Another approach is to ask Claude Code to generate the necessary code snippets directly. The more information you can provide to Claude Code, the better. This is where CLAUDE.md comes in again. In CLAUDE.md, you can give detailed information about the desired functionality, including specific requirements, constraints, and the tech stack to use, etc.
For this use case, we’ll do a variant of the first option: we will tell Claude Code what we are after, and have it come up with a plan, but not to write any code initially. That way, we have better control of what is happening and can steer Claude Code in the direction we want. In Claude Code’s input text box, enter something similar to:
|
|
Code Snippet 2:Tell Claude Code what you want to achieve
In Code Snippet 2, we provide Claude Code with a clear description of the desired functionality. This allows Claude Code to understand our intentions and come up with a suitable implementation plan.
NOTE: Please notice my use of think (“Can you think …”) in the command. This is a deliberate choice to encourage Claude Code to engage in a more thoughtful analysis of the problem, rather than jumping straight into code generation. It allows Claude Code to consider the existing codebase, architecture, and best practices before suggesting an implementation plan. There are variants of
think, and you can find more information at Think, Megathink, Ultrathink: Claude Code’s Power Keywords Decoded.
Having entered the command, you execute:
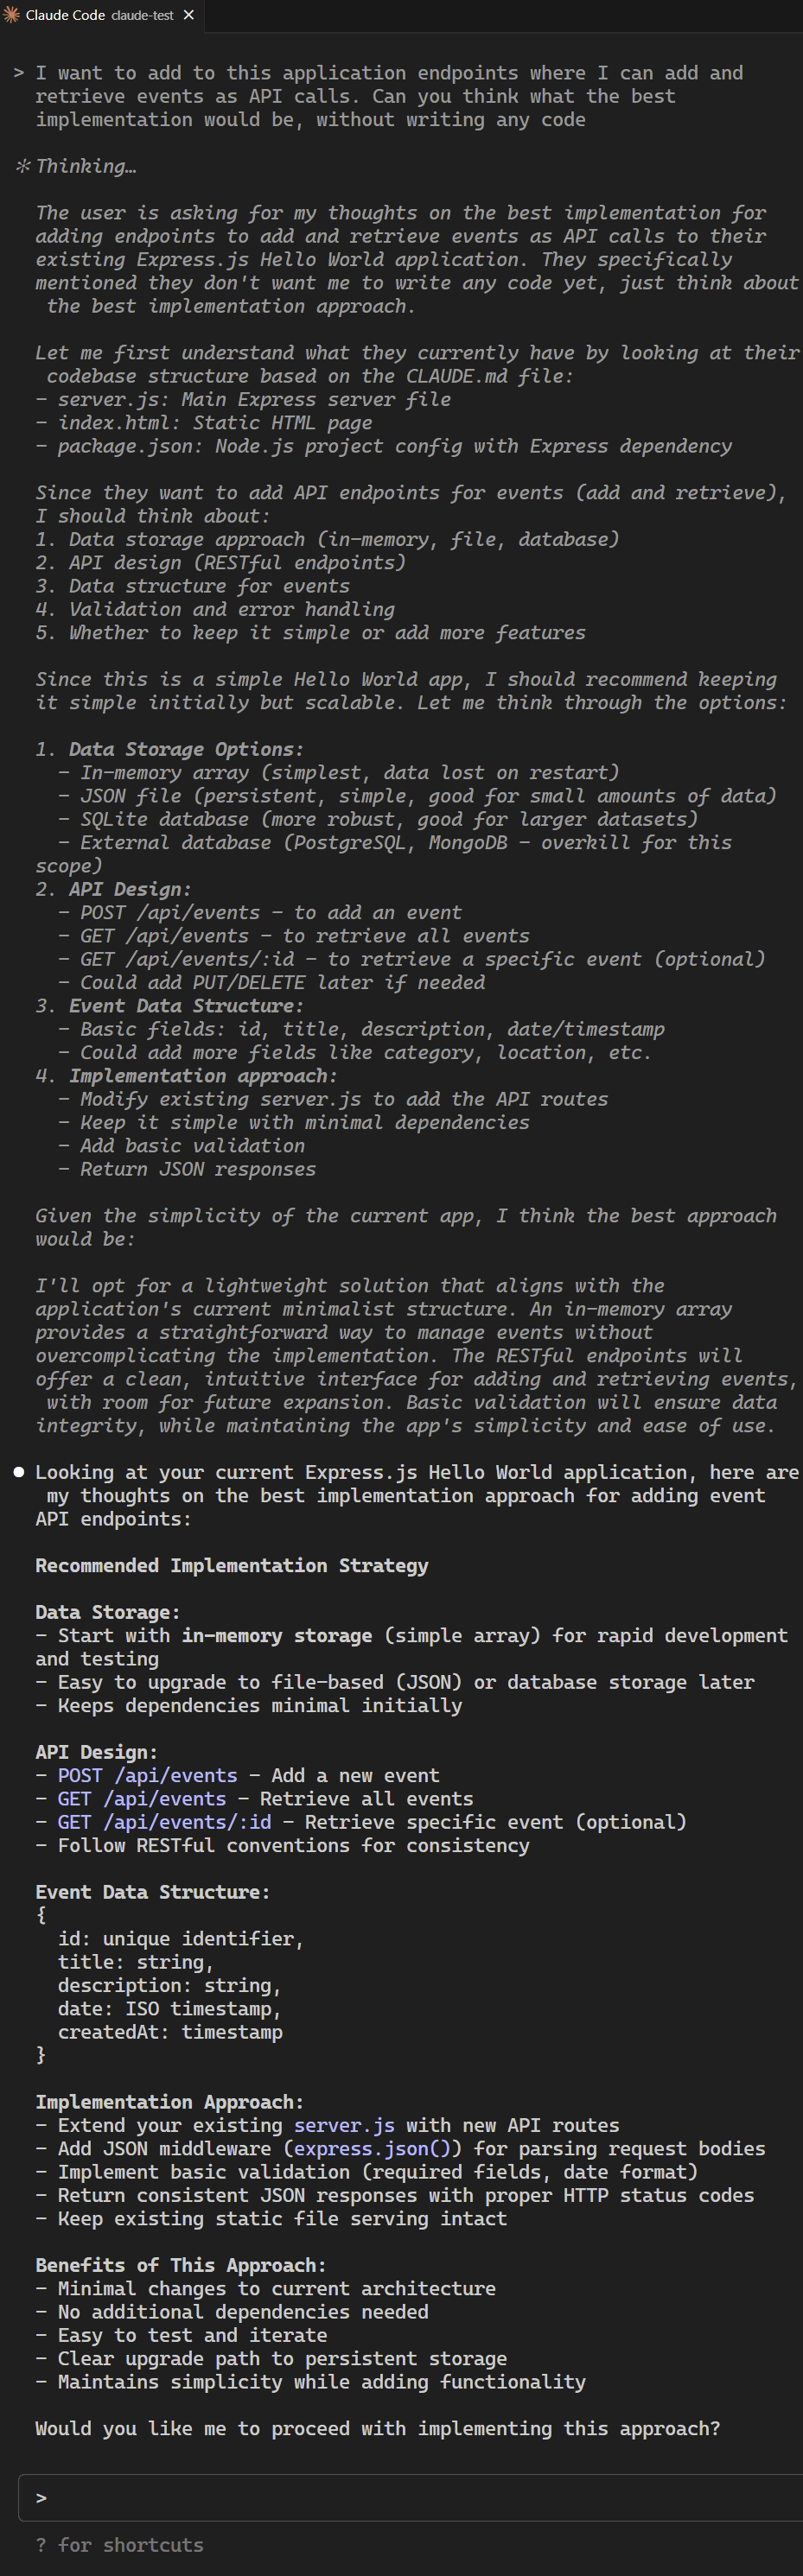
In Figure 13, you see Claude Code processing the input command (click on the image to see the full output). After a short while, Claude Code will provide a detailed plan for implementing the desired functionality. The paragraphs in italics in Figure 13 indicate Claude Code’s thinking process.
NOTE-I: I urge you to click on the image to see the full output and see exactly what Claude Code is proposing.
NOTE-II: Claude Code may not always get it right on the first try. Be prepared to iterate on the design and provide feedback to refine the implementation plan.
Let’s go ahead and let Claude Code implement the proposal.
Implementing the Proposal
The proposal looks good. I would, however, like to simplify the Event Data Structure to only have an id and a title:
|
|
Code Snippet 3:Tell Claude Code to implement the poroposal
I am entering the above in Claude Code and hit Enter:
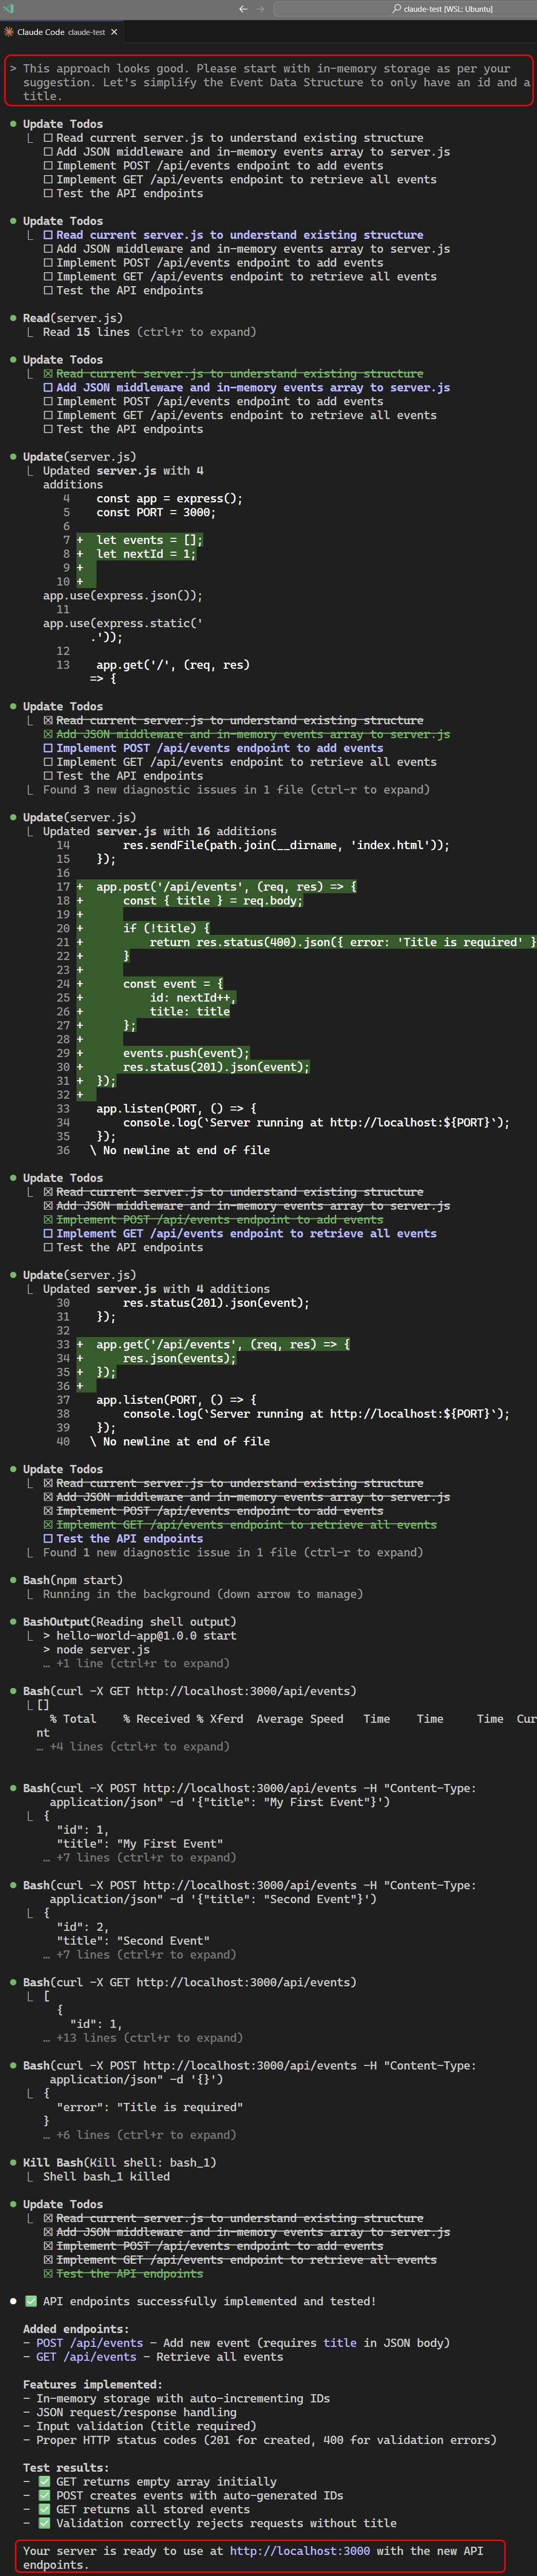
In Figure 14, you see Claude Code processing the input command (click on the image to see the full output), and start planning what to do (create and update ToDos). It then starts implementing everything, and you can go off and plot “world domination” (or have a coffee/tea). As you enjoy your coffee/tea, Claude Code performs its tasks. Eventually, you will see the output outlined in blue and yellow in Figure 14.
NOTE: Saying that you can leave Claude Code to it, and go off plotting “world domination” is not entirely true. Claude Code tries to be responsible and will ask for your permission to do certain things, such as writing files. When Claude Code asks for those permissions, you have the option to say: “… yes, now go off and don’t ask again”. That handles that particular type of permissions, but Claude Code will ask for other permissions. However, if you don’t want Claude to ask you at all, you can run Claude under the
YOLO(You Only Live Once) setting, and tell Claude that it does not need to ask for any permissions at all. You do that by starting Claude Code with the--dangerously-skip-permissionssetting. A future post will discuss this more in detail.
The last thing to do is to test that it works:
-
Start the application by running
npm startin the terminal:1npm startCode Snippet 4: Start the Application
When you execute the code in Code Snippet 4, you should get a message like: Server is running on http://localhost:3000, and when you browse to it, you should see your Hello World message in the browser. You can now start testing the new API endpoints.
-
Test the
GET /eventsendpoint:1 2 3 4# call the endpoint curl -X GET http://localhost:3000/api/events # result []Code Snippet 5: Test the GET /events Endpoint
When testing the GET /events endpoint, as in Code Snippet 5, using curl, you get an empty array [] as the result, indicating that there are no events stored yet.
-
Let us add an event:
1 2 3 4# call the endpoint curl -X POST http://localhost:3000/api/events -H "Content-Type:application/json" -d '{"title": "My First Event"}' # result {"id":1,"title":"My First Event"}Code Snippet 6: Test the POST /events Endpoint
Executing the code in Code Snippet 6 should give you the result you see beneath the curl command. You can now run the code in Code Snippet 5 to verify that the event was created successfully.
Congratulations! You have now used Claude Code to create some new functionality in the application. The application is no longer a glorified static file server - so there!
Summary
This post significantly expanded our Claude Code development capabilities by focusing on IDE integration and advanced project management features. We successfully integrated Claude Code with VS Code (including WSL setup for Windows users), transforming our development experience from terminal-based interactions to seamless in-editor AI assistance.
Key accomplishments include
🔗 IDE Integration: We set up the Claude Code extension in VS Code, enabling context-aware AI assistance directly within our familiar development environment. For Windows users, we configured WSL integration through the Remote Development extension pack, creating a seamless Linux development experience.
📝 CLAUDE.md Implementation: We discovered and implemented the powerful CLAUDE.md file using the /init command, which serves as a centralised knowledge base that gives Claude Code a comprehensive understanding of our project’s architecture, goals, and development patterns.
🧭 Context-Aware Development: We experienced how Claude Code’s understanding of entire project structures enables more intelligent suggestions that align with existing code patterns, dependencies, and architectural decisions.
👥 Team Onboarding Revolution: We explored how Claude Code serves as an intelligent onboarding assistant, capable of analysing repositories and explaining complex codebases to new team members, dramatically reducing the time needed for developers to become productive contributors.
⚡ Practical Implementation: We moved from theory to practice by using Claude Code to analyse our existing “Hello World” application, plan new functionality, and successfully implement a working events API with GET and POST endpoints, transforming our basic static server into a functional web application.
🎯 Strategic Development: We learned to use specific prompting techniques like think commands to encourage Claude Code to engage in thoughtful analysis rather than immediate code generation, giving us better control over the development process.
The integration of Claude Code into our IDE workflow has transformed how we approach development tasks, making AI assistance a natural part of our coding process rather than a separate tool. With proper project context through CLAUDE.md and seamless editor integration, we’re now equipped to tackle more complex development challenges while maintaining high code quality and development velocity.
This foundation prepares us for the more advanced planning work coming in Part 3, where we’ll use Claude Code’s analytical capabilities to design the complete architecture for our event management system before diving into implementation.
What’s Next?
Our next instalment will focus on using Claude Code’s planning and architectural capabilities to design our event management system:
🎯 System Planning with AI: We’ll leverage Claude Code’s analytical capabilities to help us plan and design the complete architecture for our Data & AI Community Day Durban event management system, moving from simple prototypes to comprehensive system design.
📋 Requirements Analysis: Using Claude Code to help analyse our specific needs, compare them against Brevo’s limitations, and define detailed functional requirements that will guide our development roadmap.
🏗️ Architecture Design: Exploring how Claude Code can assist with architectural decision-making, technology stack selection, and system design patterns that will scale with our event management needs.
🗺️ Development Roadmap: Creating a structured development plan with Claude Code’s help, breaking down the complex event management system into manageable phases and identifying dependencies between different components.
🔍 Technical Specification: Working with Claude Code to define detailed technical specifications, database schemas, API contracts, and integration points that will serve as our development blueprint.
📊 Feature Prioritisation: Using AI assistance to help prioritise features based on user needs, technical complexity, and business value to ensure we build the most impactful functionality first.
We’ll also explore advanced Claude Code planning techniques, including how to use it for technical documentation generation, risk assessment, and creating comprehensive project documentation that will guide our development efforts throughout the series.
This planning-focused approach will ensure we have a solid foundation before diving into implementation, demonstrating how Claude Code can be invaluable not just for writing code but for the crucial planning and design phases that determine project success.
~ Finally
That’s all for now. I hope you find this information valuable. Please share your thoughts and ideas on this post, or ping me if you have any suggestions. Your input is highly valued and can help shape the direction of our discussions. If you found this post helpful, please share it with your network. Follow me on LinkedIn for more updates on this project and other AI-related topics.
comments powered by Disqus