This post is the third in a series about installing R packages in SQL Server Machine Learning Services (SQL Server ML Services). To see all posts in the series go to Install R Packages in SQL Server ML Services Series.
Why this series came about is a colleague of mine Dane pinged me and asked if I had any advice as he had issues installing an R package into one of their SQL Server instances. I tried to help him and then thought it would make a good topic for a blog post. Of course, at that time I didn’t think it would be more posts than one, but here we are.
In this post, we look at how we can use T-SQL and DDL commands to install packages in a remote SQL Server.
Let us do a recap to see where we are.
Recap
The first post in the series gave an overview of what ways we can install packages in the external R engine in SQL Server ML Services:
- R packet managers
- T-SQL
- RevoScaleR
The post then went into details about using R packet managers, where an R packet manager is an R command line tool or GUI installed on the SQL Server Machine Learning Services machine. The packet manager should be run with elevated permissions and target the R engine for the instance on which you want to install the package. The easiest is to use either of the R tools that come as part of SQL Server’s R service:
- The command line tool:
Rterm.exe. - The GUI:
Rgui.exe.
These two packet managers live in the \\<path_to_SQL_Server_instance>\R_SERVICES\bin\x64 directory. When you install packages via an R packet manager, they can only be installed to the default packet library for that instance. You find the library at: \\<path_to_SQL_Server_instance>\R_SERVICES\library. The file system folder for this library has restricted access and you need elevated permissions to write to this folder. Typical code for installing packages from a packet manager can look like so:
|
|
Code Snippet 1: Install Packages Command
In Code Snippet 1 we use install.packages to install “pkg_name” to a hardcoded library path.
Using an R Package manager is the most straight forward way to install R packages, but the downside with it is that you need admin rights on the SQL Server box. Having admin rights on a SQL Server box in production can be an issue, and in Installing R Packages in SQL Server Machine Learning Services - II we looked at how we can install packages without having admin rights, by using RevoScaleR:
- To use RevoScaleR for package installation both the SQL Server instance as well as the database need to be enabled for package management. You enable package management via
RegisterRExt.exetool and the/installpkgmgmtoption. There are additional flags for database enabling, authentication and so forth. - When enabling the database the process creates a table, stored procedures and roles.
- For a user to be able to install packages he needs to have necessary permissions on
sp_execute_external_scriptas well as theEXECUTE ANY EXTERNAL SCRIPTpermission. He also needs to be in a role which allows him to install packages. - The roles that the enabling process creates are:
rpkgs-users,rpkgs-privateandrpkgs-shared. - The roles which allow the user to install packages are
rpkgs-privateandrpkgs-shared(anddb_owner). - The roles define the scope of the installed packages:
privateandshared. - When a user installs a package with
privatescope, only he can see and use the package. - If the user installs a package with
sharedscope, all users in any of the roles, includingrpkgs-userscan use that package. The user needs to be in therpkgs-shared(ordb_owner) to install asharedpackage. - You use the function
rxInstallPackagesto install a package, and the function needs to run in an SQLCC. - When the user calls
rxInstallPackageshe needs to define which scope the package has through thescopeargument. If thescopeis not defined, it defaults toprivate. - To use a package, either in
privateorsharedscope, the code needs to run in SQLCC. - For a package that does not know SQLCC, the functions in the package can be run via
rxExec.
Housekeeping
Before we “dive” into today’s topics let us look at the code we use today. This section is here for those of you who want to follow along in what we are doing in the post.
|
|
Code Snippet 2: Create Databases
In Code Snippet 2 we create two databases; DataScienceDB and DataScienceDBRemote where the latter is to emulate a database on a remote SQL Server instance. In previous posts, we have created logins and users, but in this post, we only log in as sa.
Installing R Packages Using T-SQL
In the Recap above we said that in previous posts we have looked at installing R packages either by using R package managers on the SQL Server box, or doing it remotely via script using RevoScaleR. The third option we have is to do it via a T-SQL statement. More specifically through a statement introduced in SQL Server 2017: CREATE EXTERNAL LIBRARY.
NOTE: In SQL Server 2017 only R packages are supported whereas, in SQL Server 2019 R, Python and Java are supported. For both SQL Server 2017 and 2019 (up to and including CTP 2.3) only the Windows platform is supported. For SQL Server 2019, Linux may be added as a supported platform in later CTP releases.
What CREATE EXTERNAL LIBRARY does is it uploads package files to a database from a file path or byte stream. The signature looks like so:
|
|
Code Snippet 3: Signature CREATE EXTERNAL LIBARY
The arguments we see in Code Snippet 3 are:
library_name: A unique name for the package. When we create an external library for an R package, the name has to be the actual package name. While this may seem obvious, I mention it as when you create external libraries for Java code the name does not matter. We discussed this in the SQL Server 2019, Java & External Libraries - II post. When I say the package name has to be unique, the unique:ness is based on the name and the principal id under which it is created. We talk more about that in a future post.owner_name: This optional parameter specifies the name of the user or role that owns the external library. More about this in a future post as well.file_spec: Thefile_specspecifies the content of the package for a specific platform, and it can either be in the form of a file location (local path/network path) or a hex literal. If we want to install an R package from a file location, the package needs to be in the form of a zipped archive file. If we install based on a hex-literal, the hex-literal need to derive from the package zip file.platform: ThePLATFORMparameter, which defines the platform for the content of the library. ThePLATFORMparameter defaults to the platform on which SQL Server runs on, and sinceCREATE EXTERNAL LIBRARYis only supported on Windows, for now, we do not set it.language: Specifies the language of the package. For this post we only deal withR, and - as I mentioned above - in SQL Server 2017, R is the only language supported.
Using CREATE EXTERNAL LIBRARY
To see how to use CREATE EXTERNAL LIBRARY we want to install the randomForest package into our DataScienceDB database. We start with downloading the randomForest zip archive to a directory which is readable by SQL Server. I have it at W:\randomForest_4.6-14.zip. We log in to the server and database as dbo (sa login), and we are ready to execute the CREATE EXTERNAL LIBRARY DDL:
|
|
Code Snippet 4: Create External Library
As we see in Code Snippet 4 I name the external library randomForest, as that is the name of the R package, and I set the location of where the package zip file is. Before we execute the code in Code Snippet 4, let us look at what R packages we have installed already:
|
|
Code Snippet 5: View R Packages
When we execute the code in Code Snippet 5 we see something like so:
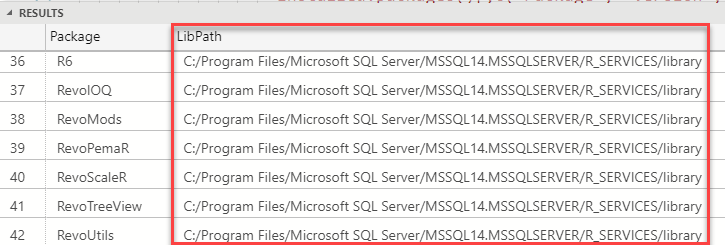
Figure 1: View Installed R Packages - I
In Figure 1 we see some of the installed R packages and notice that we do not see randomForest. Also, notice the LibPath column outlined in red. Remember how I mentioned in
Installing R Packages in SQL Server Machine Learning Services - I how, when using SQL Server ML Services, we install packages to a specific library which SQL Server then loads the packages from. That location is the LibPath in Figure 1.
NOTE: As we see later in this post, what I said above about only one location is not entirely true.
The last thing to do before we execute the code in Code Snippet 4 is to browse around in File Explorer and look at a directory under C:\<path_to_SQL_instance>\MSSQL. When we look around we see a directory named ExternalLibraries, and when we “drill” into it we see:
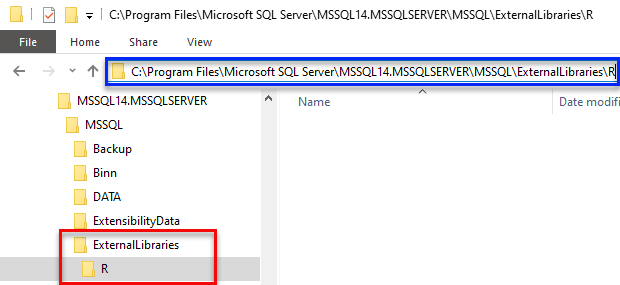
Figure 2: ExternalLibraries Directory
Hmm, what is so interesting with this directory we see in Figure 2, it has a subdirectory named R, but otherwise, it is empty? Well, the name is interesting: ExternalLibraries. I wonder if it has anything to do with creating external libraries? So to find out we execute the code in Code Snippet 4.
Strange, after we execute the code in Code Snippet 4 nothing changes in the directories we look at. Are we wrong in our assumptions about the directories, or did the code fail? In either case, how can we find out?
Creating an external library is very similar to creating an SQLCLR assembly, and if you have ever created an SQLCLR assembly you are probably aware of a couple of catalog views that gives us information about the assemblies:
sys.assemblies: base catalog view for assemblies with one row per assembly created in the database.sys.assembly_files: contains the binary representation of the assembly files.
For external libraries we have similar catalog views:
sys.external_libraries: base catalog view for external libraries with one row per external library created in the database.sys.external_library_files: contains the binary representation of the external library files.
So, if we successfully created the external library we should see something in sys.external_libraries:
|
|
Code Snippet 6: View External Libraries
When we execute the code in Code Snippet 6 we see:

Figure 3: Installed External Library
Yes, when we look at Figure 3 we see that we have created an external library. The columns we see represents:
external_library_id: the id of the external library as assigned by the database.name: name given to it during creation.principal_id: id of the owner, (principal), of the library.language: name of the language of the library. As mentioned before; in SQL Server 2017, only R, in SQL Server 2019; R, Python, and/or Java.scope: defines who can access the library, 0 forPUBLIC, 1 forPRIVATE. More about that in a.scope_desc: literal description of the scope.
Let us see if we can use it the external library:
|
|
Code Snippet 6: Load R Package
Admittedly the code in Code Snippet 6 does not accomplish much, but when we execute it we can tell whether we have succeeded in creating the external library:
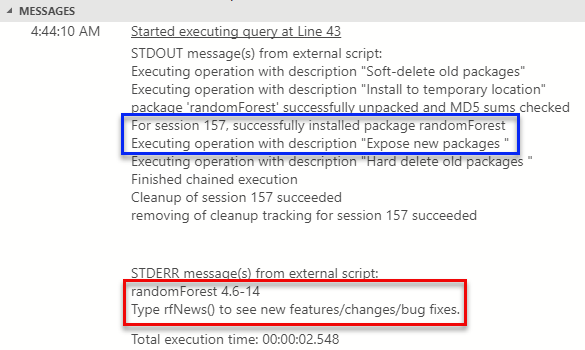
Figure 4: Execute randomForest
From what is outlined in red in Figure 4 we see that we have successfully executed against the randomForest package. We also see how external libraries only get loaded and “properly” installed at first use (blue outline). Cool, so that worked. What about the ExternalLibraries directory:
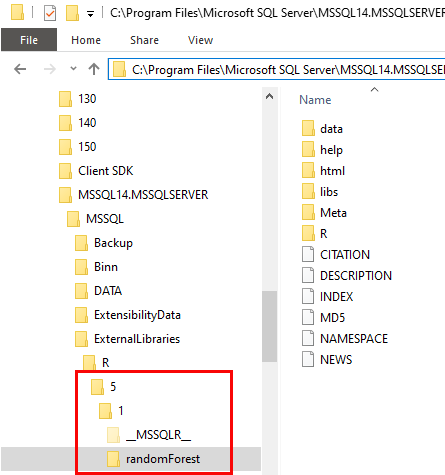
Figure 5: ExternalLibraries after First Execution
So, our assumption above regarding ExternalLibraries were correct; the directory contains the actual packages for the external libraries we create. We see in Figure 5 how there are new directories, and how we have a randomForest directory which contains the randomForest package.
NOTE: The number 5 in Figure 5 refers to the database id, and the number 1 beneath the 5 is the id of the external library (
external_library_id). So the databases have their own top-level directory, named after the database id. Underneath the database id directory is the individual external library directories identified by the external library id.
When we execute the code in Code Snippet 5 we get:

Figure 6: View Installed R Packages - II
We now see in Figure 6 how the randomForest package comes up as an installed packet (outlined in red), and we see the installation path (highlighted in yellow), and this is where it loads from. So what I said in
Installing R Packages in SQL Server Machine Learning Services - I about SQL only loads packages from one directory is not entirely true, SQL Server can load packages from different locations.
What we have seen so far looks quite good, but the problem is similar to what we discussed in Installing R Packages in SQL Server Machine Learning Services - I:
- In the post we said we needed elevated access to the box where the SQL Server instance is.
- Here we need access to a directory to which we can copy the package(s) we want to create the external library(s) from, and SQL Server needs read access to that directory. This directory is most likely on the SQL Server server, so we still have the same problem as before.
Fortunately, there is a way to solve this. Remember how we said above that the file_spec parameter which, up until now, has been a file path, also can be a hex-literal.
Hex Literal & CREATE EXTERNAL LIBRARY
The question is then how do I get the hex-literal for a package?
NOTE: What follows related to hex literal is more or less a copy from my post SQL Server 2019, Java & External Libraries - II.
The hex-literal is the actual binary representation of the package, so let us look at a couple of ways we can get hold of the binary package representation:
- From a local database.
- Generate binary from code.
Local Database
We know (from above) that the catalog view sys.external_library_files contains the binary representation of the package, and we see that using a query like so:
|
|
Code Snippet 7: View External Library
In Code Snippet 7 we SELECT out the library id, name from the sys.external_libraries view, and content from sys.external_library_files. When we run the code the result looks like so:

Figure 7: Binary Representation
What we see highlighted in Figure 7 is the content column, and we see it contains the hex-literal for the randomForest package.
So if we want to create an external library on a remote SQL Server on which we do not have access to the file system, but we have access to a local SQL Server, we can do this:
- Create an external library in a database on the local machine, like in Code Snippet 4.
- Get the hex-literal from the
contentcolumn and save it.
The naive way, (what I did initially), to get the hex-literal is to use code like this:
|
|
Code Snippet 8: Get the Hex Literal
To get the hex-literal, we see in Code Snippet 8 how we:
- Declare a
varbinary(max)variable into which weSELECTthecontentcolumn. - Print that variable so we can use it.
When we execute the code, it looks like so:

Figure 8: Selecting out Hex Literal
In Figure 8 we see part of the hex literal. However, I mentioned above that what we see in Code Snippet 8 is a naive way to do it, and - in most cases - it does not work. Sure you get something that looks like your hex-literal, but if you compare the size of the printed output of the variable, with the size of the value in the column, you see how the size in the column is much bigger. This is because when you do a PRINT either in SSMS or Azure Data Studio the output is limited to a max size of 8000.
NOTE: In the SQL Server 2019, Java & External Libraries - II post I used the method above, and it worked. The reason was that the
.jarfile I wanted to create an external library from, had a size of ~1.5k.
So what do we do if we want to capture the value of the variable? Well, by using some xml “magic” we can achieve what we want:
|
|
Code Snippet 9: Output as XML
We see that the code in Code Snippet 9 is not that much different from Code Snippet 8. Instead of selecting the content column value into a variable which we PRINT, we CONVERT the binary value to varchar(max) and then indicate we want it exposed as xml (FOR XML PATH('')). When we execute the result is like so:

Figure 9: Hex Literal XML
When you see Figure 9 you may ask what the difference is from what we have seen before? When we copy out the content of the column, will we not get just a part of the full value? The answer to that is yes, however, as the column data type is xml, and if we click on it we see something different:
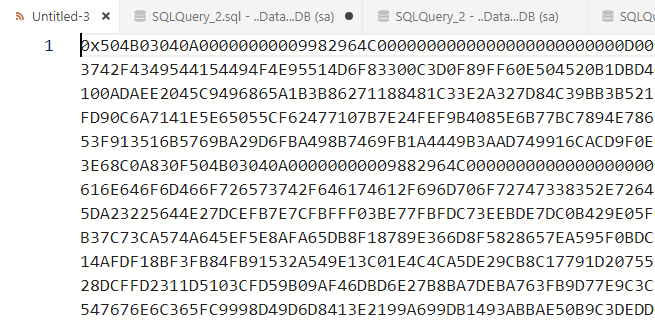
Figure 10: XML Output
When we clicked on the column a new file opens, and in that file, we get the full hex-literal value, as we see in Figure 10. We can now use the full hex literal to create the randomForest external library on another SQL Server instance.
In this post I do not have access to a remote SQL Server, so what we do instead is that we emulate doing it; we do it against the second database we created in Code Snippet 2; DataScienceDBRemote. After we ensure we have the full hex literal saved off somewhere we:
- Switch over to
DataScienceDBRemote(assa). - Open a new query window.
In the new query window we declare a new variable, let us call it @hexLit, as a varbinary(max), and we assign the hex literal from DataScienceDB to the variable:
|
|
Code Snippet 10: Assign Hex Literal Value to Variable
When we have declared the variable and assigned the hex-literal value to it, we can use it in CREATE EXTERNAL LIBRARY:
|
|
Code Snippet 11: Create External Library from Hex Literal Variable
Finally, we execute the code in Code Snippet 11 and the SELECT shows us that we now have an external library named randomForest in the “remote” database.
So this is one way we can get a binary for a package. It may, however, be somewhat convoluted, so let us look at the second way.
Generate Binary from Code
Compared to the above, to get the binary representation based on code is probably somewhat easier, and I decided to use Python to create a script which writes the package binary to a file:
|
|
Code Snippet 12: Python Script to Generate File with Hex Literal
We see in Code Snippet 12 how the script:
- Asks for what package zip file to use.
- What name to give the output file.
- Generates the binary.
- Saves it into a file.
We now take the code in Code Snippet 12 and copy it into a Python script file, for example createBinary.py. When we have the Python file we execute from the command prompt like so:
|
|
Code Snippet 13: Run Python Script
After we run the script as per Code Snippet 13 we open the created file and grab the hex-literal. We now follow the same procedure as we did in Code Snippet 10 and Code Snippet 11, without having the package installed as an external library on the local machine.
However, why do copy and paste when we can connect directly from Python to the remote database and execute CREATE EXTERNAL LIBRARY:
|
|
Code Snippet 14: Execute Directly Against the Remote Database
So, what do we do in Code Snippet 14? Well, we use the same code as in Code Snippet 12 to generate the binary representation. However, instead of writing it to a file we connect to the database using the pyodbc module, and the latest SQL Server ODBC driver. The hex_bytes variable is now a parameter in the CREATE EXTERNAL LIBRARY statement. The name of the external library is passed in as a parameter together with database connection details. It is worth noting that the way the script captures the password variable is not particularly secure. Instead of input, we should use getpass or something similar.
NOTE: Unless the user with which you connect is part of the
db_ownerrole, the user needs explicit permissions to executeCREATE EXTERNAL LIBRARY. A future post covers permissions forCREATE EXTERNAL LIBRARY.
To run this, we do as we did in Code Snippet 12; we copy the code into a Python file and run it from the command line. The code should run OK, and we have created an external library in a database in a remote SQL Server (well, in my case an emulated remote SQL Server).
Summary
In this post, we set out to solve the issue of how to deploy an R package without having access to the filesystem of the SQL Server where we want to deploy the package to.
We have seen two ways of doing it:
Local Datbase
- Create an external library from the R package based on the file path in a local SQL Server where we have access to the filesystem (like
localhost). - Get the binary representation from the
contentcolumn insys.external_library_filesvia some XML “magic”. - Assign the retrieved value to the
CONTENTparameter inCREATE EXTERNAL LIBRARY. - Execute
CREATE EXTERNAL LIBRARY.
Generate from Code
- Write script code which generates the binary representation.
- Follow from step 3 above (local database).
Alternatively, you can connect to the database from inside the script and call CREATE EXTERNAL LIBRARY from the script.
~ Finally
If you have comments, questions etc., please comment on this post or ping me.
comments powered by Disqus