I wrote a blog post back in November 2018, about how to install and deploy SQL Server 2019 Big Data Cluster on Azure Kubernetes Service. Back then SQL Server 2019 Big Data Cluster was in private preview, (CTP 2.1 I believe), and you had to sign up, to get access to the “bits”. Well, you did not really get any “bits”; what you did get was access to Python deployment scripts.
Now, September 2019, the BDC is in public preview (you do not have to sign up), and it has reached Release Candidate (RC) status, RC 1. The install method has changed, or rather, in addition to installing via deployment scripts, you can now also install using Azure Data Studio deployment notebooks, and that is what this blog post is about.
I install it on Azure, and since I am in South Africa, I use one of the South African hosting locations.
Pre-Reqs
To deploy using Azure Data Studio, (ADS), you need ADS (duh - see below), but you also need some other things.
Azure Subscription
If you want to install on Azure Kubernetes Service, (AKS), you need an Azure subscription. If you do not have one you can sign up for a free trial subscription here.
Of course you do not need to install it on AKS, you can install it on basically any Kubernetes cluster
Python
Well, Python is not a tool as such, but you need Python installed on the machine you install from, as the ADS deployment runs some Python scrips. You need Python3, and on my machine, I have Python 3.7.3. Ensure that Python is on the PATH.
azdata
azdata is a Python command-line tool replacing mssqlctl. It enables cluster administrators to bootstrap and manages the big data cluster via REST APIs.
There are a couple of steps to install it:
- If you have
mssqlctlinstalled you need to uninstall it:
|
|
Code Snippet 1: Uninstall mssqlctl
In Code Snippet 1 above I have inserted a line continuation (\) to make the code fit the page.
- If you have deployed CTP 3.2 of the BDC, then you need to uninstall that version of
azdata:
|
|
Code Snippet 2: Uninstall azdata
In Code Snippet 2 you see how the uninstall command takes the version of azdata to uninstall: 2019-ctp3.2. If you have the 3.2 version installed you need to confirm when you run the code in Code Snippet 2 that you want to remove some installed components:
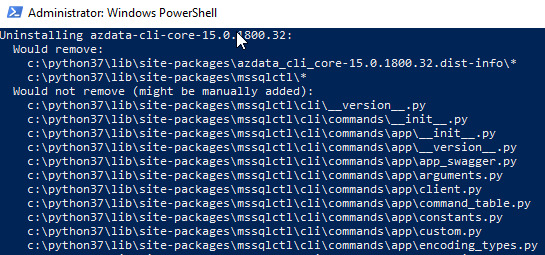
Figure 1: Confirm Uninstall azdata
Just click y when asked to proceed.
NOTE: The biggest issue causing errors in a BDC deployment, by far, is using an older version of
azdata. So please, do not be “that guy” (or girl) - make sure you uninstallazdataif you have an earlier version. In fact, before a deployment, always uninstallazdatafollowed by an install, (see below).
- You need the latest version of the Python
requestspackage installed:
|
|
Code Snippet 3: Install/Upgrade requests
- When you have executed the code in Code Snippet 3 you can install
azdata:
|
|
Code Snippet 4: Installing azdata
After executing the code in Code Snippet 4 you can go ahead and install the other tools needed.
kubectl
The kubectl tool is a Kubernetes command-line tool, and it allows you to run commands against Kubernetes clusters. You can use kubectl to deploy applications, inspect and manage cluster resources, and view logs.
You can install kubectl in different ways, and I installed it from
Chocolatey: choco install kubernetes-cli.
Azure CLI
The Azure CLI is Microsoft’s cross-platform command-line experience for managing Azure resources, and you install it on your local machine. You find install links for Azure CLI here.
Azure Data Studio
Since this post is about installing and deploying a BDC using Azure Data Studio, you also need ADS. You may already have ADS installed, but to be able to install and deploy to the release candidate of BDC you need a specific install. If you have already installed ADS, this ADS version installs side-by-side with existing ADS installations.
The install link to the ADS RC version is here.
SQL Server 2019 (Preview)
In addition to ADS, you also need the SQL Server 2019 (Preview) extension, which you install after installing ADS.
As opposed to other ADS extensions, you need to download the extension to your machine before you can install it. You download it from here. After download, you install it from the File menu, and the Install Extension from VSIX Package item:
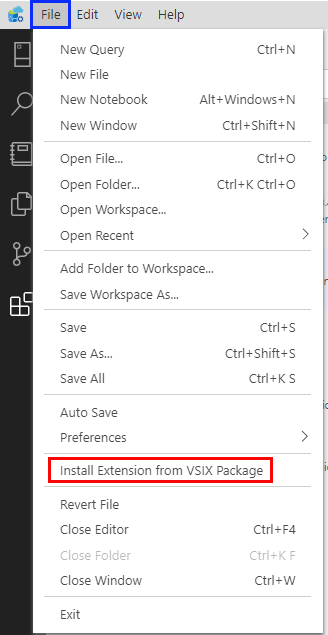
Figure 2: Install Extension
In Figure 2 you see the File menu (outlined in blue), and the Install Extension from VSIX Package item outlined in red.
Azure Data Studio Notebooks
I mentioned above that you deploy the BDC using ADS deployment Notebooks. You may ask yourself what an Azure Data Studio Notebook is? Well, Notebooks come from the Data Science world where a Notebook can contain live code, equations, visualizations and narrative text. It is a tool for teaching or sharing information between people. A notebook makes it easy to link lots of docs and code together.
When Microsoft developed ADS, the embedded the Jupyter service in ADS, which enables ADS to run Notebooks. When you talk about Notebooks, you also talk about Kernels. A Kernel is the programming language you can write and execute code in, in the Notebook:
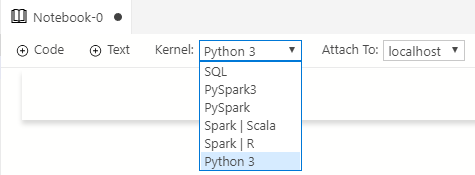
Figure 3: Notebook Kernels
The drop-down you see in Figure 3 shows the Kernels ADS supports. When you deploy, you use the Python 3 kernel.
If you have not used Python Notebooks before in ADS, you need to configure Python for use with Notebooks. You enter Ctrl+Shift+P to open the command palette, and you search for Configure Python:
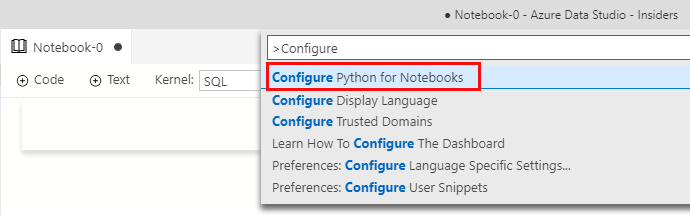
Figure 4: Configure Notebooks
In Figure 4 you see the command palette, and you choose Configure Python for Notebooks, and follow the instructions.
When you have configured Python for the notebooks, you are ready to deploy the BDC.
Deployment Settings
The first step in the deployment is to configure settings which the notebook use.
After you launch ADS, you click on the Connections icon in the top of the Activity bar (leftmost panel in ADS). That opens the sidebar where you can see your connections. Click on the ellipsis, (the three dots “…”), to the right in the top panel of the sidebar:
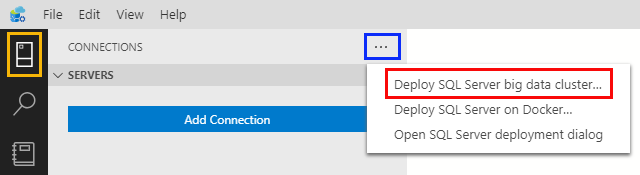
Figure 5: Connections
You see in Figure 5:
- Connections icon outlined in yellow.
- The three dots in the connections panel outlined in blue.
- The pop-up menu items when clicking on the three dots.
You also see in Figure 5 that the pop-up menu gives you choices for SQL Server deployments. To deploy a BDC, you click on the item outlined in red:
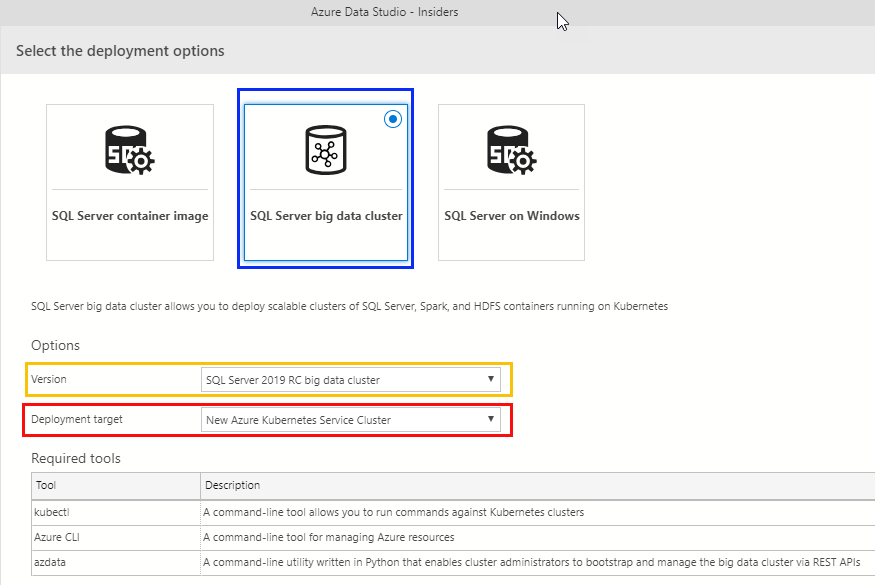
Figure 6: Connections
When you click on the *Deploy SQL Server big data cluster you see something like in Figure 6: the Select the deployment options dialog. You see in the dialog what you can deploy, and what options you have.
You choose SQL Server big data cluster, (outlined in blue), the version SQL Server 2019 RC big data cluster, (outlined in yellow), and the target to deploy to: New Azure Kubernetes Service cluster. When you click Select in the dialog, you see a new dialog:

Figure 7: New AKS Cluster
You see in Figure 7* a settings dialog for the creation and deployment of your new cluster. All of the settings are relatively self-explanatory. However, there are two where you may not know how to retrieve them:
- Subscription id - you can have multiple subscriptions in Azure. This defines under which subscription to create the cluster. If you only have one subscription you leave this as is. If you have more subscriptions see below.
- Region - in what Azure region your cluster should be created.
Subscription id
You retrieve subscription information either by using the Azure portal or logging in via the Azure CLI. I prefer to log-in using Azure CLI:
|
|
Code Snippet 4: Login to Azure
When I execute the code in Code Snippet 4 a tab opens in my browser, and I see a dialog that asks me to pick an account to log in to Azure with:
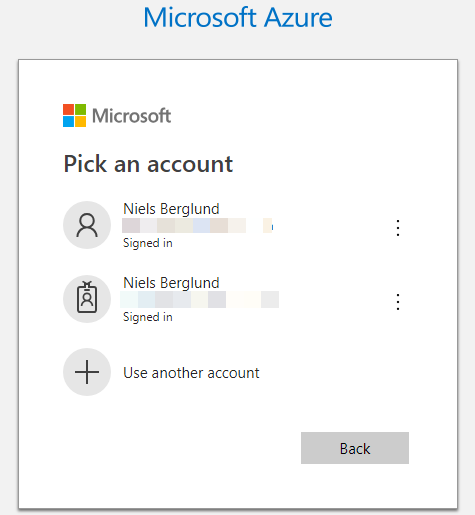
Figure 8: Azure Login
I choose the account from what I see in Figure 8, and after a little while, I see in the browser a success message:
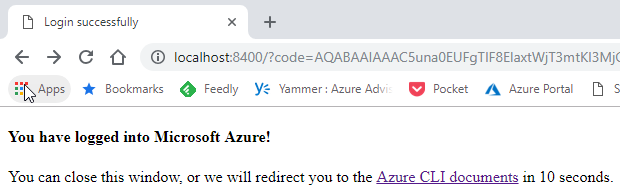
Figure 9: Azure Login Success
At the same time as the success message in Figure 9, the code in Code Snippet 4 returns with information what subscriptions I have access to in Azure:
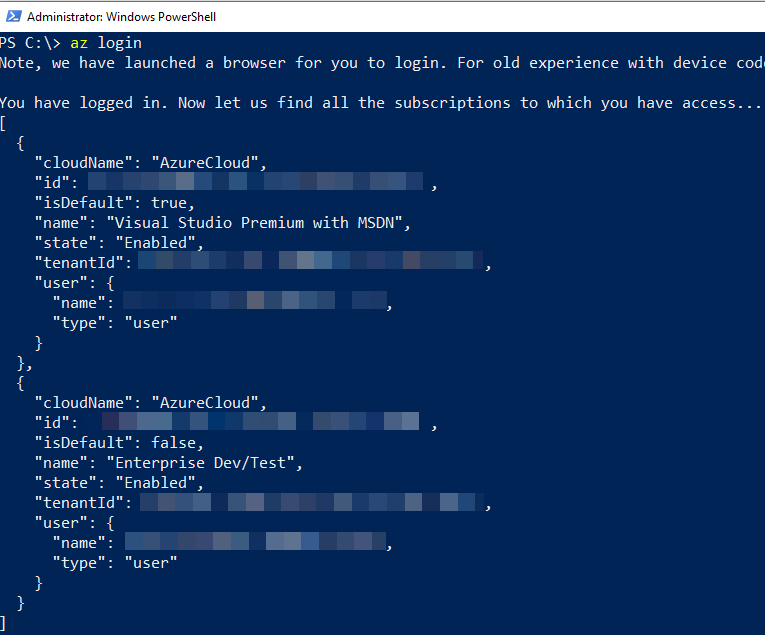
Figure 10: Azure Login Return
As we see in Figure 10, I have access to multiple subscriptions, and I enter the id for the subscription I want to use in the Subscription id field.
Regions
To see a list of Azure regions you execute az account list-locations:
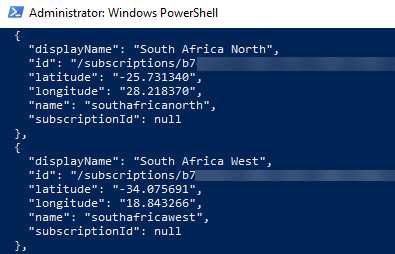
Figure 11: Azure Regions
When you execute the code above you get back a list of all regions you have access to and what you enter in the Region is the name property of your chosen region. In my case, I choose southafricnorth. When you have the necessary information, you set the various settings. For me the settings dialog looks like so:
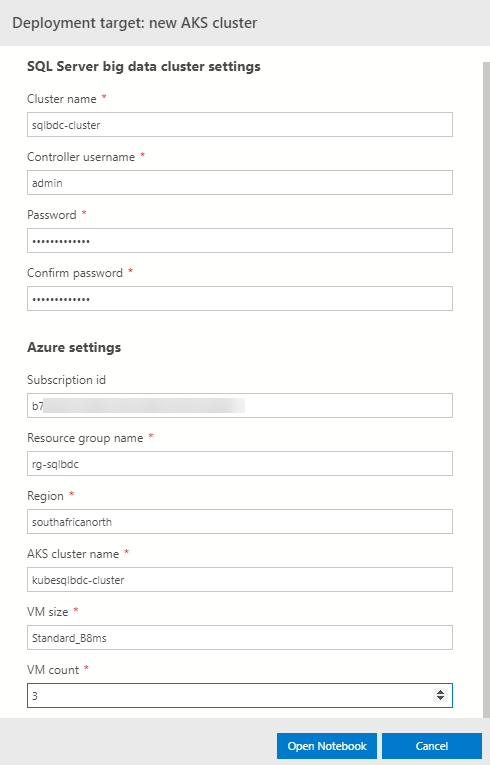
Figure 12: Azure Regions
It is worth noting that I have changed the VM size, and VM count from its default of Standard_E4s_v3, and 5 to Standard_B8ms and 3. Reason for this is that having fewer nodes cuts down on install time. The thing to bear in mind here is that a BDC deployment requires at a minimum around 24 hard disks altogether in your cluster, and each VM has a set number of disks. In my case, each Standard_B8ms VM has 16 disks so I should be good (3 * 16).
Deployment Notebook
With the settings set you now click Open Notebook:
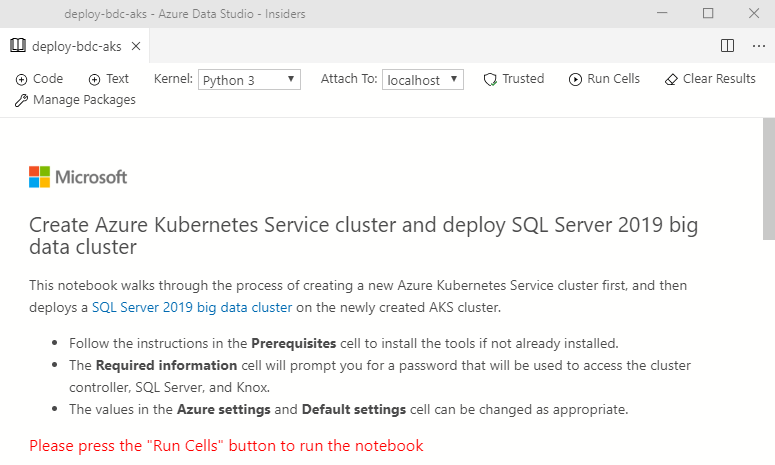
Figure 13: Deploy Notebook
In Figure 13 you see the opened deployment notebook. When you scroll through the notebook, you see the various stages of the deployment, and what it does in each stage:
- Check dependencies.
- Required information.
- Azure settings.
- Default settings.
- Login to Azure.
- Set active Azure subscription.
- Create Azure resource group.
- Create AKS cluster.
- Set the new AKS cluster as current context.
- Create a deployment configuration file.
- Create SQL Server 2019 big data cluster.
- Login to SQL Server 2019 big data cluster.
- Show SQL Server 2019 big data cluster endpoints.
- Connect to master SQL Server instance in Azure Data Studio.
To do the deployment, you can now either run each cell independently by clicking on the cell and hit F5 or click on the Run Cells command at the top of the notebook. In either case, you see what command the cell executes as well as the result:
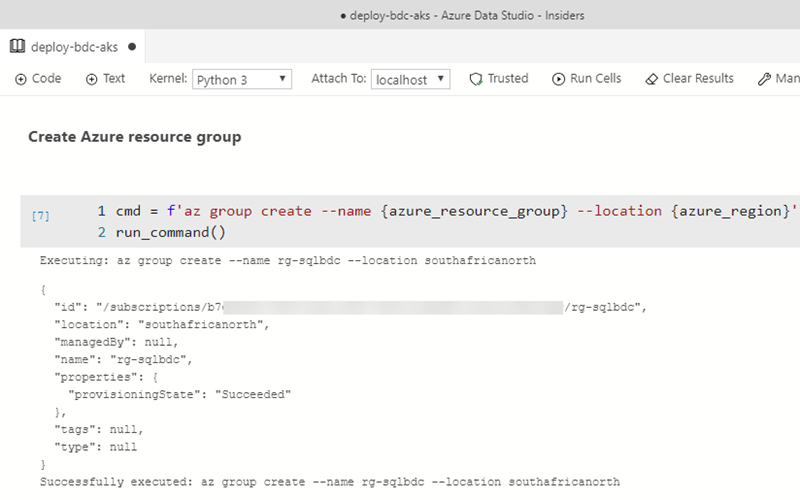
Figure 14: Cell Output
What you see in Figure 14 is the output from creating the Azure resource group.
Be aware that the deployment takes a while, and especially the stage Create SQL Server 2019 big data cluster. Eventually, the deployment finishes, and you get an output from the cell Show SQL Server 2019 big data cluster endpoints:
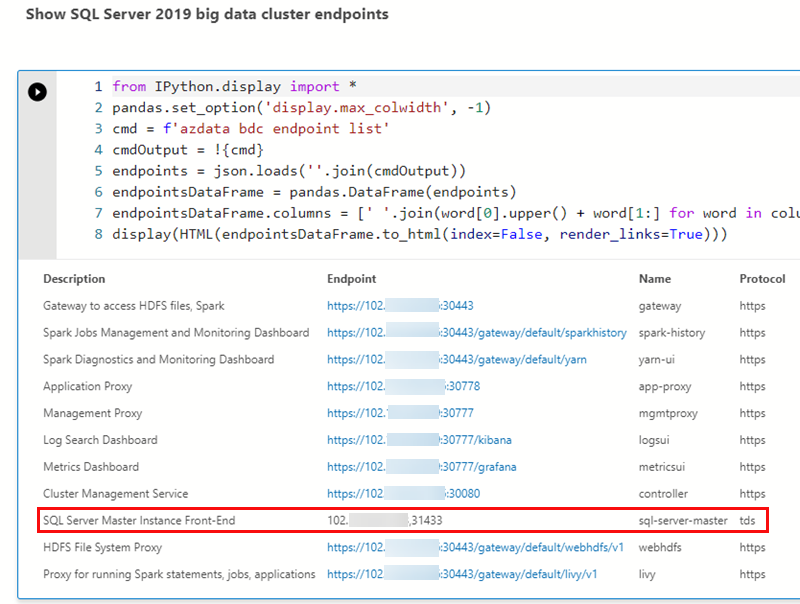
Figure 15: Cell Output
The BDC exposes external endpoints for various services, and those are the ones you see in Figure 15. It is beyond the scope of this post to discuss what all those endpoints are, but the one outlined in red is the endpoint for the SQL Server master instance.
To connect to the master instance, you create a new connection:
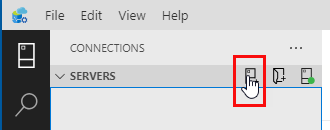
Figure 16: New Connection
When you click the New Connection icon in the Servers panel in the sidebar that you see in Figure 16, a Connection dialog “pops up”:

Figure 17: Connection Dialog
In the Connection dialog you enter the details for your connection, including the IP address for the SQL Server master instance, and then you click Connect:
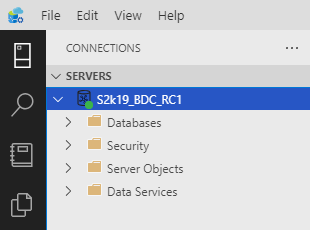
Figure 18: Connected
As you see in Figure 18, you are now connected.
Summary
In this post you saw how you can deploy a *SQL Server 2019 Big Data Cluster using Azure Data Studio and notebooks.
~ Finally
If you have comments, questions etc., please comment on this post or ping me.