At the Microsoft Ignite 2018 conference back in September Microsoft released SQL Server 2019 for public preview, and I wrote two short blog posts about it:
What Microsoft also announced was SQL Server 2019 Big Data Clusters, which combines the SQL Server database engine, Spark, and HDFS into a unified data platform! Yes, you read that right: SQL Server, Spark, and Hadoop right out of the box. Seeing that both Spark and Hadoop are mainly Linux based, what makes the Big Data Cluster possible is SQL Server on Linux. When you deploy a SQL Server 2019 Big Data Cluster, you deploy it as containers on Kubernetes, where the Kubernetes cluster can be in the cloud, such as Azure Kubernetes Service, or on-prem like Red Hat OpenShift or even on a local dev-box/laptop using Minikube.
Initially, this post was about SQL Server 2019 Big Data Clusters on Minikube, but after quite a few failed installation attempts I realised I did not have enough memory on my development box, so I decided to try it on Azure Kubernetes Service (AKS) instead.
NOTE: If you want to run SQL Server 2019 Big Data Clusters on Minikube it is suggested that your host machine (Minikube is essentially a VM) has at least 32Gb of memory, and you allocate at least 22Gb to the Minikube VM.
Since I am a complete novice when it comes to Kubernetes, this post covers both how I set up AKS as well as the deployment of SQL Server 2019 Big Data Clusters to AKS, and the post is somewhat a summary of the official documentation.
NOTE: SQL Server 2019 is in public preview, but the preview does not contain the Big Data Cluster parts. To deploy SQL Server 2019 Big Data Clusters you need to be part of the SQL Server 2019 Early Adoption Program, for which you can sign up for here.
Pre-reqs
Apart from having an Azure subscription and being enrolled in the SQL Server 2019 EAP, there are a couple of other pre-reqs needed.
Python
If you, like me, are a SQL Server guy, you are probably quite familiar with installing SQL Server instances by mounting an ISO file, and running setup. Well, you can forget all that when you deploy a SQL Server 2019 Big Data Cluster. The setup is all done via Python utilities, and various Docker images pulled from a private repository. So, you need Python3. On my box I have Python 3.5, and - according to Microsoft - version 3.7 also works. Make you that you have your Python installation on the path.
When you deploy you use a Python utility: mssqlctl. To download mssqlctl, you need Python’s package management system pip installed. During installation you also need a Python HTTP library: Requests. If you do not have it you need to install it:
|
|
Code Snippet 1: Installing Python Requests
Down below we talk some more about how to download the mssqlctl utility.
Azure CLI
When working with Azure, you can do it in three ways:
- Azure Portal
- Cloud Shell from within the portal.
- Azure CLI.
The Azure CLI is Microsoft’s cross-platform command-line experience for managing Azure resources, and you install it on your local machine. In this post I mainly use the Azure CLI, so if you want to follow along download it from here.
Kubectl
The kubernetes-cli (Kubernetes command line tool), gives you an executable kubectl.exe which you use to manage your Kubernetes cluster. Using kubectl, you can inspect cluster resources; create, delete, and update components; etc.
You can install kubectl in different ways, and I installed it from
Chocolatey: choco install kubernetes-cli.
Azure Kubernetes Cluster
Ok, so having “sorted” out the pre-reqs, let us start with creating an Azure Kubernetes cluster through the Azure CLI.
Login
I start with open Powershell as administrator and from Powershell I log in to Azure:
|
|
Code Snippet 2: Login to Azure
When I execute the code in Code Snippet 2 a tab opens in my browser, and I see a dialog that asks me to pick an account to log in to Azure with:
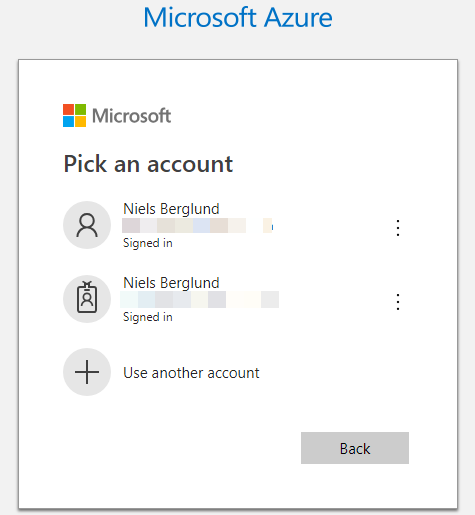
Figure 1: Azure Login
I choose the account from what I see in Figure 1, and after a little while I see in the browser a success message:
Figure 2: Azure Login Success
At the same time as the success message in Figure 2, the code in Code Snippet 1 returns with information what subscriptions I have access to in Azure:
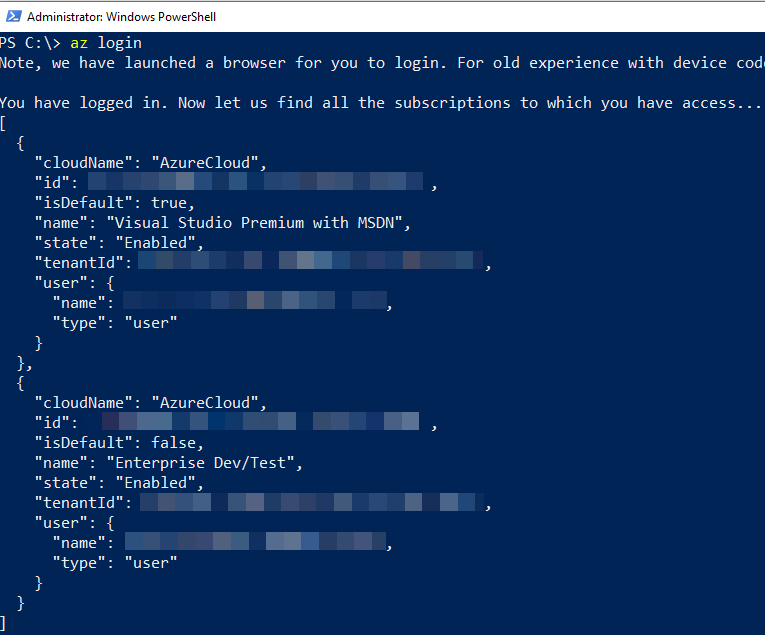
Figure 3: Azure Login Return
As we see in Figure 3, I have access to multiple subscriptions, and before we go any further, I set the subscription I target. I look at the id for the subscription I want and:
|
|
Code Snippet 3: Set Azure Context
I have now logged in and indicated, as in Code Snippet 3, what subscription to use.
Resource Groups
Everything we do in Azure is in the context of a resource group. A resource group is a logical group in which Azure resources are deployed and managed, and it exists in a physical location (Azure data center). So when I create a Kubernetes cluster, I need to define what resource group the cluster should belong to. So let us create a resource group:
|
|
Code Snippet 4: Create Resource Group
In Code Snippet 4 we see how I create a group named kubernetes-rg, and I want it in the West Europe region. After I run the code in Code Snippet 4, I get back a JSON blob:
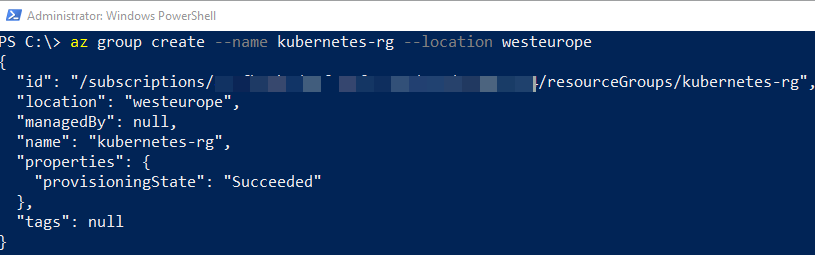
Figure 4: Azure Create Group Return
The JSON blob, as in Figure 4, contains details about my newly created resource group. If I log in to the Azure Portal:
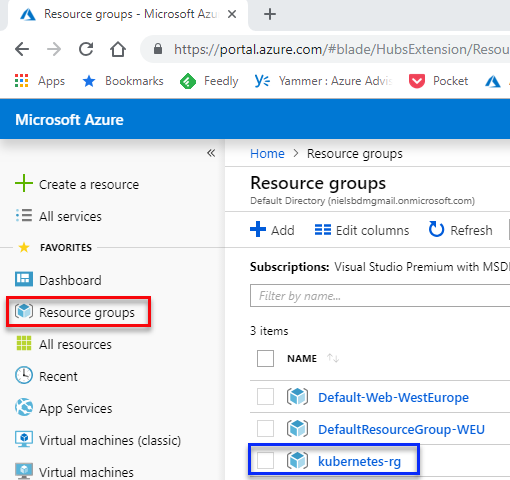
Figure 5: Azure Resource Group
In the portal, when I click the Resource groups link (outlined in red in Figure 5), I see my newly created resource group outlined in blue.
Create Kubernetes Cluster
I now have a resource group, and I go on to create the Kubernetes cluster.
NOTE: You do not need to create a new resource group as such. When you create the Kubernetes cluster, you can create it in an existing group.
To create the Kubernetes cluster I continue to use the Azure CLI, and I use the az aks create command. The command has quite a few parameters, which you can read about
here, but I use only a few of them:
--name: name of the cluster.--resource-group: name of the resource group.--disable-rbac: disables Kubernetes Role-Based Access Control.--generate-ssh-keys: if no SSH keys exist, generate both public and private key files.--node-vm-size: the size of the VM’s used for the nodes in the Kubernetes cluster. For a SQL Server 2019 Big Data Cluster you need a VM with at least 32Gb of memory. You can see a list of VM sizes and their features in the portal here. I use “Standard E4s_v3”.--node-count: number of nodes in the Kubernetes node pool. I use 3.--kubernetes-version: the version of Kubernetes to use for creating the cluster. The SQL Server 2019 Big Data Cluster requires at minimum the Kubernetes v1.10 version.
Before I create the cluster, let us talk a little bit about --node-vm-size and --node-count as they are somewhat related to each other. In addition to defining how much memory a VM has the --node-vm-size also defines the number of virtual CPU’s (VCPUS) for the VM. The number of VCPUS controls how many data disks the VM has, (normally it is 2 disks per VCPU). The number of disks per VM is important as the SQL Server 2019 Big Data Cluster mounts quite a lot of storage on individual disks and with too few disks the mount operations fail. To get more disks you either increase the VM size or the node count, and that is the relation between --node-vm-size and --node-count.
For a “default” SQL Server 2019 Big Data Cluster deployment around 20 disks are required. So if I choose the “Standard E4s_v3” VM as vm size, I want at least 3 nodes. With this in mind the code to create a Kubernetes cluster looks like so:
|
|
Code Snippet 5: Create Kubernetes Cluster
In Code Snippet 5 we see how:
- I want to create a cluster with the name
sqlkubecluster. - I want the cluster in the
kubernetes-rgresource group. - I do not want to use Kubernetes Role-Based Access Control.
- I want SSH keys created.
- I want the VM’s to be “Standard E4s_v3”,
- I want 3 nodes.
- Finally I want the Kubernetes version to be 1.10.8.
When I execute the code I see something like so:

Figure 6: Run Create Kubernetes Cluster
What we see in Figure 6 runs for several minutes and when it completes I receive a JSON blob with information about the cluster.
I mentioned above how kubectl is used to manage your Kubernetes cluster, and now when the cluster is created, we need to configure kubectl to connect to the cluster. To do this, you use the az aks get-credentials command like so:
|
|
Code Snippet 6: Get Credentials
We see in Code Snippet 6 how I pass in the name of the resource group and cluster as parameters and when I execute:

Figure 7: Get Credentials
The config file we see outlined in red in Figure 7 holds, among other things, the keys for the Kubernetes cluster. To ensure that I can connect to the cluster I call kubectl get nodes, and I see some information about the cluster nodes.
Dashboard & Namespaces
To monitor and manage a Kubernetes cluster you do not have to rely on kubectl solely, as you can also use the
Kubernetes Dashboard. In Azure you access the Dashboard by the az aks browse command, and - as with get-credentials - you pass in the names of the resource group and cluster: az aks browse --resource-group kubernetes-rg --name sqlkubecluster, and a new tab opens in your browser:
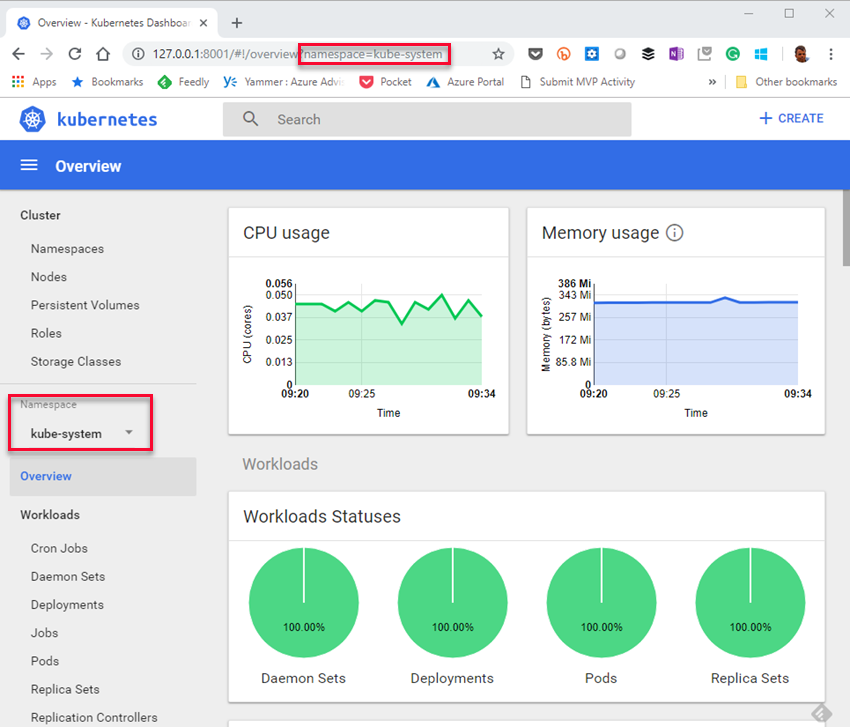
Figure 8: Kubernetes Dashboard
In Figure 8 we see the dashboard right after I created the VM and the Kubernetes cluster. Notice namespaces, outlined in red. Namespcaces help different projects, teams, or customers to share a Kubernetes cluster, and when you deploy to Kubernetes, you deploy into a namespace. To see what namespaces exist in a cluster you execute: kubectl get namespaces. When I do it at this stage I see:
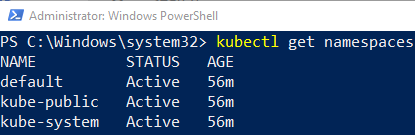
Figure 9: Kubernetes Namespaces
When we look at Figure 9 we see following namespaces:
default: A default, (duh), namespace to hold the default set of Pods, Services, and Deployments used by the cluster.kube-public: A namespace readable by everyone for public ConfigMap’s.kube-system: A namespace for objects created by the Kubernetes system.
So, coming back to Dashboard: when we want to monitor a deployment with Dashboard, we monitor a specific namespace. Enough of this, let us deploy!
Deploy SQL Server 2019 Big Data Cluster
I mentioned above that when we deploy a SQL Server 2019 Big Data Cluster we deploy using a Python utility: mssqlctl. So what we need to do is to download and install the utility:
|
|
Code Snippet 7: Download and Install mssqlctl
We download and install mssqlctl from a Microsoft repository as we see in Code Snippet 7. After download the source is located in <python_path>\lib\site-packages and the executable - mssqlctl.exe - is at: <python_path>\Scripts.
Environment Variables
When you deploy the SQL Server 2019 Big Data Cluster using mssqlctl you customise the cluster configuration via environment variables read by mssqlctl. To see all available environment variables you go
here. Below I list the ones I use:
- SET ACCEPT_EULA=Y - to accept the SQL Server license agreement.
- SET CLUSTER_PLATFORM=aks - the Kubernetes platform you deploy to: Azure -
aks, Kubernetes -kubernetes, Minikube -minikube. - SET CONTROLLER_USERNAME=admin - the user name for the cluster administrator. You can set this to anything.
- SET CONTROLLER_PASSWORD=<some_secret_password> - the password for the cluster administrator.
- SET KNOX_PASSWORD=<some_secret_password> - the password for the Knox user. Knox is an application gateway for interacting with the REST API’s and UI’s of Apache Hadoop deployments.
- SET MSSQL_SA_PASSWORD=<some_secret_password> - the
sapassword for the master SQL instance. It needs to meet password complexity requirements. - SET DOCKER_REGISTRY=private-repo.microsoft.com - the registry for the images being pulled.
- SET DOCKER_REPOSITORY=mssql-private-preview - the repository within the registry.
- SET DOCKER_USERNAME=<docker_username> - user name to access the images. You get this when you sign up for the EAP.
- SET DOCKER_PASSWORD=<some_secret_password> - the password for the above user. You get this when you sign up for the EAP.
- SET DOCKER_EMAIL=<email_for_the_docker_user> - the email associated with the registry. You get this when you sign up for the EAP.
- SET DOCKER_PRIVATE_REGISTRY=1 - this has to be set to 1.
Before you deploy the environment variables, need to be set, and if you are on Windows, you need to do it from a command prompt (not Powershell). Instead of having to enter these variables individually, I have a bat file I run before deploying: set_env_variables_aks.bat.
Create Cluster
After I have set the variables I create the cluster with the mssqlctl command, and I do it from the command prompt (not Powershell):
|
|
Code Snippet 8: Create Big Data Cluster
Looking at Code Snippet 8 we see how I call mssqlctl to create a SQL Server 2019 Big Data Cluster, and I want to create it in a namespace called sqlbigdata1. I use the -v flag (as in verbose) to get debug output. When I execute the code I see something like so:
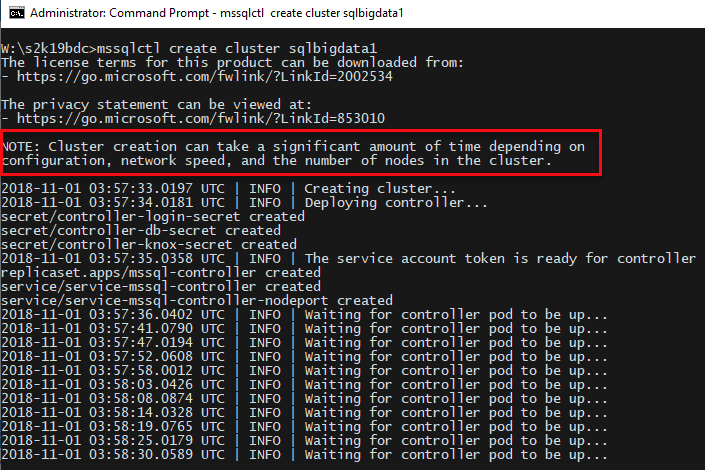
Figure 10: Create Big Data Cluster
What we see in Figure 10 is how we have started to create the main controller and its pod. We also see a note (outlined in red) saying that it can take quite a while to create the cluster. To monitor the process you can use Dashboard:
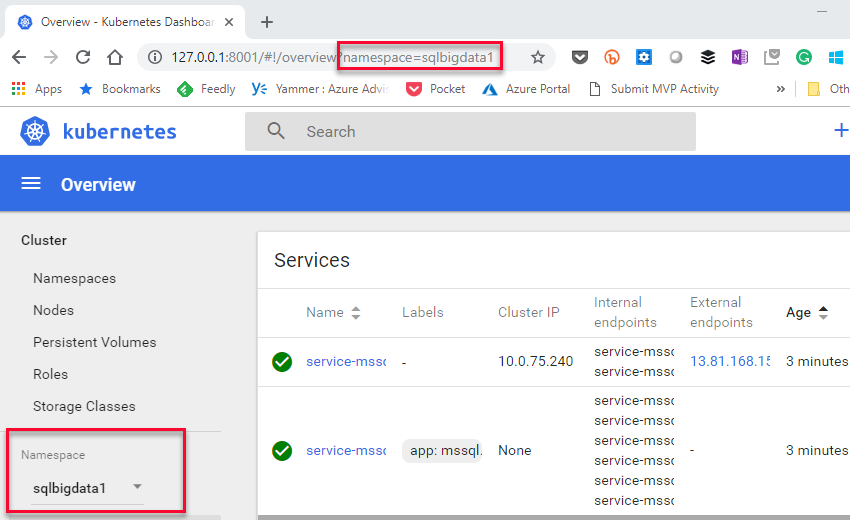
Figure 11: Kubernetes Dashboard
In Figure 11 we see an overview of the sqlbigdata1 namespace. You may see errors in the dashboard, but you can ignore them initially. In addition to Dashboard to monitor progress you can use kubectl commands, for example: kubectl get pods -n sqlbigdata1:
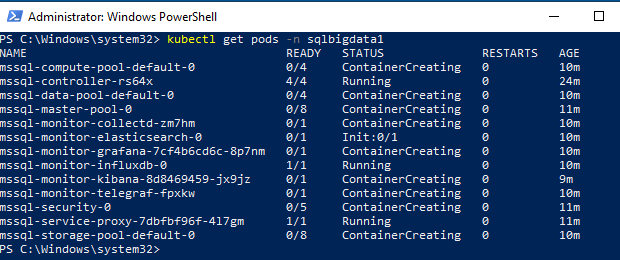
Figure 12: Pods being Created
The SQL Server 2019 Big Data Cluster exposes its own dashboard; the Cluster Administration Portal, which we can use to monitor the deployment as well. The portal becomes available as soon as the controller is up, and in a running state. The portal is exposed at the endpoint for the service-proxy-lb (proxy load balancer) service. To find the IP address, you call: kubectl get svc service-proxy-lb -n <name of your cluster>:

Figure 13: Endpoint for Cluster Admin
In Figure 13 we see how svc service-proxy-lb has an external IP of 13.94.174.28, and it exposes two ports: 30777 and 31826. The port for the portal is 30777, and when I browse there, I first need to log in with the CONTROLLER_USERNAME (admin in my case) and CONTROLLER_PASSWORD. After login, I come to the Overview page. I then click on the Deployment link outlined in red:
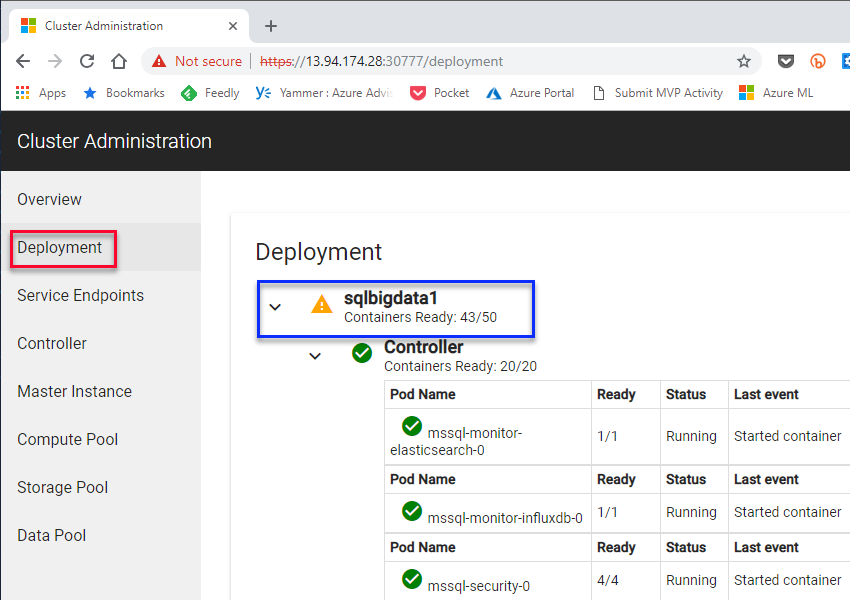
Figure 14: Deployment Progress
What we see in Figure 14 is the progress of the SQL Server 2019 Big Data Cluster deployment, and we see that it is still in progress: yellow triangle by the namespace, (outlined in blue).
Eventually, the deployment finishes, and we know that either: by seeing that the triangle in Figure 14 is now a green circle, or by the output from command line:
|
|
Code Snippet 9: Cluster Deployed Successfully
We see in Code Snippet 9 how mssqlctl reports that the various pools are ready, followed by successful cluster deployment.
Connection Endpoints
So far, so good - but what do we do now? We know that a SQL Server 2019 Big Data Cluster consists both of a SQL Server master instance, as well as Hadoop/Spark, but where do we find them?
As with the portal, the endpoints are service load balancers endpoints. The service load balancer for the SQL Server master instance is: service-master-pool-lb and for Hadoop/Spark it is: service-security-lb. To retrieve the endpoints I call:
|
|
Code Snippet 10: Get Endpoints
In Code Snippet 10 we see how I customize what I want to be returned from the get service calls to only to return IP addresses and ports. With these endpoints, I can now connect to my SQL Server 2019 Big Data Cluster. Once again, to connect to the SQL Server master instance (databases), you use the service-master-pool-lb endpoint, and to connect to Hadoop/Spark, the service-security-lb endpoint is what you use.
The user names and passwords are:
- SQL Server master instance:
saas user name, andMSSQL_SA_PASSWORDas password. - Hadoop / Spark:
rootas user name, andKNOX_PASSWORDas password.
In a future post I look at what we can do with SQL Server 2019 Big Data Cluster.
Summary
In this post we looked at how to install SQL Server 2019 Big Data Cluster on Azure Kubernetes Service (AKS). We saw how to:
- Create a new Azure resource group using Azure CLI.
- Create a Kubernetes cluster in that resource group.
We discussed the size requirements for the VM’s in the cluster, and mentioned they needed at least 32Gb of RAM. We also need quite a few disks to mount storage on, so the node count is important.
The actual deployment of a SQL Server 2019 Big Data Cluster is done using a Python utility mssqlctl. During the deployment process we can monitor the progress via:
kubectlcommands.- the Kubernetes dashboard.
- the SQL Server 2019 Big Data Cluster’s Cluster Administration Portal.
Access to the various services in a SQL Server 2019 Big Data Cluster is through service load balancers and their external IP addresses and ports:
- Cluster Administration Portal:
service-proxy-lb. - SQL Server master instance:
service-master-pool-lb. - Hadoop/Spark:
service-security-lb.
~ Finally
If you have comments, questions etc., please comment on this post or ping me.