For you who follows my sporadic posts, you may wonder why I have yet another post, (YAP), covering how to deploy a SQL Server 2019 Big Data Cluster, (BDC), using Azure Data Studio, (ADS).
The answer to that is that the version of BDC I deployed in this post was a pre-release, and since then BDC has gone GA, (General Availability), and there are certain differences in deployment process between RC1, and RTM.
So in this post let us look at how to deploy BDC RTM to Azure Kubernetes Service using ADS.
Pre-Reqs
To deploy using Azure Data Studio, (ADS), you need ADS (duh - see below), but you also need some other things.
NOTE: If you wonder where you have seen this pre-req section before, the answer is that it is almost identical to the pre-req section in my previous install post.
Azure Subscription
As this post covers how to deploy a SQL Server 2019 Big Data Cluster to Azure Kubernetes Service, (AKS), you need an Azure subscription. If you do not have one, you can sign up for a free trial subscription here.
Python
Well, Python is not a tool as such, but you need Python installed on the machine you install from, as the ADS deployment runs some Python scrips. You need Python3, and on my machine, I have Python 3.7.3. Ensure that Python is on the PATH.
azdata
azdata is a Python command-line tool enabling cluster administrators to bootstrap and manages the big data cluster via REST APIs. It replaces mssqlctl, which was the previous command-line tool for deploying a BDC.
There are a couple of steps to install azdata:
- If you have
mssqlctlinstalled you need to uninstall it:
|
|
Code Snippet 1: Uninstall mssqlctl
In Code Snippet 1 above I have inserted a line continuation (\) to make the code fit the page.
- If you have deployed CTP 3.2, or any later CTP’s of the BDC, (including RC1), then you need to uninstall the corresponding version of
azdata:
|
|
Code Snippet 2: Uninstall azdata
In Code Snippet 2 you see how the uninstall command indicates which version of azdata to uninstall via <version-indicator>. The value of the `
-
CTP 3.2:
2019-ctp3.2. -
RC1:
2019-rc1. -
With the above in mind, the command I used to uninstall the
RC1version ofazdatalooks like so:
|
|
Code Snippet 3: Uninstall RC1 azdata
In Code Snippet 3 we see how I have replaced <version-indicator> with 2019-rc1. When you run the command, you have to confirm that you want to remove some installed components:
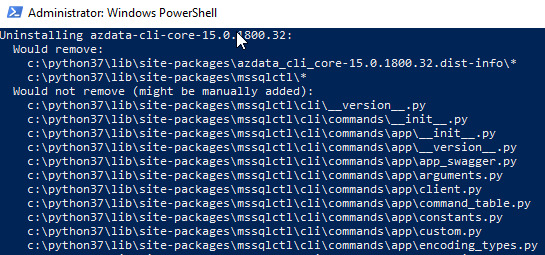
Figure 1: Confirm Uninstall azdata
Just click y when asked to proceed.
NOTE: The biggest issue causing errors in a BDC deployment, by far, is using an older version of
azdata. So please, do not be “that guy” (or girl) - make sure you uninstallazdataif you have an earlier version. In fact, before a deployment, always uninstallazdatafollowed by an install, (see below).
- You need the latest version of the Python
requestspackage installed:
|
|
Code Snippet 4: Install/Upgrade requests
When you have executed the code in Code Snippet 4 you can install azdata:
|
|
Code Snippet 5: Installing azdata
After executing the code in Code Snippet 5 you install the other tools needed.
kubectl
The kubectl tool is a Kubernetes command-line tool, and it allows you to run commands against Kubernetes clusters. You use kubectl to deploy applications, inspect and manage cluster resources, and view logs.
You can install kubectl in different ways, and I installed it from
Chocolatey: choco install kubernetes-cli.
Azure CLI
The Azure CLI is Microsoft’s cross-platform command-line experience for managing Azure resources, and you install it on your local machine. You find installation links for Azure CLI here.
Azure Data Studio
Since this post is about installing and deploying a BDC using Azure Data Studio, you also need ADS. Pre-releases of the BDC required special builds of ADS for deployment, (the Insiders builds), and the BDC RC1 release required the ADS RC build.
This is not the case anymore; any ADS build from 1.13.0 is sufficient for deployment. You find installation links for ADS here.
Azure Data Studio Notebooks
You deploy the BDC using ADS deployment Notebooks. You may ask yourself what an Azure Data Studio Notebook is? Well, Notebooks come from the Data Science world where a Notebook can contain live code, equations, visualizations and narrative text. It is a tool for teaching or sharing information between people. A notebook makes it easy to link lots of docs and code together.
When Microsoft developed ADS, they embedded the Jupyter service in ADS, which enables ADS to run Notebooks. When you talk about Notebooks, you also talk about Kernels. A Kernel is the programming language you write and execute code in, in the Notebook:
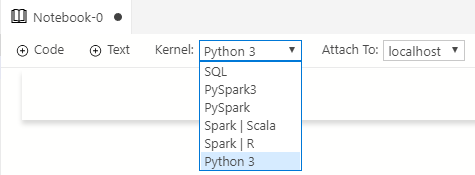
Figure 2: Notebook Kernels
The drop-down you see in Figure 2 shows the Kernels ADS supports. When you deploy, you use the Python 3 kernel.
Code in Notebooks exists in cells, and to run the code you execute the cell.
If you have not used Python Notebooks before in ADS, you need to configure Python for use with Notebooks. You enter Ctrl+Shift+P to open the command palette, and you search for Configure Python:
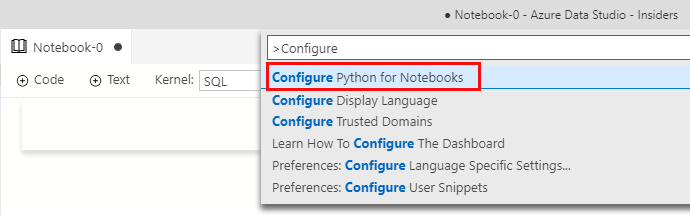
Figure 3: Configure Notebooks
In Figure 3 you see the command palette, and you choose Configure Python for Notebooks, and follow the instructions.
When you have configured Python for the notebooks, you are ready to deploy the BDC.
Azure Data Studio Deployment Wizard
When you use ADS to to a deployment you use a deployment wizard who guides you through the steps necessary for the deployment. To start up the wizard you can use the Command Palette, (as per above), and you enter dep in the textbox:
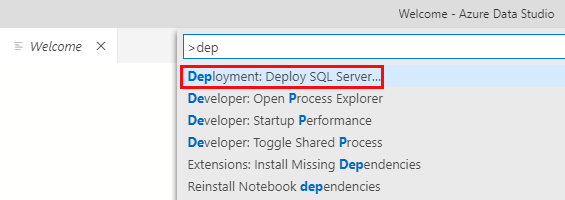
Figure 1: Command Palette Deploy SQL Server
We see in Figure 1 the command palette and how I entered dep in the text box, which then shows available commands. Among the commands we see Deployment: Deploy SQL Server …, (outlined in red).
Before we go any further I want to mention that we do not necessarily need to use the command palette to get to the Deploy … command:
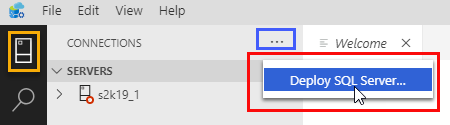
Figure 2: Deploy via Connections
In Figure 2 we see the Deploy SQL Server … command, (outlined in red), as we saw in Figure 1. In this case, we got to the command by:
- Clicking on the first icon from the top, (outlined in yellow), in the activity bar. The activity bar is the leftmost panel in ADS.
- Click on the ellipsis, (outlined in blue), in the CONNECTIONS panel.
So, we get to the Deploy command either through the command palette or the CONNECTIONS panel.
To start the deployment wizard, we click on the Deploy command as we see in Figure 1/Figure 2:
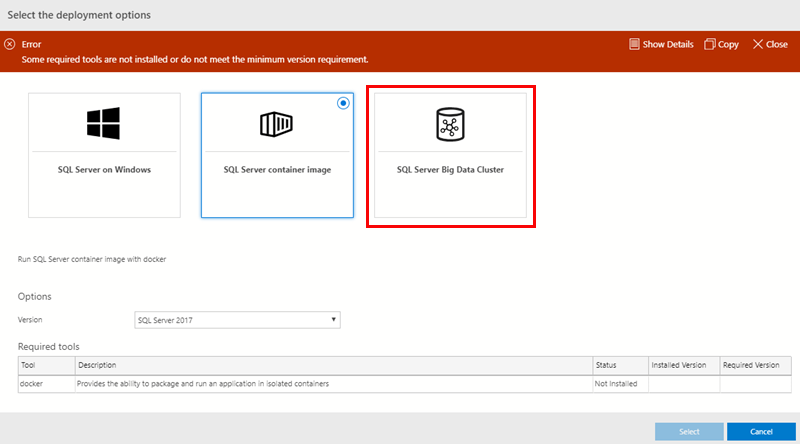
Figure 3: Deployment Options
We see in Figure 3 how the deployment wizard supports different SQL Server deployment options:
- SQL on Windows.
- SQL Container.
- SQL Server Big Data Cluster.
The default deployment option, as we see in Figure 3, is to deploy SQL Server as a container image. We also see that ADS checks whether we have the necessary tools installed for the deployment in question. In this case, I do not have docker installed, so there is an error.
Fortunately, I do not want to deploy a container but the SQL Server Big Data Cluster, so I click on the BDC option, (outlined in red):
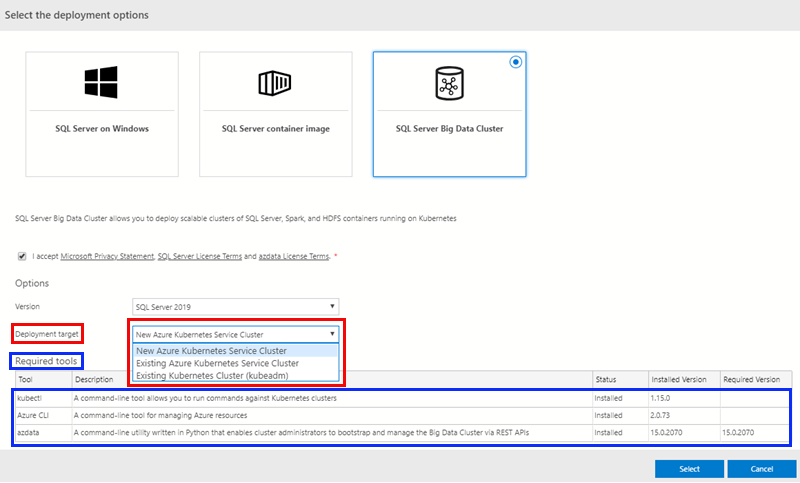
Figure 4: BDC Deployment Options
Clicking the BDC option we see something like in Figure 4: the Select the deployment options dialog. The dialog gives us the options for the BDC deployment:
- Version - at this stage only SQL Server 2019.
- Deployment target - where we want to deploy the BDC to. In Figure 4 we see how I chose to deploy to a new Azure Kubernetes Service cluster.
We also see in Figure 4 how ADS ensure that we have the required tools installed.
When deploying a BDC to AKS, we have to do some configuration before the actual deployment can happen, and the configuration consists of five steps:
- Configuration template / profile.
- Azure settings.
- BDC and Docker settings.
- Service settings.
- Summary of settings.
Configuration Template
After we have chosen the SQL Server version and deployment target in Figure 4, we click Select and we get the dialog for the configuration template:
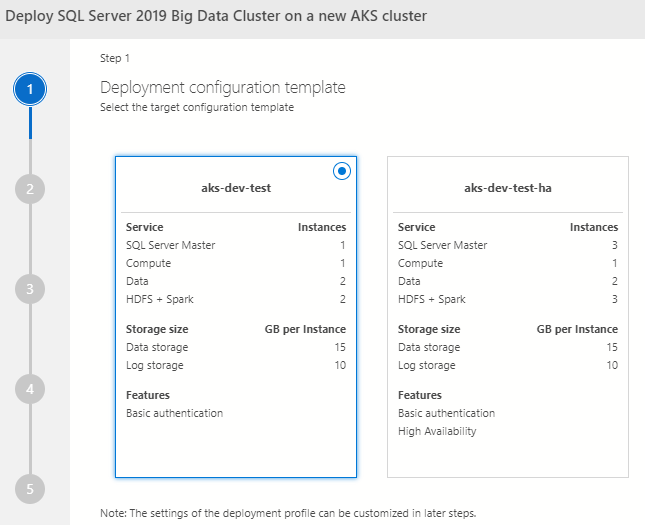
Figure 5: Configuration Template
The dialog we see in Figure 5 allows us to choose a deployment profile. The profile defines things like how many instances we want of the various BDC components, and storage requirements. These settings can be changed later during the deployment process.
I chose the aks-dev-test profile with default values,
Azure Settings
Going on from the configuration template we see:
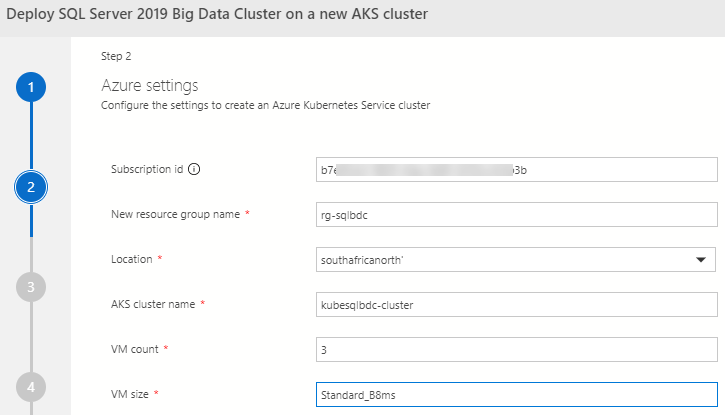
Figure 6: Azure Settings
As we see in Figure 6, we now are at the settings for the Azure Kubernetes Service cluster.
All of the settings are relatively self-explanatory, and if you are unsure about any of the settings, you can refer back to my previous post about deploying a BDC via ADS.
It is worth noting that I have changed the VM size, and VM count from its default of Standard_E4s_v3, and 5 to Standard_B8ms and 3. Reason for this is that having fewer nodes cuts down on install time.
The thing to bear in mind here is that a BDC deployment requires at a minimum around 24 hard disks altogether in your cluster, and each VM has a set number of disks. In my case, each Standard_B8ms VM has 16 disks so I should be good (3 * 16).
Cluster Settings
Moving on from Azure settings:
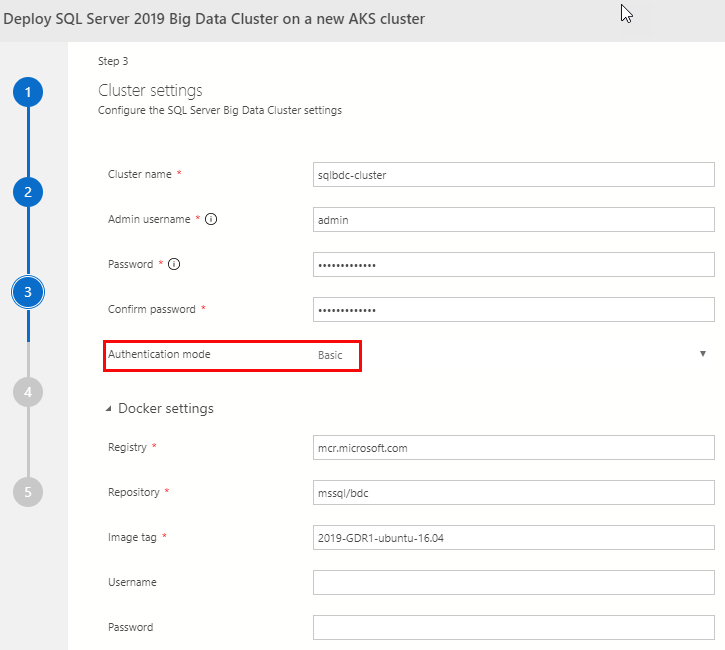
Figure 7: BDC Settings
The dialog we see in Figure 7 is for configuring settings for the SQL Server BDC. As we see, there are two sections:
- Cluster settings.
- Docker settings.
When I set up a BDC, I do not use the default value for cluster name, and as you see in the figure I named the cluster: sqlbdc-cluster. Make sure you remember the password as you need it later.
At the moment, the only authentication mode supported is Basic, so we do not need to do anything there.
For the Docker settings, I go with the default values, and no user-name or password is required.
Service Settings
Having done the cluster settings we are now almost finished, and we get to settings for the various BDC services:
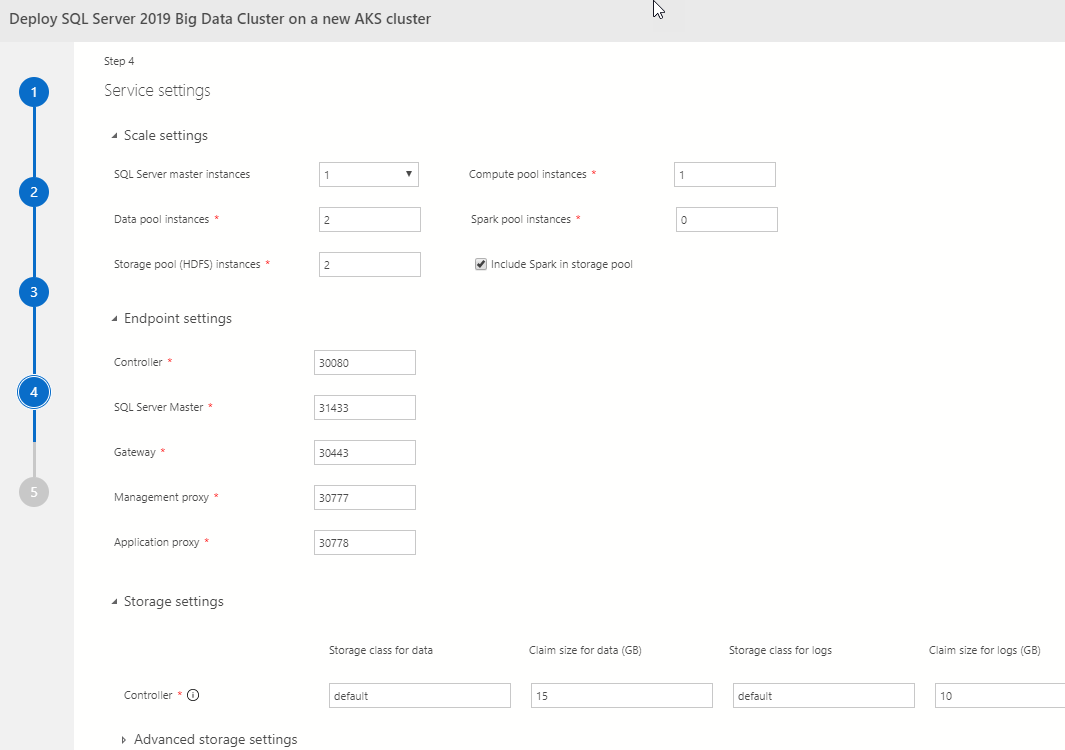
Figure 8: Service Settings
In service settings, as we see in Figure 8, we define how many instances of various services we want, endpoints for services, and also settings for storage.
When I deploy a BDC, I do not change any of these settings.
Settings Summary
We go on from the service settings:
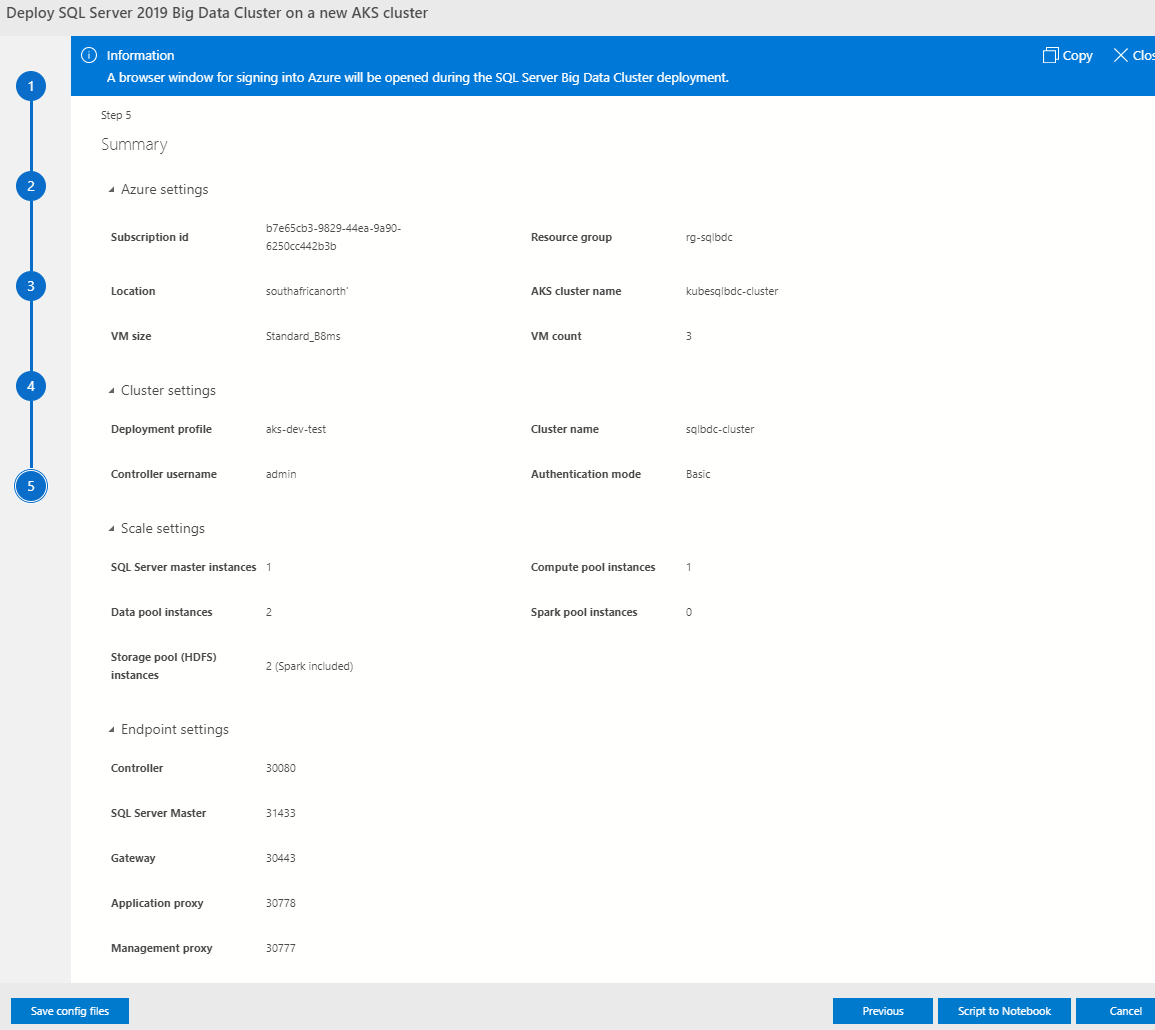
Figure 9: Settings Summary
The last step is not so much of a step where we do things, but - as we see in Figure 9 - it is a summary of the settings we have defined in the previous steps.
In this final step, (before actual deployment), we can:
- Save the settings from previous steps to config files.
- Go back and change settings.
- Cancel out.
- Script the settings to a notebook.
The last option in the list above is what we choose when we deploy.
Deployment Notebook
When we click on Script to Notebook a Notebook opens:
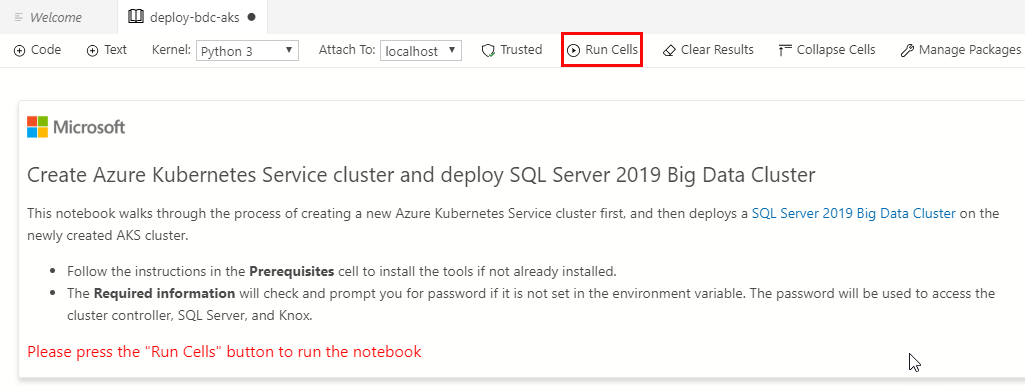
Figure 10: Deploy Notebook
We see in Figure 10 the notebook that has been scripted for us based on the settings we defined in the steps above. Since we said we wanted to deploy to a new Azure Kubernetes Service Cluster, the Notebook creates a new AKS cluster for us together with deploying the BDC.
When you scroll through the notebook, you see the various stages of the deployment and what it does in each stage:
- Check dependencies.
- Required information.
- Azure settings.
- Default settings.
- Login to Azure.
- Set active Azure subscription.
- Create Azure resource group.
- Create AKS cluster.
- Set the new AKS cluster as current context.
- Create a deployment configuration file.
- Create SQL Server 2019 big data cluster.
- Login to SQL Server 2019 big data cluster.
- Show SQL Server 2019 big data cluster endpoints.
- Connect to master SQL Server instance in Azure Data Studio.
An example of the Notebook is below:
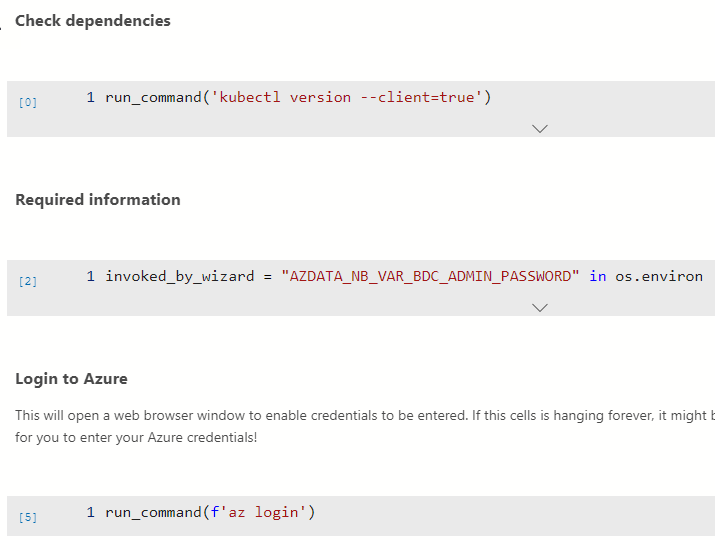
Figure 11: Notebook Cells
In Figure 11 we see some cells with code, and above the cells describing text.
To do the deployment, you can now either run each cell independently by clicking on the cell and hit F5 or click on the Run Cells command at the top of the notebook, (outlined in red in Figure 10). In either case, you see what command the cell executes as well as the outcome:
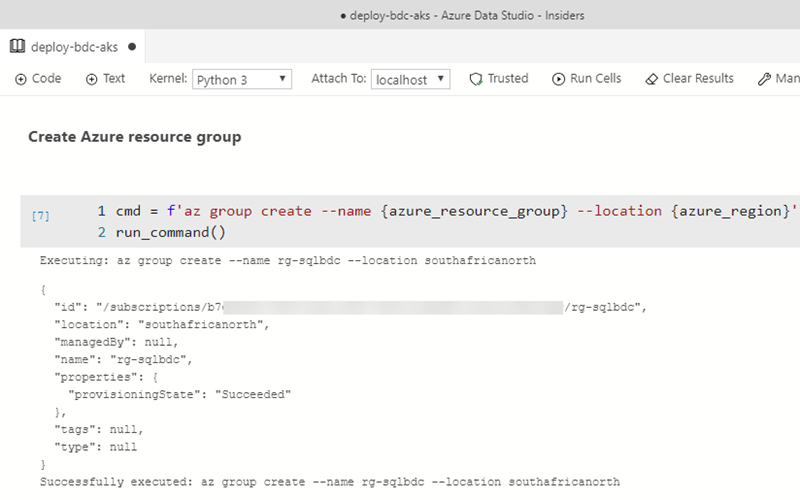
Figure 12: Cell Output
What you see in Figure 12 is the output from creating the Azure resource group.
Be aware that the deployment takes a while, and especially the stage Create SQL Server 2019 big data cluster. Unfortunately, the Notebook does not give you much information where you are in the deployment, but you can use kubectl from the command line to get some feel for where you are in the process:

Figure 13: Get Pods - I
We see in Figure 13 how I have executed kubectl get pods -n sqlbdc-cluster early in the deployment process.
NOTE: For the
-nflag in the command I use the name of the BDC cluster I assigned in step 3, (Cluster Settings), above.
We see that the deployment is busy deploying two pods related to the controller service. If I run the same command a bit later, I see:
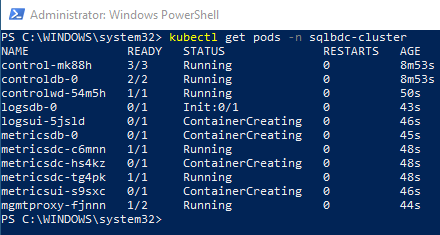
Figure 14: Get Pods - II
Now we see in Figure 14 how more pods are deployed, and some of them also have a state of running, amongst them the control pods. As the control pods have a state of running, the controller service should now be up and running.
Controller Service
The controller service is, as the name implies, what controls the BDC, and it is the controller service which interacts with the Kubernetes cluster. When deploying a BDC, the controller service is always deployed first so it can co-ordinate deployments with the Kubernetes service.
The controller service exposes an endpoint with which we can monitor the BDC. While the deployment is in process we can get to the IP address for the endpoint via a kubectl command:
|
|
Code Snippet 6: Retrieve Endpoints
In Code Snippet 6 we see how I call kubectl get svc with the name of the BDC cluster. The command lists all services in the specified namespace, (the -n flag), together with information about the services. Part of the information is the exposed IP address, (if any), of the service.
When I run the code in Code Snippet 6 I see the following:

Figure 15: Services
We see in Figure 15 the controller service and its external IP address and port, (outlined in red). With this in hand, we can now use ADS to connect to the controller:
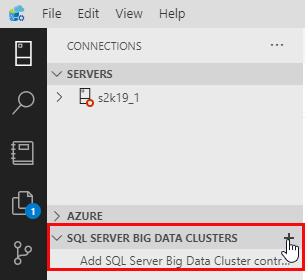
Figure 16: Add Big Data Cluster Controller
To add a BDC controller we expand the SQL SERVER BIG DATA CLUSTERS panel in ADS as we see in Figure 16, and click on the + sign. That gives us a connection dialog:
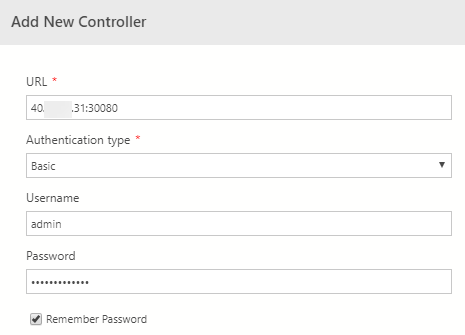
Figure 17: Connect to BDC Controller
In the connection dialog we see in Figure 17 we fill in the IP address and port we retrieved when we executed Code Snippet 6. The user name and password are the ones we defined in Cluster Settings, (Figure 7). We then click Add and the controller appears in the SQL SERVER BIG DATA CLUSTERS panel. Right-clicking on the controller we see:
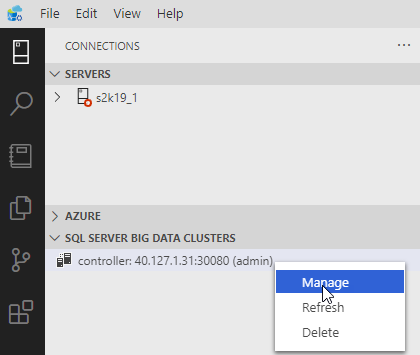
Figure 18: Controller Manage
We see in Figure 18 how we get a menu where we choose Manage:
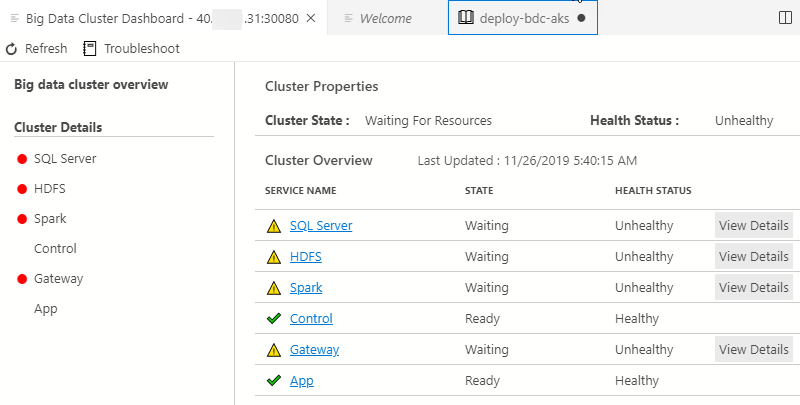
Figure 19: BDC Dashboard
When we click Manage as in Figure 18 we get a BDC dashboard as we see in Figure 19, and the dashboard gives us an overview of the cluster. Since we have not finished deploying yet, we see that quite a few services are in an unhealthy state. By refreshing now and then we see how the services move from unhealthy to healthy.
Deployment Finished
Eventually, the deployment finishes, and we get an output from the cell Create SQL Server 2019 Big Data Cluster:
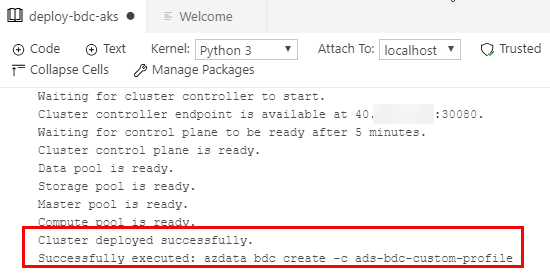
Figure 20: Deployment Finished
In Figure 20 we see the output after a successful deployment. We can now go back to the controller service and see what it reports:
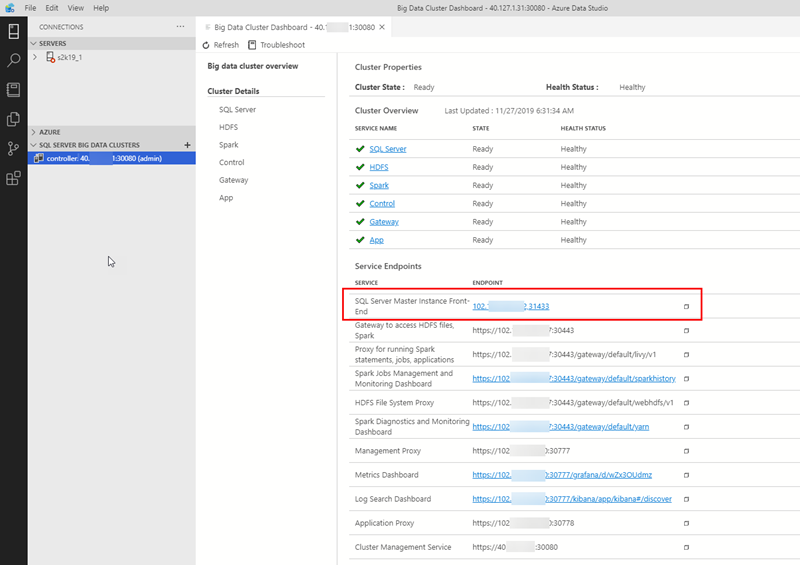
Figure 21: Healthy Cluster
As we see in Figure 21 all services are green, yay! What we also see in Figure 21 are service endpoints. The BDC exposes external endpoints for various services, and those are the ones you see in Figure 21. It is beyond the scope of this post to discuss what all those endpoints are, but the one outlined in red is the endpoint for the SQL Server master instance.
Connect to Cluster
To connect to the SQL Server master instance, we use the endpoint outlined in red in Figure 21. We can either try and connect via clicking on the link for the endpoint or via the New Connection icon in the servers panel:
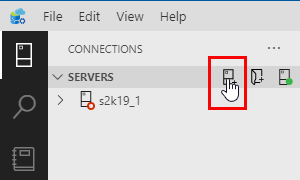
Figure 22: New Connection
Clicking on the New Connection icon as we see in Figure 22 brings up a Connection dialog:
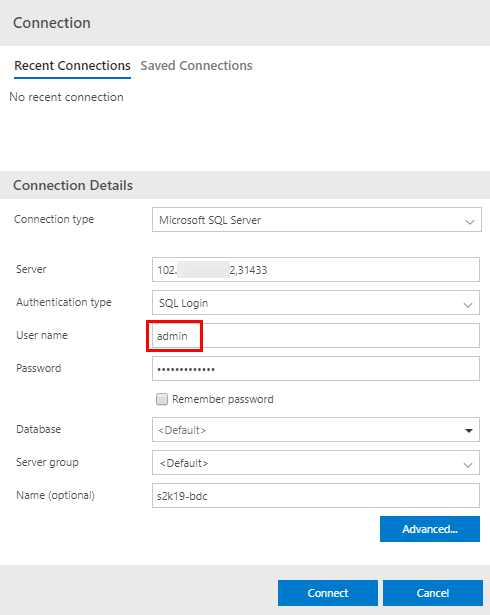
Figure 23: Connect to SQL Server
There are two things to notice in Figure 23:
- The Server IP includes a port number.
- User name is not
sabut the user name we defined in Cluster Settings, (Figure 7).
The reason for the port number is that the default port number for SQL Server: 1433 is used within the BDC, and for external use 31433 is used as default. You can set the port number to something other than the default in the Service Settings step, (Figure 8).
Why we use admin as user name, and not sa - which every SQL DBA/Developer worth his/her salt loves - is that sa is by default disabled.
You would have noticed that if you tried to connect via the endpoint link, as that uses sa as user name. To enable sa we log in as admin, and then run the following code:
|
|
Code Snippet 7: Enable sa
In Code Snippet 7 we see how we set a super-secret password for sa, and then we enable the account.
We now have a fully functional BDC!
Summary
In this post you saw how you can deploy a *SQL Server 2019 Big Data Cluster using Azure Data Studio and notebooks.
~ Finally
If you have comments, questions etc., please comment on this post or ping me.