In this post, we look at how to build Boost.Python and Numpy. We look at it from a perspective where we want to use what we build as part of a bridge between SQL Server 2019 and Python. However, if you are not interested in SQL, the post should still give you some - hopefully - useful information.
Please note that I am a SQL dude, and my knowledge of Boost, Python and Numpy is limited at best. So take this post for what it is; the steps I took to successfully build Boost.Python and Numpy on a Windows box.
Background
In my post, Bring Your Own R & Python Runtimes to SQL Server Extensibility Framework I wrote about how we can use other R and Python runtimes in SQL Server Machine Learning Services than the ones that come “out of the box”. In the post, I wrote that if you want to bring a Python runtime other than version 3.7.x, (like 3.8, 3.9, etc.), you need to build your own bridge; a SQL Server Python language extension.
A language extension is a C++ dll acting as a bridge between SQL Server and an external runtime - in this case Python. To interact between C++ and Python you often use Boost, and for the SQL Server Python extension, Boost libraries are required.
Pre-reqs
What do we need to do this:
- Python: I have Python 3.9.1 installed together with
numpy. - Boost: well, that’s fairly obvious. I downloaded Boost 1.75.0 from Boost Downloads.
- A C++ compiler, (a
toolsetin Boost speak). I use the compiler from Visual Studio 2019 - in Boost it is defined asmsvc-14.2.
Obviously, if you want to use what we do here to build a Python SQL Server Language Extension, you need the source code for the language extensions and SQL Server. That will be covered in a future post.
Now, let’s get on with it.
Boost
Boost is a set of C++ libraries complementing the C++ standard libraries. The Boost libraries provide support for tasks and structures such as linear algebra, pseudorandom number generation, multithreading, image processing, regular expressions, and unit testing.
Boost also allows us to interact between C++ and Python, via Boost.Python. In the Python extension, Boost is used - among other things - to interact with the runtime, execute scripts as well as to interact with numpy.
Most of the Boost libraries are pre-built, however, Boost.Python needs to be built before we can use it. Initially, I thought “how hard can it be to build this”, well - it turned out a lot more complicated than I imagined. This, in my opinion, is due to that the Boost documentation is less than stellar, which is one big reason I wrote this post.
Boost Installation
There is no installation file as such, I just unzipped the file I downloaded above to a location on my box: C:\:
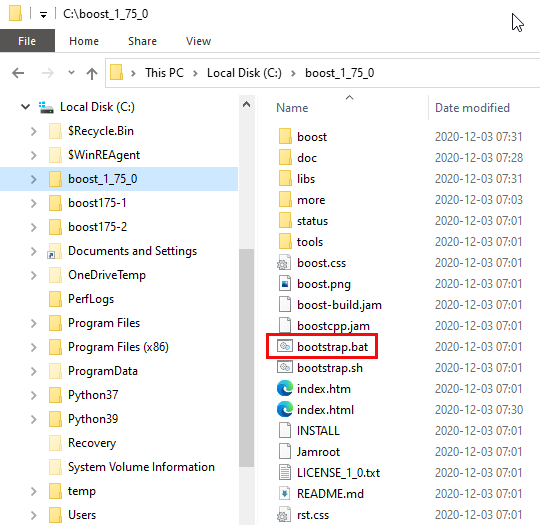
Figure 1: Boost Install
We see in Figure 1 the Boost installation. The question now is what we do with it? We know from above that we somehow have to build Boost.Python, but what do we build with?
Bootstrap
It turns out that you have to bootstrap the Boost build engine, Boost.Build. On Windows, you do that by running the bootstrap.bat file, outlined in red in Figure 1:
|
|
Code Snippet 1: Bootstrap Boost Build Engine
In Code Snippet 1 we see how I from command prompt have cd:ed into the Boost directory. I indicate that I want to use the Visual Studio 2019 toolset by defining the vc142 flag. When I execute the script, some information is output to the console, and when the script has finished, I see:
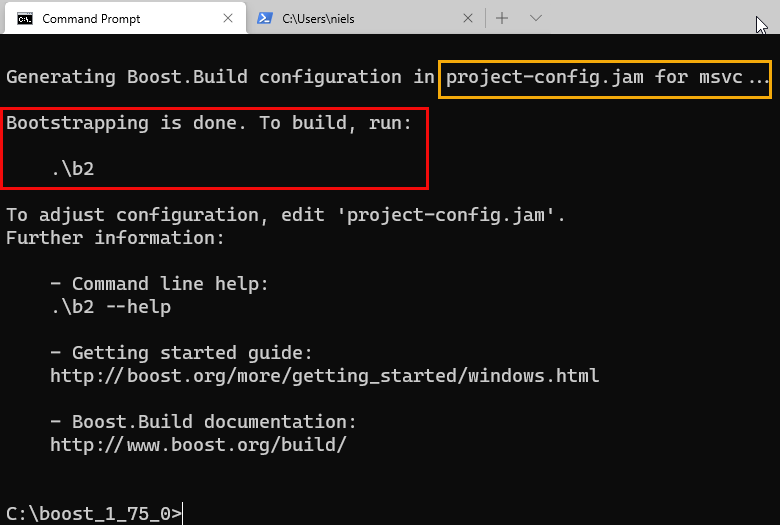
Figure 2: Boost Install
In Figure 2 I have a couple of things outlined in red and yellow:
- What is outlined in red is the command you use to build with Boost:
b2.exe. That is the executable created bybootstrap.bat. - Outlined in yellow is a configuration file. You configure your builds using - among other things - configuration files which are
.jamfiles. This fileproject-config.jamis used for project-specific configuration.
Let’s talk configuration.
Configuration
Above I mentioned the project-config.jam file created when you run the bootstrap script. There are two more configuration files used by b2.exe:
site-config.jam: usually installed and maintained by a system administrator. Not installed by default.user-config.jam: for the user to configure, not installed by default. It usually defines the available compilers and other tools. We’ll create the file to indicate what version of Python to compile against.
Create a file in your home directory and name it user-config.jam. Edit it to look like so:
|
|
Code Snippet 2: Configuration File
We see in Code Snippet 2 how we indicate where to find the Python executable, Python header files, and Python lib files.hr
NOTE: Defining the Python version is not really necessary if you have only one Python version installed.
Now when we have a configuration, it is time to build.
Build
As mentioned above to build, we run b2.exe. If we were to cd into the Boost install directory and just do: b2, then we would build everything - and it would take a while. Here we are only interested in building Python, so we need to limit what b2 does.
After browsing for information around Boost, I started with something like so:
|
|
Code Snippet 3: Build Take 1
Let’s look at the code in Code Snippet 3, and see what it means:
--with-python: limit the build to only build Python. This will also includenumpy.--prefix: where to build to. In Code Snippet 3 I want everything built to be placed in a root directory:c:\\boost175. Notice for the files to be put into this directory, theinstallflag needs to be set.address-model=64: specifies if 32-bit or 64-bit code should be generated by the compiler. In my case I want 64-bit.variant=release: specifies release or debug, or both.link=static: defines whether to createstaticorsharedlibraries. For the Python extension, we wantstatic. Read more aboutstaticvs.sharedhere.threading=multi: threading model.runtime-link=shared: determines if shared or static version of C and C++ runtimes should be used.install: ensures that the built files are put into the--prefixdirectory.
Running the code we see in Code Snippet 3 “spews” out a lot of information to the console, and if something is not working correctly, it can be difficult to see what is going wrong, due to the amount of data being output.
An example of something going wrong was when I initially ran this code on Windows 10; the boost175 directory was created as expected. However, when I drilled down in the directory, I saw only a Python lib file, but no Numpy lib file. I knew there should be both Python and Numpy files, so something was clearly not right.
After tearing my hair out for quite a while, I came across the B2 User Manual, and invocation options. In there, I found two option flags:
--debug-configuration: this flag tellsb2to produce debug information about the loading ofb2and toolset files.-d0: suppresses all informational messages.
|
|
Code Snippet 4: Build Take 2
When I ran the build as in Code Snippet 4 it produced some useful output:
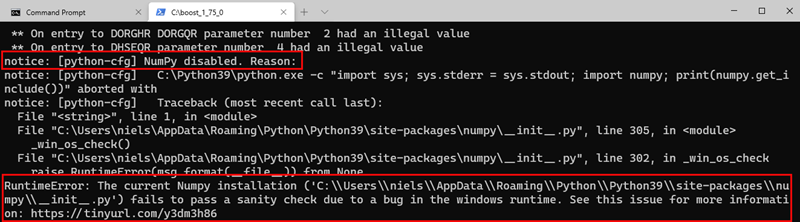
Figure 3: Numpy Error
We see in Figure 3 (outlined in red) a bug in Windows 10 2004/20H2, (from build 19041.488), impacting Numpy. It is fixed from build 20270 and upwards. However, that build is still not generally available, (you can get it from Windows Insiders Dev channel). Microsoft estimates a fix will be rolled out sometimes in January 2021. If you are affected by this and you can not get a Windows 10 Dev build you can solve it by downgrading numpy to version 1.19.3: pip install --upgrade numpy==1.19.3.
NOTE: The link here has more information about the bug.
I have since then upgraded to the latest Windows Dev build and when I run the code, everything works fine:
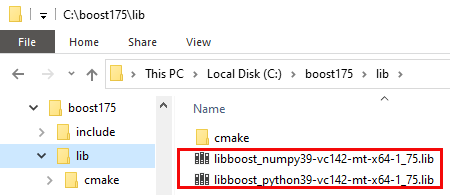
Figure 4: Lib Files
In Figure 4 we see how we have lib files for both Python and Numpy! Success!
When you look at the console output when you do the build you may see something like so:

Figure 5: Boost Address Model & Architecture
Hmm, that does not look right. In the code we definitely said address-model=64, but in the output, it says 32 bit. It turns out this is a bug in the build output, so nothing to worry about.
Summary
We have in this post looked at how to build Boost.Python, and Numpy on a Windows 10 box:
- Ensure we have Python and Numpy installed.
- Download Boost and unzip.
- Ensure you have a C++ compiler installed.
- Run the
bootstrap.batscript, and optionally define the compiler, (toolset). - Execute
b2.exeas per Code Snippet 4 to buildBoost.PythonandNumpy.
You can now start to use the libs created. In a future post we’ll see how to create the SQL Server Python extension, using the files above.
~ Finally
If you have comments, questions etc., please comment on this post or ping me.