NOTE: This post has been updated after it was originally published. I have edited information about the
PYTHONHOMEsystem variable, as well asPATHrequirements.
In my post, Bring Your Own R & Python Runtimes to SQL Server Extensibility Framework I wrote about how we can use other R and Python runtimes in SQL Server Machine Learning Services than the ones that come “out of the box”. In the post, I wrote that if you want to bring a Python runtime other than version 3.7.x, (like 3.8, 3.9, etc.), you need to build your own Python language extension, and we’d look at it in a future post.
NOTE: For R and Java the existing language extension can be used regardless of R/Java version, (at least as far as I know).
When I wrote we’d look at it in a future post I thought to myself; “how hard can it be?”. I had read the steps of how to build a Python language extension for Windows here, and it didn’t seem that hard: some Boost, CMake, compile, and Bob’s your uncle! Well, it turned out it was somewhat more complicated than what I anticipated. So, if you are interested - read on!
Background
As I wrote in the post mentioned above, Microsoft open-sourced R and Python language extensions in September 2020. This allows us to bring our own R/Python runtime to SQL Server 2019, (CU3+), and use those runtimes in SQL Server Machine Learning Services. We may want to do this because we want to use a later version of the runtime, for example.
Language extensions are C++ dll’s acting as a bridge between SQL Server and the external runtime. The language extensions implement the Extensibility Framework API for SQL Server
In the post, we looked at using Python 3.7.9, and what we did was:
- installed Python 3.7.9.
- after installing Python, we installed the
pandasmodule, as it is not installed by default:pip install pandas. - ensured that Python was on the
PATH, - created a system environment variable
PYTHONHOMEpointing to the install directory of Python 3.7.9. The post has been updated since, and thePYTHONHOMEvariable is not necessarily needed. - assigned read and write permissions for the SQL Server instance-specific Launchpad service, and the
ALL APPLICATION PACKAGESgroup to the Python install directory. - downloaded the Python language extension zip file to a location accessible by SQL Server.
We then created an external language from the downloaded zip file:
|
|
Code Snippet 1: Create Python Language
We see in Code Snippet 1 how we:
- create the language in a database named
ExtLangDB. - give the language the name of
p379. We cannot use the name Python, (or R if it is an R extension), as it is a reserved keyword. - point to the path of the zip file.
- indicate what file in the zip file is the extension dll.
To use the newly created language we:
|
|
Code Snippet 2: Version Check Python
The code in Code Snippet 2 outputs the Python version we execute against, and by setting the @language parameter to p379, we ensure we use the language we created in Code Snippet 1. When we run the code, we see 3.7.9 being output.
That’s how we used another runtime than the one coming with SQL Server. However, when we tried to do the same with Python 3.9, we failed, as - as mentioned above - the Python language extension is version bound to Python 3.7.x. So, to use another Python version than 3.7.x, we need to re-build the existing Python extension, and - as I said above- how hard can that be, the code is open-source after all.
Pre-reqs
Let us look at what we need to do this.
In the last post, we downloaded the zip file for the Python language extension, but in this post, we will build from source, so we start with cloning the GitHub repo for SQL Server Language extensions.
When you drill down into the
root for the Python extension, there is a README.md file that explains the steps, (those steps are the ones I referred to in the beginning), and what is needed to build the Python extension. There, (in the root for the Python extension), is also the Python extension source code.
Reading the steps in the README.md file, we see some requirements:
- CMake for Windows
- Boost Python.
- C++ tools for CMake.
In addition to this we obviously need SQL Server and Python.
SQL Server
No changes from
previous post. We need CU3+ with Machine Learning Services and Language Extensions installed. Execution of external scripts needs to be enabled as well. We covered all this in detail in the
last post. In this post, we use the same database as in the last post: ExtLangDB.
Python
Instead of Python 3.7.9, we use Python 3.9.1. When installing Python on the SQL Server machine, make sure you “Install for all users”:
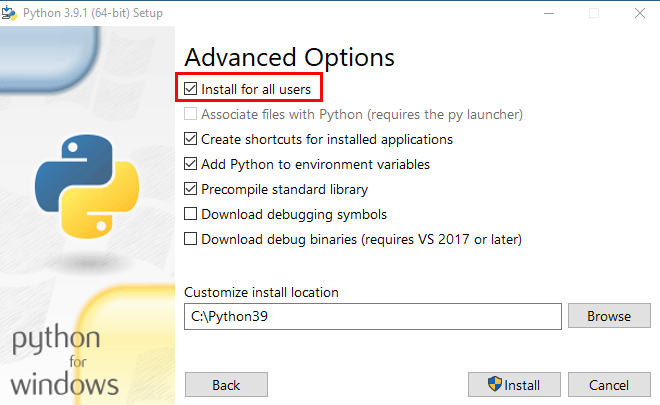
Figure 1: Python Install on the SQL Server Box
In Figure 1 we see how I have checked the “Install for all users” box. On the SQL Server box you also should install pandas: pip install pandas, as we will use that in our testing script. When you install pandas, actually when installing any Python modules, ensure they are installed system-wide, and not for the installing user.
NOTE: Make sure the Python installation on the SQL Server box is on the
PATH.
If you create the Python extension on another machine than where SQL Server is, you do not need to install pandas, but you should at least install numpy, (numpy is part of pandas).
CMake for Windows
CMake is an open-source, cross-platform family of tools designed to build, test and package software. I install it via Chocolatey: choco install cmake -y. Alternatively, you can download CMake from
here.
CMake is used when building the extension, so install it on the box where you will do the build.
C++ Tools for CMake
This is the C++ compiler that CMake will use. In the instructions on the building page, it says you get it from “Build Tools for Visual Studio 2017”. I am using “Build Tools for Visual Studio 2019” instead. As with CMake, this should be on the box where you will do the build.
NOTE: If you use the 2019 compiler you will need to change part of the build script and some of the source code. More about that below.
Whichever version you use, install by following the instructions on the page.
That should be it for pre-reqs, except for Boost.Python.
Boost
Boost is a set of C++ libraries complementing the C++ standard libraries. The Boost libraries provide support for tasks and structures such as linear algebra, pseudorandom number generation, multithreading, image processing, regular expressions, and unit testing.
Boost also allows us to interact between C++ and Python, via Boost.Python. In the Python extension, Boost is used - among other things - to interact with the runtime, execute scripts, as well as to interact with numpy.
Most of the Boost libraries are pre-built, however Boost.Python needs to be built before we can use it. Unfortunately it is not very clear how to build Boost.Python, and that is - I believe - why this became complicated. Or it is because I am stupid - the jury is still out on that one.
Anyway, originally I had planned how to build Boost.Python to be part of this post - but after a while, I realized it deserved a post of its own. So, before you go any further read
Build Boost.Python & Numpy in Windows, to build Boost.Python.
Welcome back!
Directory Layout
When building Boost.Python we tell the build engine we want the files, etc., created by the build to be output to a certain directory. In my
build post, the output directory was C:\boost175. Looking at the content of the directory, we see something like:
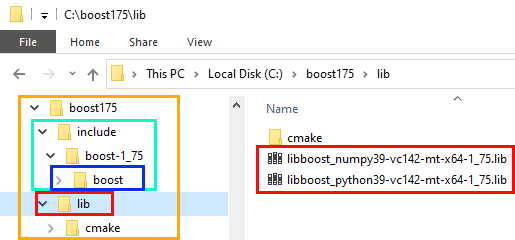
Figure 2: Boost Build Output
Outlined in yellow, (ish), in Figure 2 we see the directory hierarchy created from the build, with boost175 as root. We see a lib directory outlined in red and how that directory contains two lib files. These lib files are needed when building the extension. In green, we have an include directory, and two levels down in the include directory structure is a directory named boost, (outlined in blue).
When building the extension, the build script expects the boost directory to sit directly below the include directory, so before we go any further copy/move boost to underneath include.
System Environment Variables
We are almost ready to build the extension, but before we can build, we need to set some system environment variables, so the build scripts will work.
The Python Language Extension page mentions these variables:
CMAKE_ROOT: pointing at CMake’s install directory. On my box, it isC:\Program Files\CMake.BOOST_ROOT: from my experiments that should point to the Boost output directory mentioned above, (C:\boost175on my box).PYTHONHOME:this is not build related, but a variable that SQL Server uses to find the Python installation.This variable is required on the box where you build the extension. The variable bonds the correct Python version to the extension.
When I first tried building with the variables as above the build scripts threw an error saying it needed an extra variable: BOOST_PYTHON_ROOT. So set BOOST_PYTHON_ROOT to point to the directory containing the two lib files we saw in Figure 2. For me it is C:\boost175\lib, (as in Figure 2).
We should now be set up for getting the show on the road.
Build
As we have a later version of Python than the original extension and a newer compiler we need to do some changes to build scripts and source code.
CMakeLists
The CMakeLists.txt file, located in the root of the src directory contains a set of directives and instructions describing the project’s source files and targets (executable, library, or both).
We want to change the Python version, as well s the names of the lib files. As I build for Windows, I change it in the code-block related to Windows:
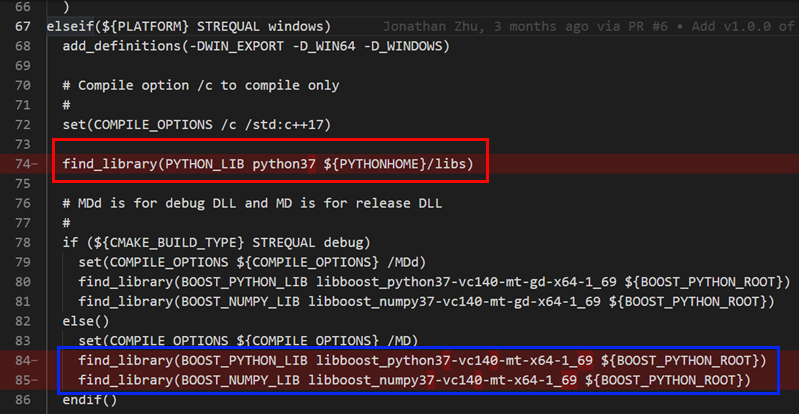
Figure 3: CMakeLists Change From
We see in Figure 3 the code blocks, (outlined in red and blue), we need to change, and we change it to:
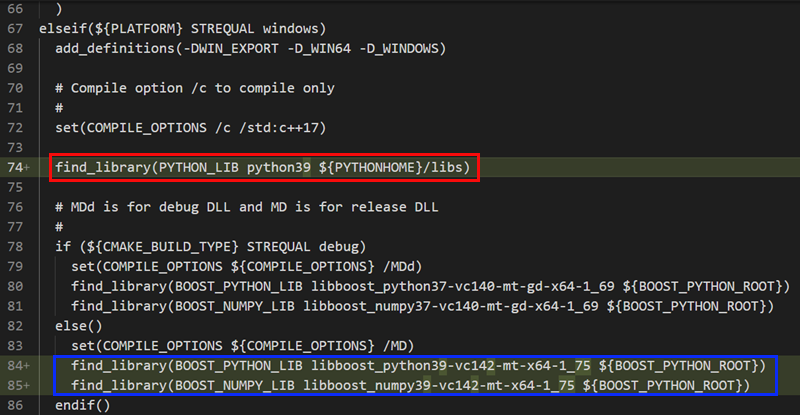
Figure 4: CMakeLists Change To
The two figures above show what we change:
- at line 74 we change the Python version from
python37, topython39. - at lines 84 and 85 we change the Python and Numpy
libfiles to what we built in Boost, (the files we see in Figure 2).
Notice that I only change the code for release build as we have not built debug versions of the lib files. If you build a debug version you should also change lines 80 and 81.
Build Script - build-python-extension.cmd
The build-python-extension.cmd file is the script that kicks off the build. As we are using the VS 2019 compiler, we need to do some changes to this file.
We do the first change at line 88, where we change the path to the VsDevCmd.bat file. For my box I change 2017 in: C:\Program Files (x86)\Microsoft Visual Studio\2017\... to 2019.
We also need to change the call to cmake.exe on line 99 - 107 to:

Figure 5: Change to CALL cmake.exe
We see in Figure 5 what the call to cmake.exe should look like. I have changed the build system generator name -G to point to Visual Studio 2019. Using VS 2019 also requires to define a platform name. Therefore I added the -A option and defined it being 64-bit via x64.
Source Code
When we have done the changes above, we should be ready to go. However, if we were to run the build, we would get some compiler errors. Something along the lines of:
|
|
Code Snippet 3: Compiler Error
What Code Snippet 3 implies is that we need to change the <experimental/filesystem> header to <filesystem>, and the reference std::experimental::filesystem should be changed to std::filesystem. We need to do it for the following source code files:
PythonLibrarySession.h: change<experimental/filesystem>to<filesystem>.PythonExtension.cpp,PythonExtensionUtils_win.cpp,PythonLibrarySession.cpp, andPythonLibrarySession.cpp: change<experimental/filesystem>to<filesystem>andnamespace fs = std::experimental::filesystem;tonamespace fs = std::filesystem;.
NOTE: If we use the VS 2017, (or earlier), compiler we do not need to change this.
Save the changes, and we’re ready to build.
Build
So to build we cd into ..\language-extensions\python\build\windows and:
|
|
Code Snippet 4: Build the Extension
To kick off the build we run the code in Code Snippet 4. The build starts, and we see something like so:
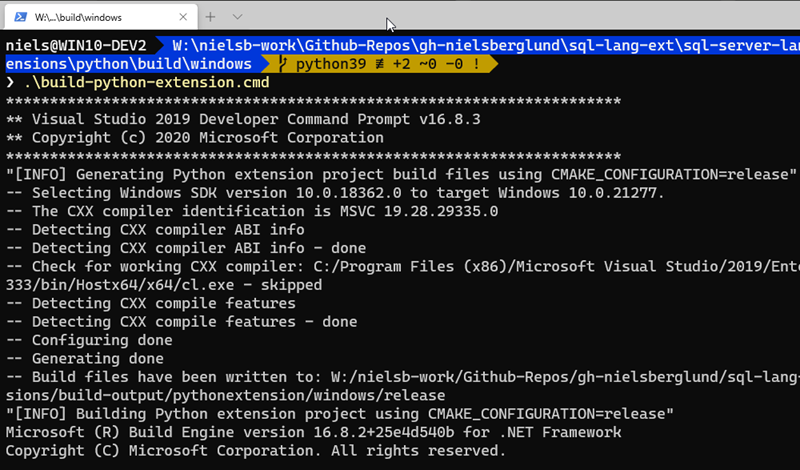
Figure 6: Build Start
We see in Figure 6 how the build process starts and outputs information to the console. We see what SDK is used, what compiler, and whether it is release or debug, plus other “stuff”.
After a while, the build finishes, and we see output like so:

Figure 7: Build Finished
Yay, from what we see in Figure 7 it looks like the build succeeded, and that the extension dll has been copied to a build output directory, (outlined in red).
The final thing to do is to create a zip file out of the extension dll.
We do that by executing create-python-extension-zip.cmd in the same directory as build-python-extension.cmd:
|
|
Code Snippet 5: Create the Extension zip File
When we run the script in Code Snippet 5 the extension dll is compressed into a zip file and placed in ..\build-output\pythonextension\windows\release\packages:
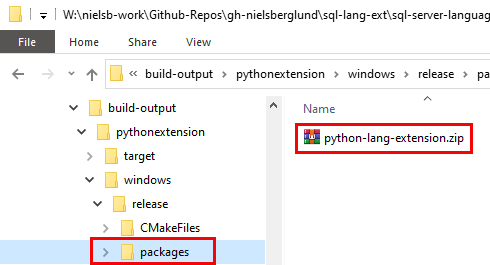
Figure 8: Output Extension dll
As we see in Figure 8 the Python extension dll is now available.
Actually, this last step running create-python-extension-zip.cmd is not entirely required. When you run build-python-extension.cmd an extension dll file is created and it is output to ..\build-output\pythonextension\target\release.
What is left is now to use this Python 3.9 extension dll.
Usage
To make sure our extension works, we do pretty much what we did in the Bring Your Own R & Python Runtimes to SQL Server Extensibility Framework post:
- Copy the
python-lang-extension.zipfile to a location on the SQL Server box accessible to the SQL Server instance. - Make sure the Python installation is on the
PATHon the SQL Server box. - Ensure that the
PYTHONHOMEenvironment variable is set on the SQL Server box and points to to the Python 3.9 installation, (on the SQL Server box). This step is not required unless you want to be able to create external libraries for your language.
Having set the done the above, we have to assign read and execute permissions to the Python location. We assign the permissions to the Launchpad service of the SQL Server, and to the PYTHONHOME environment variableALL APPLICATION PACKAGES group. From an elevated command prompt, we do:
|
|
Code Snippet 6: Setting Permissions
Notice in Code Snippet 6 how I define the instance with $instance_name. If you do this for the default instance the command is without $instance_name, like so: icacls "<python-path> /grant "NT Service\MSSQLLAUNCHPAD":(OI)(CI)RX /T. The ALL APPLICATION PACKAGES is defined by SID S-1-15-2-1.
Let us create the external language in SQL Server:
|
|
Code Snippet 7: Create External Language
After we have run the code in Code Snippet 7 restart the Launchpad service, and then test what we have done:
|
|
Code Snippet 8: Execute against External Language
When executing the code in Code Snippet 8 we get:
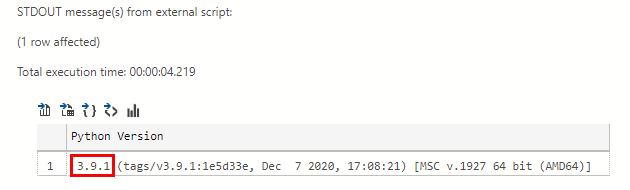
Figure 9: Output Success
Wohoo, as we see in Figure 9, it works! We are now using version 3.9.1 of Python!
NOTE: If you are unsure of what we are doing in Code Snippet 7, and Code Snippet 8, go back to the Bring Your Own R & Python Runtimes to SQL Server Extensibility Framework post, (or the Recap above).
Oh, one last thing. I have mentioned this in the Bring Your Own R & Python Runtimes to SQL Server Extensibility Framework, as well as the Build Boost.Python & Numpy in Windows posts, but it is worth mentioning again:
You may get an error when you execute the code in Code Snippet 8 along the lines of: The current Numpy installation (<path to numpy) fails to pass a sanity check due to a bug in the windows runtime. This is due to, as the error says, a bug in Windows which impacts Numpy version 1.19.4. The bug was introduced in build 19041.488 of Windows 10 2004/20H2. It is fixed from build 20270 and upwards. However, that build is still not generally available, but you can get it from Windows Insiders Dev channel. Microsoft estimates a fix will be rolled out sometimes in January 2021.
If you are affected by this and can not get a Windows 10 Dev build you can solve it by downgrading numpy to version 1.19.3: pip install --upgrade numpy==1.19.3. Personally, I am now running on build 21277, and I am not impacted by the bug.
Here is a link if you are interested in more details about the bug.
Summary
We have now built a Python language extension for Python 3.9. Along the way, we:
- Built
Boost.Python. - Edited the build scripts and source files to handle a new Python version and compiler.
- Built the extension dll.
- Created the external language against the new dll.
- Executed against the new language.
It looks like all is good, but maybe not? In a future post we’ll look at an issue we have introduced - but for now, let us bask in the glory of having created a new Python language extension.
~ Finally
If you have comments, questions etc., please comment on this post or ping me.