A couple of weeks ago, I posted how I set up Kafka to run serverless in Azure by deploying Confluent Cloud.
If you have followed my blog lately, you have probably seen that I am interested in Azure Data Explorer and that I have a couple of conference talks coming. One being:
- How to do Real-Time Analytics Using Apache Kafka and Azure Data Explorer: We are looking at how to stream events from Apache Kafka to Azure Data Explorer (ADX) and perform user-facing analytics in near real-time.
The question is how to connect Kafka with ADX? You normally connect Kafka with another system using a Kafka Connect connector, and fortunately a connector exists for connecting Kafka with ADX: the Kafka Connect Kusto Sink Connector.
However, since I am running managed Kafka (Confluent Cloud, remember), I need a managed connector to run it in Confluent Cloud’s Kafka Connect. In the previous paragraph, I mentioned I was fortunate as we had a Kafka connector for ADX. Unfortunately, it is not a managed connector, so I cannot run it in Confluent Cloud - bummer!
So, this post looks at the various options we have if we want to use the Kafka Connect Kusto Sink Connector connecting Confluent Cloud in Azure with Azure Data Explorer. However, if you are not interested in neither Kafka nor ADX, the post may still be of use for you. The reason being it also covers running Docker images in Azure Container Instances (ACI).
NOTE: Even though this post comes out of me wanting to use the Kafka Connect Kusto Sink Connector, the post is NOT about the usage or the configuration of the connector. That is covered in a future post.
Credits
Usually, the credits “roll” at the end of the movie post, but I feel I should start with the credits as this post would not have happened if it wasn’t for this blog post:
- Running a self-managed Kafka Connect worker for Confluent Cloud. I came across this post by Kafka guru extraordinaire Robin Moffat when I looked into running a self-managed connector when you use Confluent Cloud. His post made me look into what it would take to run the connector in Azure Container Instances (ACI).
As I said, Robin Moffat is a Kafka Guru, and if you are into Kafka, then you MUST read his blog.
Pre-Reqs
This section is here if you want to follow along. I am listing what you need if you’re going to deploy and run a container in ACI; not all required components for Kafka and ADX:
- An Azure account. If you don’t have an Azure subscription, sign up for a free account.
- Azure CLI. The Azure CLI is a cross-platform command-line tool to connect to Azure and execute administrative commands on Azure resources. You find downloads and install instructions here.
- Docker Desktop: We will build a Docker image, so we need Docker Desktop.
- Something to build the image from. The image I build for this post includes the Kusto Sink Connector, which I download from here.
The version (2.0) of the Kusto Sink Connector I downloaded is not the latest you find on the release page, but I could not get the 2.1 version to work.
In addition to the above, I have Confluent Cloud deployed as per my post mentioned in the beginning. As I want to connect Kafka to Azure Data Explorer, I also have Azure Data Explorer installed.
Background
Before we get down into it, let us get an understanding of some of the components in this post:
- Azure Data Explorer
- Confluent Cloud
- Kafka Connect
- Kafka Connect Kusto Sink Connector
Azure Data Explorer
Azure Data Explorer is a fully-managed big data analytics cloud platform and data-exploration service that ingests structured, semi-structured (like JSON) and unstructured data. The service then stores this data and answers analytic ad hoc queries on it with seconds of latency. It is a full-text indexing and retrieval database, including time series analysis capabilities, machine learning, regular expression evaluation, and text parsing.
It is ideal for analyzing large volumes of diverse data from any data source, such as websites, applications, IoT devices, and more. Essentially it is a distributed database running on a cluster of compute nodes in Azure.
Confluent Cloud
In my post setting up Confluent Cloud I said it is a resilient, scalable streaming data service based on Apache Kafka, delivered as a fully managed service. It is Confluent Platform, running as a managed service in the cloud, and you can run it on Azure, AWS, and Google Cloud.
As it is Confluent Platform, you get so much more than just Kafka. You get built-in stream processing through ksqlDB, schema registry for data integrity, managed Kafka Connect connectors for data sources/sinks, and more.
Kafka Connect
Kafka Connect is a tool for streaming data between Apache Kafka and other systems scalable and reliable. The way you move data between systems and Kafka is using connectors, and there are two flavors of connectors:
- Source connectors that understand how to interact with the source system send records into Kafka
- Sink connectors that propagate records from Kafka topics to other systems.
Kafka Connect is a JVM process, and it operates separately from the Kafka Broker. The process loads connectors, and the connectors know how to interact with Kafka and the source/sink systems. The connectors are written in Java and packaged into .jar files.
Kafka Connect Kusto Sink Connector
The Kusto Sink Connector is a Kafka Connect connector. It is - as the name implies - a sink connector, dequeuing events from Kafka topics and ingesting them into Azure Data Explorer. The ingestion is, for now, queued ingestion leveraging the Azure Data Explorer Java SDK, i.e. batch mode.
Since the Kusto connector is not a managed connector, we need to decide where and how to run it.
Options
Robin covered the various options in his post a lot better than I ever could, so I won’t repeat that. Furthermore, seeing that I say in the title of this post Azure Container Instances (ACI), it is probably safe to assume that’s the option we’ll go with. As a picture says more than a thousand words, our solution looks something like so:
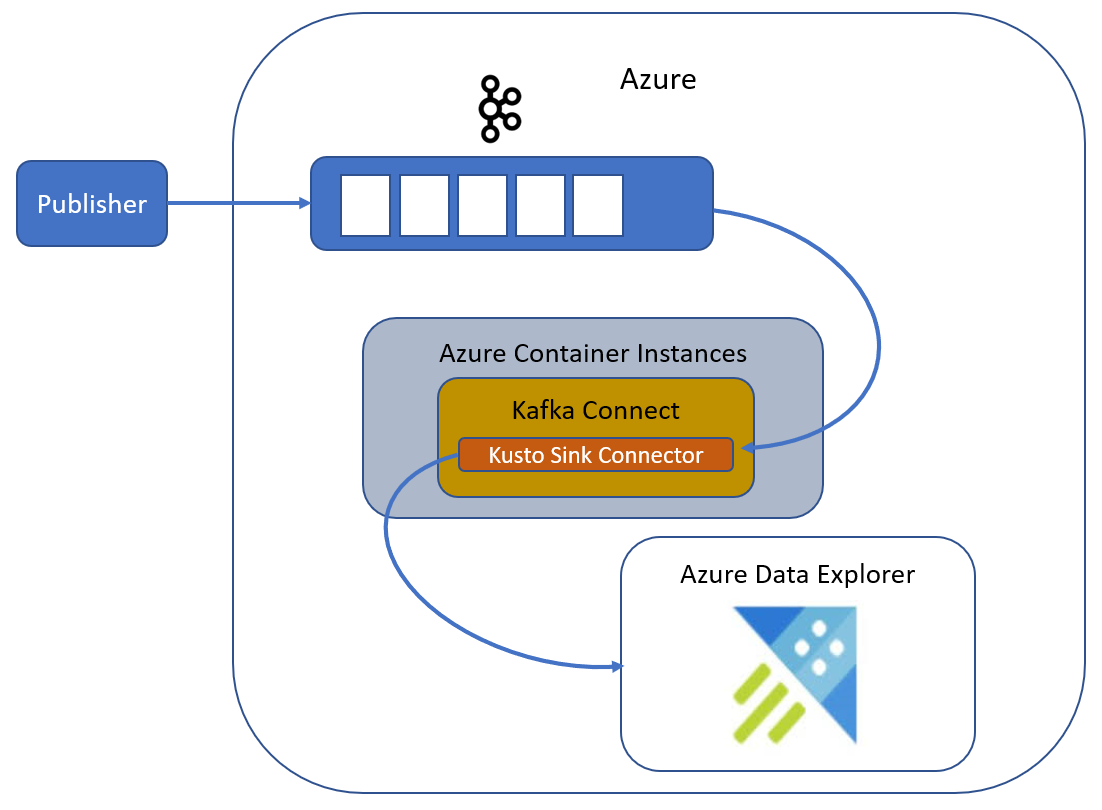
Figure 1: Kafka - ADX Architecture
We see in Figure 1 how we have:
- Kafka in Azure (Confluent Cloud).
- an Azure Container Instances running the Kusto Sink Connector.
- data ingested from the connector into Azure Data Explorer.
Oh, and yes - the data being ingested is published to Kafka from the publisher we see in the upper left-hand corner.
In this post, the term Azure Container Instances has been mentioned a couple of times. What is that, then?
Azure Container Instances
ACI gives you an easy way to run containers in the Azure cloud, eliminating the need to manage virtual machines (VMs) or using more complex container orchestration services, like Kubernetes. For me, just testing this out, ACI is “good enough”.
There are a couple of ways you can deploy and run a container in ACI:
- Utilise the integration between Docker and Azure and execute
docker run. You do this mostly in test scenarios. - Deploy the container image to ACI and run it in ACI.
Even though I said I am using ACI for testing at the beginning of this section, I will not use docker run but instead do a “proper” deployment to ACI.
Create Kusto Sink Connector Image
We start with creating the Dockerfile for the image we want to deploy to ACI:
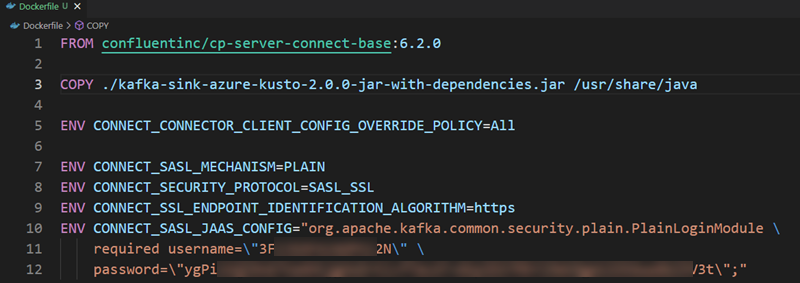
Figure 2: Dockerfile
As we need to run the connector in Kafka Connect, we base the image on the cp-server-connect-base image (the FROM statement). This image contains the bare minimum for Kafka Connect.
In the Pre-Reqs section, I mentioned how I downloaded the Kusto connector. I downloaded it as a zip file and unzipped it to the same directory the Dockerfile is in. In line 3, we see how I copy the connector’s .jar file to /usr/share/java in the base image. That path is a “well known” path to load connectors from.
The ...OVERRIDE_POLICY=All statement on line 5 allows this connector to override consumer and producer properties to not impact all connectors running in that worker.
Lines 7 - 10 in the docker file are core config security settings that need to be set at the Kafka connect worker level and need to be “baked” into the Docker image. These settings are related to authentication and authorization against the Confluent Cloud Kafka.
Build the Image
Having created the Dockerfile, we can build the image:
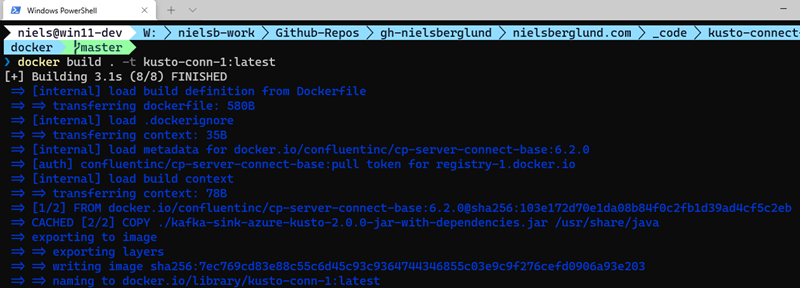
Figure 3: Docker Build
In Figure 3, we see us executing the docker build command and the outcome. When the build has finished, we can check that all looks OK by running docker images:

Figure 4: Kusto Docker Image
Success, we have an image, as we see in Figure 4. Well, at least partial success; we don’t know if it works yet. Let us find out.
Run Locally
To find out if it works, we can run the container image locally using docker-compose. We create a docker-compose.yml file containing the bare minimum for running the connector:
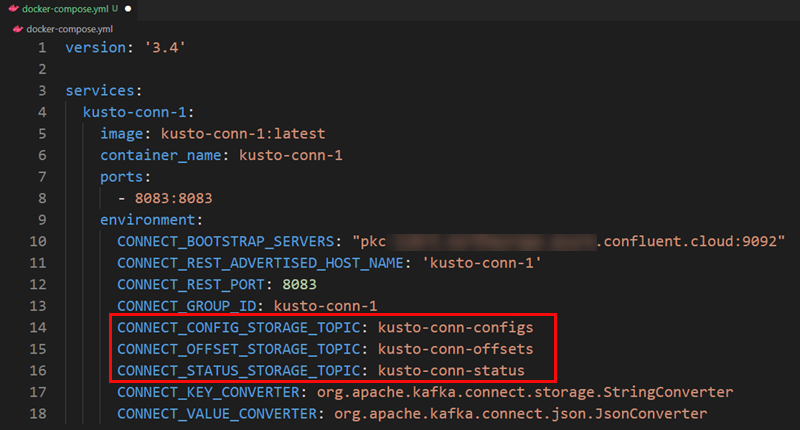
Figure 5: Docker Compose File
We see in Figure 5 the compose file I use to test that my container works. As mentioned before, the file contains the required properties to get this connector up and running. What you see outlined in red are properties naming topics needed to store Kafka offsets, configs and statuses. After we have “spun up” the container, we can check for these topics in our Kafka installation. Let us execute `docker-compose up -d':
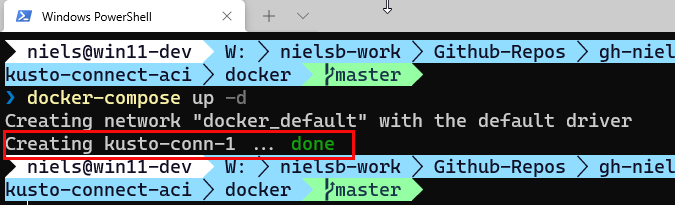
Figure 6: Run Docker Compose
In Figure 6, we see that it looks like everything has worked OK and that we have created a connector instance kusto-conn-1. We can confirm that it has worked by checking the topics mentioned above or execute a REST call against the Kafka Connect API to GET the available connectors:
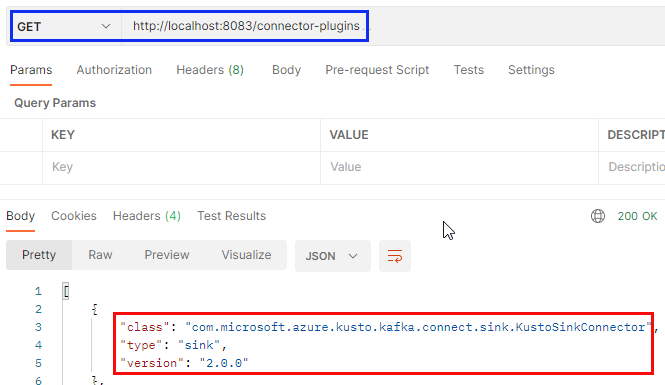
Figure 7: GET Connectors
From what we see in Figure 7 it looks like we are OK. We see, outlined in blue, the GET call on port 8083, and in the result below, we see the connector outlined in red.
Azure Container Instances
When we have confirmed that our image works, it is time to deploy it to ACI. When we run a container in ACI, the container is stored in Azure Container Registry (ACR).
We’ll create a new container registry in a second, but before we do that, let us log in to Azure and set the subscription to use. To log in, we run az login. The command may take a second or two, and a dialog in your browser may ask you for login credentials. When login is done, you will see a JSON blob with information about the subscriptions you have access to. Choose the one you want to use:
|
|
Code Snippet 1: Set Subscription
After we have logged in, we execute the code in Code Snippet 1 to set the subscription we want to use. And no, the subscription Id in Code Snippet 1 is not mine.
We are almost at the stage where we can create the ACR, but we need one more thing before creating the ACR. That one more thing is a resource group. I will use an existing resource group for this post, so I will not create a new one. If you need to create a resource group, you do:
|
|
Code Snippet 2: Create Resource Group
To see what locations are available for the --location parameter in Code Snippet 2, you can execute: az account list-locations.
Right, we now have a resource group. Let us press on.
Create Azure Container Registry
ACR is a private Docker registry service, similar to Dockerhub. As with Dockerhub, you push container images to your container registry.
To create a container registry, we use az acr create ...:
|
|
Code Snippet 3: Create Container Registry
In Code Snippet 3, we see how we create a container registry. The first two parameters define the resource group to create it in: rg-kafka, and the name of the registry: nielsblog1. You may ask what the last two parameters are:
--sku: this parameter defines the service tier:Basic,Standard, orPremium. Read more about service tiers here.--admin-enabled: an admin user account is included when creating a container registry. The account is disabled by default. For testing purposes, you may want to have it enabled, so that is why I have included it in the creation. Read more about the admin account here.
When you execute the code in Code Snippet 3, it will take a little while. When it finishes, you will see a JSON blob with some information about the created registry.
Having created the registry, we can now log in to it: az acr login --name regname. We are almost ready to push our image to the registry, but there are two things we need to do before that.
Login Server
When we push an image to the registry, we need an address to push to; the login server. To retrieve the login server, we do:
|
|
Code Snippet 4: Get Login Server
Most likely, when you execute the code in Code Snippet 4, you get back your-registry-name.azurecr.io, but it is good practice to explicitly retrieve the login server.
Credentials
The second thing we need to do is get the credentials for the admin user we enabled in Code Snippet 3. We use the credentials later when we deploy our container:
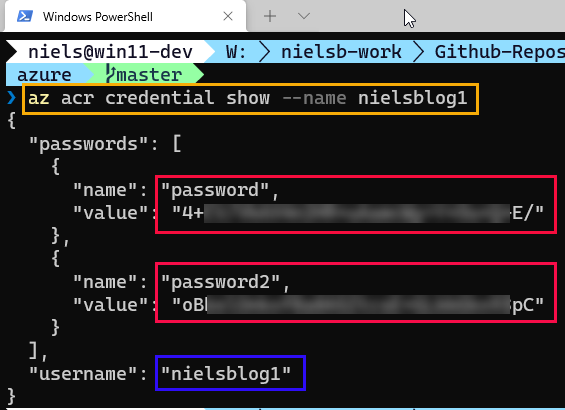
Figure 8: ACR Credentials
In Figure 8, we see outlined in yellow:ish the code to retrieve the credentials. Outlined in red, we see the two passwords. These passwords are created when the admin account is enabled, and they can also be re-generated. Finally, outlined in blue is the user name to use for the admin account.
Push Image to ACR
We are getting there. Now, the time has come to push the image we built in Figure 3 to the ACR. We do it in a two-step process:
Tag the Image
Tag the image with the login server string:

Figure 9: Tag the Image
We see in Figure 9 outlined in:
- Blue: the
docker tagstatement we use. - Yellow: the name of the image we want to tag.
- Red: the “tagged” new name of the image.
Push the Image
Having tagged the image with the login server, we can push it to ACR:
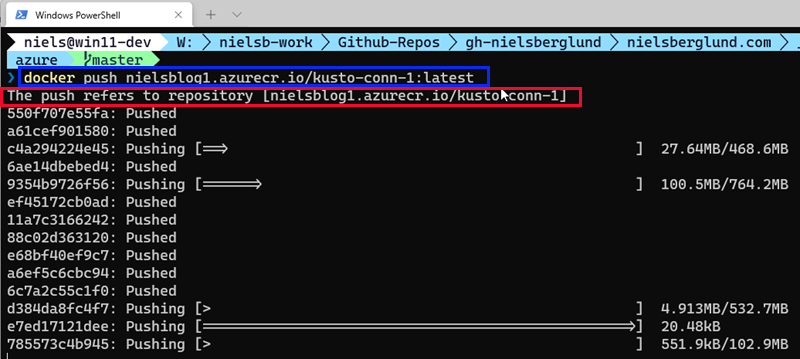
Figure 10: Docker Push to ACR
When you run the code outlined in blue in Figure 10, you see how the image layers are pushed to the registry.
Looking at Figure 10 everything looks OK, but - look at the statement outlined in red. What is this “repository” thing?
It turns out that when we push an image to the ACR, we push it not directly into the ACR. Instead, a repository is created, and we push it into that repository. A repository is a collection of container images or other artefacts in a registry with the same name but different tags.
That explains why we, when looking for images in the ACR we do something like so:
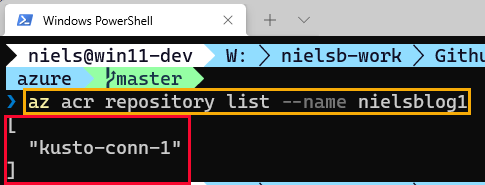
Figure 11: ACR Repository with Image(s)
In Figure 11, we see how we execute az acr repository list ... when looking for images (outlined in yellow) and how the result comes back as an array (outlined in red).
Deploy the Container
It is now time to deploy and run the image in Azure Container Instances. To create the container, we use the az container create ... command:
|
|
Code Snippet 5: Create Container - I
The code in Code Snippet 5 is part of the code we need to run to create the container. The parameters we see are straightforward. The only thing worth mentioning is the --ip-address Public and --ports 8083. We need to indicate that we need a public IP address and that port 8083 should be open.
In the previous paragraph, I mentioned that the code in Code Snippet 5 is only part of what we need to run. So what else do we need? Remember what we did when we tested the container locally, how we had a .yml file (Figure 5), with properties required to run Kafka Connect? We need the same here!
The question is, how do we supply those properties? The answer is that az container create has an --environment-variables parameter. This parameter is a list of environment variables for the container, where the list contains space-separated values in ‘key=value’ format, something like so:
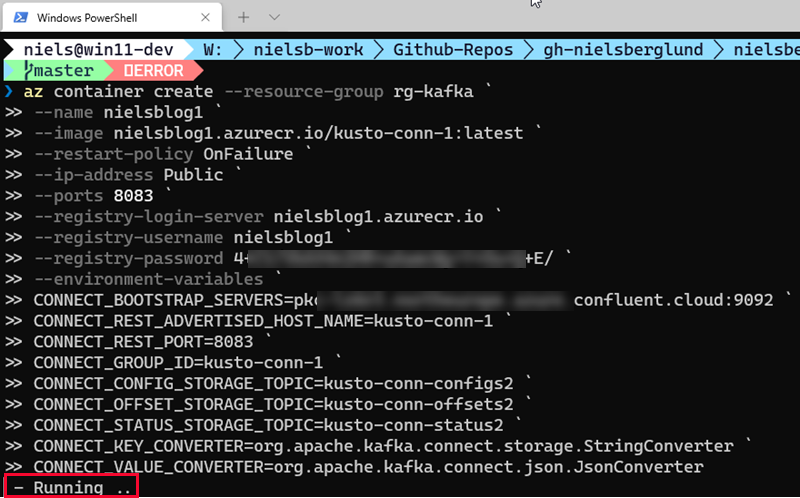
Figure 12: Create Container - II
In Figure 12, we see the entire command, including the required properties for Kafka.
NOTE: Notice how the
--environment-variablesdo not have an quotes around them. That is because I am running from PowerShell. If you run the command from command prompt you need the environment variables be enclosed in single quotes.
The text outlined in red at the bottom of Figure 12 shows that the screenshot is taken while the command executes. While the command is running, you can execute the following to see the state it is in:
|
|
Code Snippet 6: View Container State
Eventually, the creation finishes and results in a JSON blog with some information about the container. Most of the information in the blob is available from az container ... commands:
|
|
Code Snippet 7: Get Logs & IP Address
The code in Code Snippet 7 retrieves log information from the running container and the public IP address. Looking at the logs, everything looks OK, so let us use the IP address we retrieved in Code Snippet 7 and do what we did in Figure 7 (but now against the container in Azure):
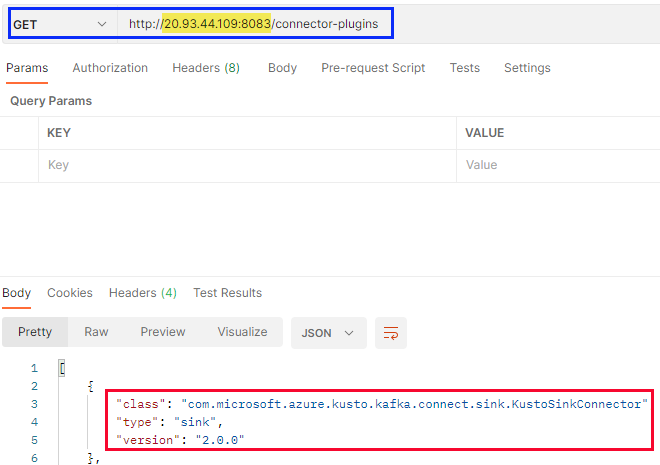
Figure 13: Get Connectors - II
Yay, from what we see in Figure 13 all is OK. We see the Kusto Sink Connector, outlined in red, being part of the returned result from the GET call. And in the GET call outlined in blue, we see we use the Azure IP address (highlighted in yellow). Well, you don’t necessarily know it is the Azure IP, but trust me - it is. Yay, again!
Summary
Wow, that was a lot! In this post, we saw how to:
- Build a docker image for the Kusto Kafka Sink Connector.
- Test it locally.
- Create an Azure Container Registry.
- Push the image to the registry.
- Deploy the image to, and run it in Azure Container Instances.
Look out for a post covering how to configure and use the Kusto Sink Connector.
~ Finally
If you have comments, questions etc., please comment on this post or ping me.