This post originates, like the one about
sqlrutils, from a question on a Microsoft forum - this time the
.NET Framework inside SQL Server forum. As the name implies, the forum cover questions about the usage of SQLCLR (.NET inside SQL Server), and the
question was about signing of SQLCLR assemblies in order to assigning other permission sets than SAFE to the assembly.
As I, back in the day, taught SQLCLR as part of Developmentor’s SQL Server curriculum, I thought that it’d be interesting if I tried to answer the question, and also make a blog-post about it. That way I’d remember what to do the next time the question came up.
NOTE: In another post, I wrote this about Developmentor: Developmentor were back in the day THE training company to go to if you wanted highly, highly technical training about COM, .NET, SQL Server, etc. This article by my old colleague Ted Neward (@tedneward) sums DM up quite accurately (apart from the fact that DM hadn’t closed its doors when the article was written, ooops). Ted was probably more accurate than he at the time thought, since DM went out of business somewhat later.
Anyway, let’s see what this is all about…
SQLCLR
SQLCLR is where the .NET framework is embedded in the SQL engine, and you execute .NET code in the SQL Server process. Since you execute .NET code, you can almost do anything you can in a “normal” .NET application.
NOTE: I wrote “almost” above, as there actually are certain limitations. For this discussion however, the limitations have almost no impact on what we want to do.
The way SQLCLR works is that you compile your code into a dll, and you then register the assembly with SQL Server:
|
|
Code Snippet 1: Creating an Assembly from Absolute Path
The code does the following:
CREATE ASSEMBLY- creates an assembly with a given name (whatever you want it to be).FROM- defines where the original assembly lives. TheFROMstatement can also take an UNC patch or a binary definition of the assembly. The installation files for this project uses the binary representation.WITH PERMISSION_SET- sets the permissions. If you don’t specify the permission set, it defaults toSAFE. More about that below.
Permission Sets
Seeing that your code runs in the same process as the SQL Server engine (scary thought), Microsoft introduced the notion of permission sets to indicate what the code is allowed to do. From Code Snippet 1 you see there are three options:
SAFE- the code is not doing anything that you cannot do in T-SQL. You are confined to do things inside the database you are executing in.EXTERNAL_ACCESS- you can get outside of the local database, but only via “approved” assemblies, such asADO.NET, etc.UNSAFE- You can do pretty much what you want. As I mentioned above, there are certain limitations, but very few.
Let us look at a very simple example of this, where we have code looking like so:
|
|
Code Snippet 2: Code to Use in SQL Server
As you can see, the code in Code Snippet 2 has two public functions, and we are interested in being able to use both from inside SQL Server. The second public function fn_clr_LongRunningAdder emulates that we do something that takes a long time, so we have to use threads. When compiling this code, it compiles into an assembly: SqlClrTest.dll.
To use it from a database in SQL Server we need to create an assembly in SQL Server, as per what we see in Code Snippet 1:
|
|
Code Snippet 3: Create Assembly in SQL Server
When the assembly has been created we can go ahead and create the T-SQL wrapper functions for the two functions we have in the assembly:
|
|
Code Snippet 4: Create T-SQL Wrapper Functions
If you want more information about the CREATE FUNCTION syntax, have a look
here. When the functions are created we can try and start use them, and we’ll begin with dbo.fn_clr_Adder:
NOTE: Before you execute the function you may have to enable SQLCLR in the database:
sp_configure 'clr enabled', 1followed byRECONFIGURE.
|
|
Code Snippet 5: Execute dbo.fn_clr_Adder
When you execute the code, you should get back a result, cool! What happens if you now try to execute the long running adder:
|
|
Code Snippet 6: Execute dbo.fn_clr_LongRunningAdder
Ouch, a very nasty error:
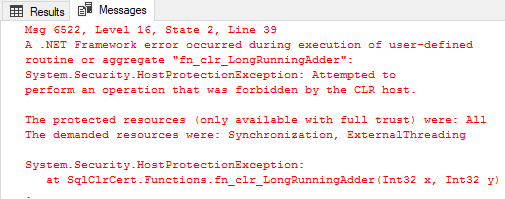
Figure 1: Error from Executing the Procedure
What you see in Figure 1 is SQL Server’s way of telling you that you are about to do something, potentially, stupid - and that this is not supported under default permission settings.
So, if we go back to Code Snippet 1 and look what options we have; maybe using the WITH PERMISSION_SET clause will help. So just to make sure that we start from the beginning, let’s drop the functions and the assembly:
|
|
Code Snippet 6: Dropping Functions and Assembly
NOTE: I am using SQL Server 2016, and its new
DROP ... IF EXISTS ...syntax.
We can now re-create the assembly with UNSAFE permissions:
|
|
Code Snippet 7: Create Assembly in SQL Server with UNSAFE Permission Set
That should do the rick, so try and run it:
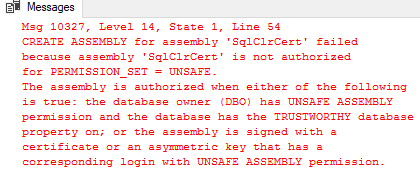
Figure 2: Error from Trying to Create the Assembly
Eish, not good! It looks like we need to do some more things with the assembly in order to be able to create it as UNSAFE.
Assembly Authorization
In Figure 2 we see that the error has something to do with authorization of the assembly: CREATE ASSEMBLY for assembly ‘SqlClrCert’ failed because assembly ‘SqlClrCert’ is not authorized for PERMISSION_SET = UNSAFE. So it is not enough to say what permissions the assembly needs to have, there are certain requirements on the environment as well.
From the error we can see that in order to be authorized either of the following requirements need to be true:
- The database owner (DBO) has
UNSAFE ASSEMBLYpermission and the database has theTRUSTWORTHYdatabase property on. - The assembly is signed with a certificate that has a corresponding login with
UNSAFE ASSEMBLYpermission. - The assembly is signed with an asymmetric key that has a corresponding login with
UNSAFE ASSEMBLYpermission.
Of the three options above, we’ll look at the two first ones (TRUSTWORTHY and certificate). I’ll skip the asymmetric key, as it - in my mind - is too inflexible to use in production.
TRUSTWORTHY
The TRUSTWORTHY setting defines whether SQL Server trusts code in the particular database to access external resources (a bit like: “Trust me, I am a professional!”). The way to set it on is through ALTER DATABASE syntax:
|
|
Code Snippet 8: Set Database to Trustworthy
To see if TRUSTWORTHY will fix the issue for us, run the code in Code Snippet 8, followed by the code in Code Snippet 7. The CREATE ASSEMBLY statement in Code Snippet 7 should now work without any issues. If you want, you can now go on and create the functions as in Code Snippet 4, and then execute the long running function as we do in Code Snippet 6. This should just work now! That was not too hard was it - why even bother doing it any other way?
Well, TRUSTWORTHY is kind of coarse grained, after having set it to ON, all assemblies can now be created with elevated permissions (EXTERNAL_ACCESS or UNSAFE) - in that particular database. If you do not have full control over the database, this can become a security hole.
My personal opinion is that the risks of TRUSTWORTHY are over exaggerated by some experts in the SQL server community, and I have yet to come across anyone that has been “bitten” by using TRUSTWORTHY. Here at
Derivco we are huge proponents of SQLCLR and the majority of our SQLCLR assemblies are UNSAFE, and we use TRUSTWORTHY all the time.
NOTE: In order to create an assembly as
UNSAFE, the user need to be part of sysadmin.
In the case of TRUSTWORTHY it is not the assembly as such being authorized, but the database.
Certificates
The second way to authorize an assembly for EXTERNAL_ACCESS or UNSAFE is by the use of certificates. For this purpose the certificate can be self-signed (preferably a certificate common for your corporation). The steps to authorize using a certificate are:
- Create a certificate, if you don’t already have one.
- Create a
.pfxfile from the certificate. Pfx stands for Personal Information Exchange, and we’ll use it to sign your assembly. - Sign the dll with the
.pfxfile. - In the database create a SQL Server certificate from the original certificate.
- In the database create login from the certificate.
- Grant the login necessary permissions (
UNSAFE ASSEMBLYin our example). - Create the dll in the database.
To do all this above, we use tools from the Windows SDK. On my box, the path to these tools are at: C:\Program Files (x86)\Windows Kits\10\bin\10.0.15063.0\x64.
Let’s start with making a certificate, and for this we use the makecert.exe tool:
|
|
Code Snippet 9: Create a Certificate Using makecert.exe
To see what the various flags used above means, you can run makecert.exe -? and makecert.exe -!. Some explanations:
-r- Create a self signed certificate.-pe- Make the generated private key exportable.-a- The signature’s digest algorithm.-sv- The PVK file to be created.-m- Number of months the certificate will be valid for.
When you run the code in Code Snippet 9, a couple of dialog boxes will “pop up” asking for you to define password for the private key, and then to enter the password for the private key. After execution you should see two newly created files in the directory where you ran the code: a .cer file, and a .pvk file.
Having created the certificate, we now create the .pfx using the pvk2pfx.exe tool:
|
|
Code Snippet 10: Create a .pfx File Using pvk2pfx.exe
The flags should be fairly self explanatory, the two that need some sort of explanation may be:
-pi- The password for the.pvkfile.-po- Password to set for the.pfxfile.
Executing the code in Code Snippet 10 should result in a third file in your directory; a .pfx file.
The last thing to do before doing things inside SQL Server is to sign your assembly. You sign the assembly with the newly created .pfx file, and you use the signtool.exe tool for this. Copy your .pfx file to where your dll is (or vise versa), and then run signtool.exe with the sign command:
|
|
Code Snippet 10: Sign the dll Using signtool.exe
The /p flag defines the password to use for opening the .pfx file.
Having done all this, we can now go to the database and do the final steps. First we need to create a SQL Server certificate from the certificate we created in Code Snippet 9. The certificate should be created in the master database:
|
|
Code Snippet 11: Create a SQL Server Certificate
With a certificate created, we now create a login from the certificate, and also GRANT it the necessary permissions (UNSAFE ASSEMBLY):
|
|
Code Snippet 12: Create a SQL Server Login and Grant Permissions
We are now back to where we were in Code Snippet 7, where we want to create the assembly with UNSAFE permission set. Before you run the code in Code Snippet 7, make sure that the database is set to TRUSTWORTHY OFF, and the run the code.
After successfully created the assembly with the necessary permission set, you can run the code to create the functions (Code Snippet 4), and the execute the long running adder (Code Snippet 6). All of this should work fine! Congratulations, you have now used certificates to deploy an UNSAFE assembly.
This may seem like a lot of work, but after you have done the initial setup: certificate, .pfx, and certificate in the SQL Server instance together with a login - you can now use this for any assembly. The only thing you need to do is to sign the assembly with the .pfx file.
Dependent / Referenced Assemblies
We have seen from the above how we can deploy assemblies to a database with elevated permissions by using either TRUSTWORTHY or certificates. But what about referenced assemblies?
In an earlier
post I wrote about how to send data from SQL Server to RabbitMQ, and in our code we referenced the .NET client for RabbitMQ. When deploying our code to the database, the referenced assembly also need to be deployed - and in all likelihood have the same elevated permissions as our assembly. In that example we used UNSAFE.
If we use TRUSTWORTHY, things will just work fine, as the authorization is on the database level (and that’s how we did it in that post). What if we do not use TRUSTWORTHY, but certificates as above? That will work too - you can sign the referenced dll with the .pfx file and deploy it as you normally would. This also works for strong named assemblies like Microsoft’s!
Summary
So to sum it up:
- To deploy an assembly to SQL Server with elevated permissions, either the assembly or the database need to be authorized for this.
- You can authorize the database by setting
TRUSTWORTHY ON. - Assemblies can be authorized by either using certificates or asymmetric keys. I definitely prefer certificates over the keys.
When it comes to the debate over “how dangerous” TRUSTWORTHY is, I call “BS” on the arguments that TRUSTWORTHY should not be used!
SQL Server 2017
Oh, one last thing: in SQL Server 2017, there are some changes to how things work, and I will make a separate blog-post about that.
~ Finally
If you have comments, questions etc., please comment on this post or ping me.