A little while ago I wrote a
blog-post about the changes in the SQLCLR security model in SQL Server 2017. I wrote about how Microsoft has changed the relation between CAS and security boundaries, and CAS is no longer supported as a boundary! And also how Microsoft introduced an sp_configure option called clr strict security, which by default is set to 1 (on). When the setting is on, SQL Server treats all assemblies (SAFE, EXTERNAL_ACCESS, UNSAFE) as if they were marked UNSAFE.
The release I wrote the post against was CTP 2.1, and earlier this week Microsoft released SQL Server 2017 RC1. Some days ago I received a comment from Paul Vestuto on my post, pointing out that in RC1 there has been some more changes to the security model. I thought those changes would earn their own blog-post, instead of just editing the previous post.
Let’s look back at what the changes were in SQL 2017, to the SQLCLR permissions.
Recap
In SQL Server 2017, Microsoft now by default requires that all type of assemblies (SAFE, EXTERNAL_ACCESS, UNSAFE) are authorized for UNSAFE access, by:
- The database is set to be
TRUSTWORTHY, OR - The assembly is signed with a certificate that has a corresponding login with
UNSAFE ASSEMBLYpermission, OR - The assembly is signed with an asymmetric key that has a corresponding login with
UNSAFE ASSEMBLYpermission.
The implication of the above is that, unless you want to mark your database TRUSTWORTHY, you can no longer “just” deploy a SAFE assembly, it has to be signed!
You may say that: “signing is not that bad - what’s the big deal”. Sure, sign one or two assemblies may not be that bad, but if you have, like us, 50 - 60 assemblies then it can become a chore. Especially since there is no real tooling for this.
So, in SQL Server 2017 RC1, Microsoft has tried to make things somewhat simpler.
Assembly Whitelisting
What Microsoft introduces in SQL Server 2017 RC1, is something I refer to as
whitelisting. It is somewhat similar to the TRUSTWORTHY setting, where you indicate that a database is to be trusted. But instead of doing it on the database level, you do it per assembly.
To whitelist in SQL Server 2017 RC1, you use the system stored procedure sys.sp_add_trusted_assembly. As the name implies the procedure adds an assembly to a list of “trusted” assemblies. By marking an assembly as trusted, SQL Server will allow it to be loaded when clr strict security is on (on by default), even if:
- the assembly is not signed, and
- the database where you want to deploy it to is not
TRUSTWORTHY.
Demo Code
Before we start to look into how this works, let’s look at the demo code we’ll be using. If you read the SQL Server 2017, SQLCLR and Permissions post, the code should look fairly familiar. So, on a SQL Server 2017 RC1 installation, let us first make sure that we are correctly configured:
|
|
Code Snippet 1: Check Configuration
In Code Snippet 1 we ensure that we can see all the various options that exist, and then we enable SQLCLR. Finally we see what values we have for the options and that should result in something like so:

Figure 1: Configuration Settings
From Figure 1 we see that SQLCLR is enabled as well as that clr strict security is on. We can now create the databases we need (yes, databases as in plural - will explain later):
|
|
Code Snippet 2: Create Databases
For now, don’t worry about the DeployDB database, the database that will be the “production” database and to where we want to deploy an assembly is TrustedAsmDB.
With the databases created, the CLR code we will use is some of what we used in the SQL Server 2017, SQLCLR and Permissions post:
|
|
Code Snippet 3: C# Code to Use
After having compiled the code in Code Snippet 3 we can now try and deploy the assembly to our production database (which is not TRUSTWORTHY):
|
|
Code Snippet 4: Create Assembly
When executing the code in Code Snippet 4, you’ll get almost the same error message as we initially saw in SQL Server 2017, SQLCLR and Permissions, when we tried an deploy an assembly without the assembly being signed:
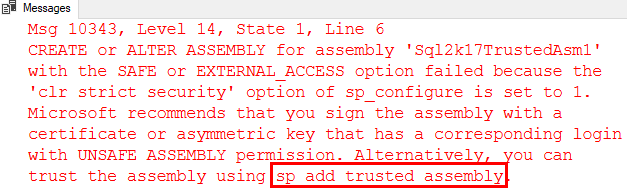
Figure 2: Error Deploying Assembly
The only difference is the last part of the error message: Alternatively, you can trust the assembly using sp_add_trusted_assembly.
sys.sp_add_trusted_assembly
Above we mentioned how sys.sp_add_trusted_assembly adds an assembly to a list of “trusted” assemblies. We also said that by marking an assembly as trusted, SQL Server will allow it to be loaded when clr strict security is on, even though the assembly in question is not signed, and the database where you want to deploy it to is not TRUSTWORTHY.
How do we use sys.sp_add_trusted_assembly? Well, the signature looks like this:
|
|
Code Snippet 5: Signature of sys.sp_add_trusted_assembly
As we see in Code Snippet 5, the procedure takes two parameters:
@hash- this is theSHA2_512hash value of the binary representation of the assembly.@description- an optional description of the assembly. It is recommended that the description is the same as you would see in theclr_namecolumn insys.assemblies.
That seems straightforward enough, grab the binary, hash it and off you go! But wait a second, how do you get the binary representation of the assembly, and how do you hash it?
Well, there are various way you can get the binary representation; write some C# code that reads out the binary value of the dll, is one way - and then when you have it, you can run some C# code to create the hash.
Me, I am a lazy guy, and I am a database developer at heart, so I use the database for this, and this is now where that second database in Code Snippet 2 comes in. The DeployDB which was marked as TRUSTWORTHY.
What I do is:
- Create the assembly in the
TRUSTWORTHYdatabase. - In SQL Server Management Studio’s (SSMS) Object Explorer I script out the assembly as
CREATEto the clipboard, or a new query window:
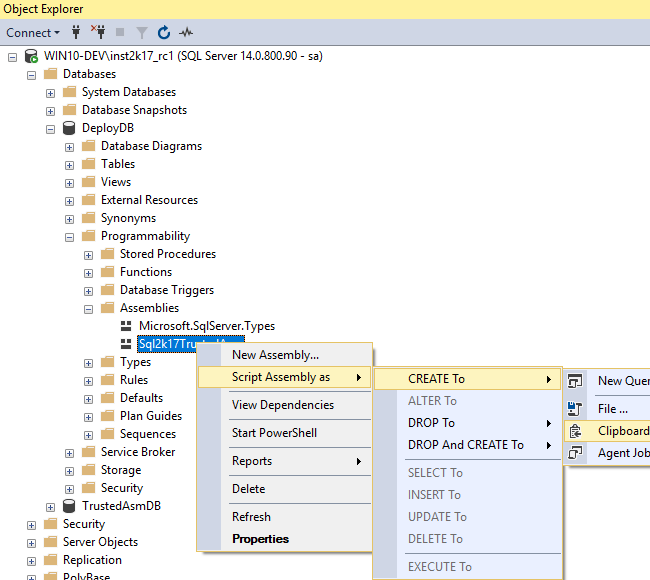
Figure 3: Scripting the Assembly
Scripting the assembly gives you the CREATE statement of the assembly based on the binary representation:
|
|
Code Snippet 6: Create Assembly from Binary
Instead of scripting it out, I could have done a SELECT against the sys.assembly_files table and the content column, but I rather do it using the scripting option. I finally grab the clr_name value from the sys.assemblies table for the assembly:

Figure 4: Clr Name
Equipped with this I can now add the assembly as a trusted assembly. You may ask how do I get the hash value of the assembly? Fortunately SQL Server has a handy function called HASHBYTES which looks like so:
|
|
Code Snippet 7: T-SQL Hashbytes Function
The function takes two parameters as you can see from Code Snippet 7:
'<algorithm>'- That is the hashing algorithm to use. In our case,sys.sp_add_trusted_assemblyrequiresSHA2_512.{@input|'input'}- This is either avarchar,nvarcharorvarbinaryvariable, (@input), or an expression that results in avarchar,nvarcharorvarbinary, ('input'). An example of the latter could be a column in aSELECTstatement.
When using the SHA2_512 algorithm, the return value is 64 bytes, and an example of executing it based on the binary value of our assembly looks like this:
|
|
Code Snippet 8: Usage of HASHBYTES
In Code Snippet 8 above, the @asmBin variable is obviously truncated for readability.
Now, when we have the various pieces of the puzzle we can execute sys.sp_add_trusted_assembly:
|
|
Code Snippet 9: Adding Trusted Assembly
The code in Code Snippet 9 should succeed, and to ensure that is the case you can do: SELECT * FROM sys.trusted_assemblies:

Figure 5: Content of sys.trusted_assemblies
So, everything looks OK. We can now go to the production database where we started this journey and try and deploy the assembly. You can deploy it either using the code in Code Snippet 4, where it is being deployed from a path, or the code in Code Snippet 6, using the binary representation. The CREATE ASSEMBLY should now succeed.
Having created the assembly, let’s create a function against the fn_clr_Adder method, and then execute the function - just to ensure everything is OK:
|
|
Code Snippet 10: Create and Test Function
Running the code in Code Snippet 10 should succeed, and you should get back a result of 42. Just for “fun” you could create a new database, and try and deploy the assembly to that database. That should just work, seeing that sys.sp_add_trusted_assembly marks the assembly as trusted on the server instance.
Permission Sets
When we created the assembly from the code above, it was created with the default permission set SAFE. When you look at the C# code you see how there is a method - fn_clr_LongRunningAdder - which internally uses a Task. Using a Task is not considered SAFE in any shape or form, so what happens if you create a T-SQL function against that method and then try to execute:
|
|
Code Snippet 11: Create and Execute an Unsafe Function
Ouch, the creation of the function succeeded, but when you executed the function you received an error that we also saw in the
SQL Server 2017, SQLCLR and Permissions post. The error says something about not having necessary permissions to do the operation. This normally happens if the assembly has not been assigned the correct PERMISSION_SET when it was created.
So, if you drop the functions and the assembly, and recreate the assembly with PERMISSION_SET = UNSAFE, then when you have recreated the functions, all should work.
The slightly interesting thing with this is that even when you mark an assembly as trusted, it still has to be created with the correct permission set.
Dropping a Trusted Assembly
As with most database objects, if you can create them - then you can also DROP them. The question is if you have a trusted assembly, which you have deployed to the database and subsequently created functions etc., against - if you DROP the trusted assembly, what effect, if any, will it have on the existing assemblies in the various databases on the server? Let’s find out.
To drop a trusted assembly you use the proc sys.sp_drop_trusted_assembly. The proc takes one parameter, the hash value of the trusted assembly, and in our example the code would look like so:
|
|
Code Snippet 12: Drop Trusted Assembly
Executing the code in Code Snippet 12 works just fine, and when you look in sys.trusted_assemblies afterward, your trusted assembly is gone. However, if you check in sys.assemblies in the database where you deployed the actual assembly to, the assembly still exists. Isn’t this now a big security hole? What happens when we execute one of our functions now, SELECT dbo.fn_clr_Adder(21, 21):
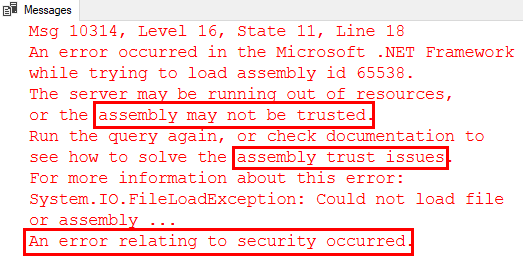
Figure 6: Assembly Not Trusted
Based on the error message we get, it definitely seems like SQL Server checks whether the assembly is either signed or trusted during execution. So, no security hole.
Summary
In the
SQL Server 2017, SQLCLR and Permissions post I summarized the new SQL Server 2017 SQLCLR security requirements with: All type of assemblies (SAFE, EXTERNAL_ACCESS, UNSAFE) have to be authorized for UNSAFE access.
With the release of SQL Server 2017 RC1 there is another option and that is, that the assembly is marked as trusted. You mark an assembly as trusted by the stored procedure sys.sp_add_trusted_assembly.
The security choices you now have for an assembly in SQL Server 2017 are:
- The database is set to be
TRUSTWORTHY, OR - The assembly is signed with a certificate that has a corresponding login with
UNSAFE ASSEMBLYpermission, OR - The assembly is signed with an asymmetric key that has a corresponding login with
UNSAFE ASSEMBLYpermission, OR - The assembly is marked as trustworthy by the
sys.sp_add_trusted_assemblyprocedure.
Marking an assembly as trusted does not mean that you can do whatever you want in the assembly, you still need to deploy the assembly with the correct permission set based on your operations in the assembly.
I’m finishing this summary with the same caveat as I had in the SQL Server 2017, SQLCLR and Permissions post: Bear in mind that all the above are based on SQL Server 2017 RC1. Things may change up until release.
~ Finally
If you have comments, questions etc., please comment on this post or ping me.