As many of you know, I am an un-ashamed .NET developer on the Windows platform. Seeing that I do a lot of SQL Server development my development and OS platforms of choice is sufficient for my work, as I on my development box (Windows of course) install SQL Server Developer edition and whatever .NET framework I use.
That has been sufficient up until now when I want to develop against Kafka. At
Derivco we are getting more and more interested in Kafka, and obviously, I want to install it so I can play around investigate it. However, to install it on my development machine as I would typically do with technologies I am interested in, SQL Server, RabbitMQ, etc., is difficult, if not impossible.
NOTE: Yes I know, there are articles on the web discussing how to run Kafka on Windows, but it is a hit and miss whether it works.
A while ago I wrote a post about how to run Kafka under Windows Subsystem for Linux (WSL), and yes it works, but I have had issues with it, and to me, it is still a hack. So the options then (if we rule out WSL) are:
- Running it on a Linux in a virtualized environment, (Virtual Box, VMWare, Hyper-V, etc.).
- Docker.
The rest of this post goes through how to set up the Confluent Platform in a Docker environment and use it from .NET.
Pre-reqs
The assumption is that you use a Windows box as your development machine, and you want to run Kafka on your box. Based on that assumption, these are the pre-reqs:
- Docker Desktop for Windows. The install instructions and download link are here.
- .NET Framework or .NET Core.
- Your IDE of choice. I kind of like VS Code.
As I in this post use Confluent Platform, (more about that below), I need to allocate at least 8Gb of memory to Docker.
Confluent Platform
I mentioned above how in this post we install and use Confluent Platform. Some of you may ask why I use the enterprise edition, (which Confluent Platform is), which you need a license for and not the Community Edition which is open source and license free.
There are two reasons really for this:
- With Confluent Platform I get ALL the goodies, including Control Center.
- With the introduction of Confluent Platform 5.2. Confluent announced that Confluent Platform is “free forever” on a single Kafka broker! In other words, it is like a “Developer Edition” of Confluent Platform. That to me, is excellent, as I can now build awesome streaming and event-driven applications on Apache Kafka using the powerful capabilities of Confluent Platform.
NOTE: I confess; I “lifted” parts of the last bullet point from the previously mentioned announcement.
Install Confluent Platform Using Docker
It is time to install the Docker images we need for Confluent Platform. All the images for the individual components of Confluent Platform are on Docker Hub, and we could get them from there. However, if we did that, then we would need to “compose” them together, and I am way too lazy for that.
NOTE: Docker Hub is a cloud-based repository for container images, to which organizations upload their container images.
Instead of us grabbing the individual containers, we use a Docker Compose file that Confluent have been kind enough to create. For those of you who don’t know what Docker Compose is, you can read more about it here.
We get the file by:
- Cloning the
Confluent Platform Docker Images GitHub Repository. That gives us a directory
cp-docker-images. cdinto the directory and check out the branch5.2.1-post:git checkout 5.2.1-post.
After the check out the cp-docker-images directory looks like so:
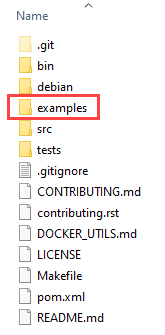
Figure 1: Directory Structure After Checkout
Notice in Figure 1 how we have a directory named examples. Underneath this directory are directories for different examples, (who’d “thunk”), of Kafka setups. We are interested in an example, (and directory), named cp-all-in-one:
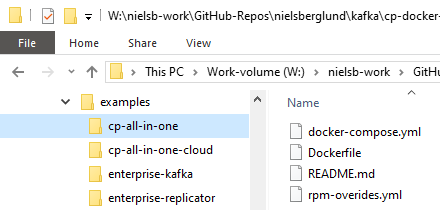
Figure 2: Example Directory
When we navigate to the cp-all-in-one we see something like what we see in Figure 2. Among the files in the directory, there is a docker-compose.yml file, which includes all of the Confluent Platform components. After opening the docker-compose.yml file in a text editor, we see what components make up the Confluent Platform:
- Zookeeper.
- Kafka broker.
- Schema registry.
- Kafka connect.
- Control center.
- KSQL server.
- KSQL CLI.
- KSQL datagen.
- Rest proxy.
When we look at the list above, there is one component that we should not use in production: the ksql-datagen component. It is included for development and test purposes, and we can use it to generate data loads, and you can read more about it
here.
NOTE: This post does not cover in any greater detail the various components. Stay tuned for future posts for that.
While we look at the docker-compose.yml file, let us look a bit closer at the broker section, which describes the Kafka broker:
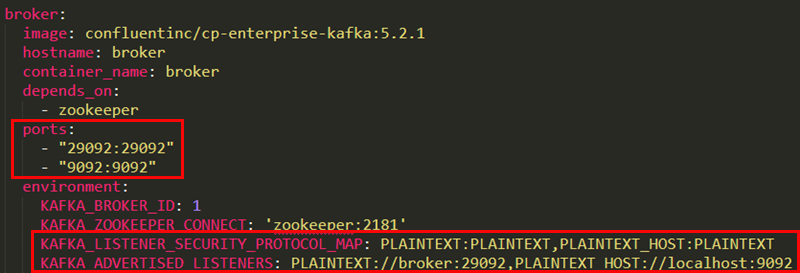
Figure 3: Kafka Broker
In Figure 3 we see two areas outlined in red, and those two areas have to do with what ports the Kafka broker listens on. In a non-Docker Kafka installation, the port Kafka exposes is typically 9092, and clients, as well as internal components, can connect without any issues. However, in a Docker environment, things are somewhat different, as you have both a Docker internal network, as well as an external network (host machine to Docker containers, for example). That’s why we define two ports, (29092 and 9092), and set up two listeners. The broker:29092 is for the internal Docker network, and the localhost:9092 is for external connections.
NOTE: Robin Moffat, who is a Kafka guru, has written a blog post about port addresses and listeners: Kafka Listeners - Explained. If you are interested in Kafka, you should read that post, and whatever else Robin publishes. He knows his stuff!
A final word before we install the Docker containers; please do not forget to increase memory for Docker to at least 8Gb:
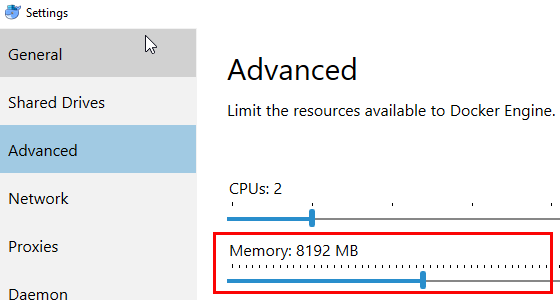
Figure 4: Docker Memory
In Figure 4 we see how we have increased the memory for Docker to 8192MB. After you do this, you need to restart Docker.
We are now ready for installation so cd into the cp-all-in-one directory. In there, from the command line, execute:
|
|
Code Snippet 1: Execute Docker Command
The code in Code Snippet 1:
- Pulls the different images for the Confluent Platform (if they are not on the machine already).
-
- The
--buildflag builds the Kafka Connect image together with thedatagenconnector.
- The
- Creates the containers and starts up the Confluent Platform.
When you execute the command in Code Snippet 1, you see something like so:

Figure 5: Pull Images
Unless the images for Confluent Platform exists on the machine, the docker-compose command starts to pull them from the registry, and in Figure 5 we see how we initially pull ZooKeeper. Eventually, all images have been pulled and the containers created.

Figure 6: Create Images
As we see in Figure 6 we have now created the containers for Confluent Platform, and everything should be up and running. Let us first ensure that that is the case (containers running). We use the docker-compose ps command, which lists containers related to images declared in the docker-compose.yml file:
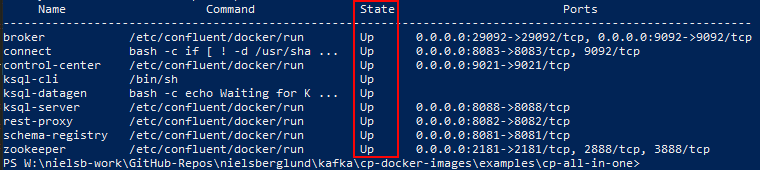
Figure 7: Container Status
From what we see in Figure 7 all containers have a State of Up, so everything should be good. That we see that the State is Up do not necessarily indicate that the individual components are up and running, (they most likely are), so to be on the safe side we can check that the Kafka broker is up.
We can confirm this in various ways, and here we use the command line and have a look at logs. For this, we use the docker logs command, which shows information logged by a running container: docker logs <container_name>. So the question is then what the container_name is for the Kafka broker? Well, if we look in the docker-compose.yml file, we see that for the Kafka broker we have a container-name of broker, and as we see in Figure 6 we have a corresponding broker container. With this in mind, the logs command looks like so:
|
|
Code Snippet 2: View Logs
I use PowerShell for this, and I also do a grep like selection by the Select-String command-let, which we see in Code Snippet 2. The reason for this is to filter out what the logs command returns. When I run it, I see:

Figure 8: Kafka Broker Started
Cool, from what we see in Figure 8 it looks like the Kafka broker is up and running! Now if we want to, we can go ahead and create topics etc. Once again, there are various ways we can do this. One way is to do it from the command line; we spin up the bash shell in the Kafka broker container and use: kafka-topics --create .... However, since I said one big reason for me to use Confluent Platform is Control Center, let us create topics via Control Center.
Control Center
Control Center is a web UI for managing and monitoring Kafka. It does a lot more though than just managing/monitoring the Kafka broker. With Control Center you can manage and monitor:
- Data Streams
- System Health
- Configuration of Kafka Connect
- and more …
In a Docker installation, you find where to load the UI from by looking at the Ports column for control-center after you run docker-compose ps. In Figure 6 we see control-center exposed by port 9021. So let us, in our favourite browser, browse to: localhost:9021:
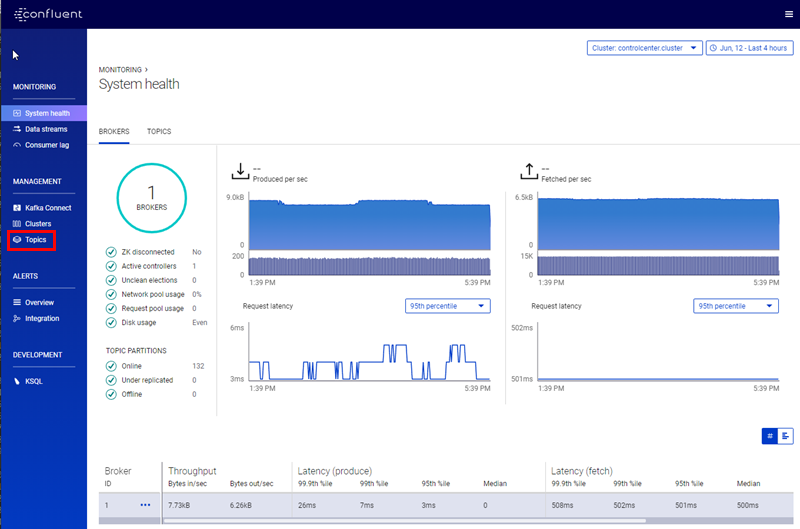
Figure 9: Control Center
In Figure 9 we see the user interface for Control Center. We see charts showing information about our data pipelines, and on the left a menu where we can choose between different functions of Control Center. For now, as we want to create a topic, what we are interested in, is the Topics menu, outlined in red. We click on it, and we see a screen like so:
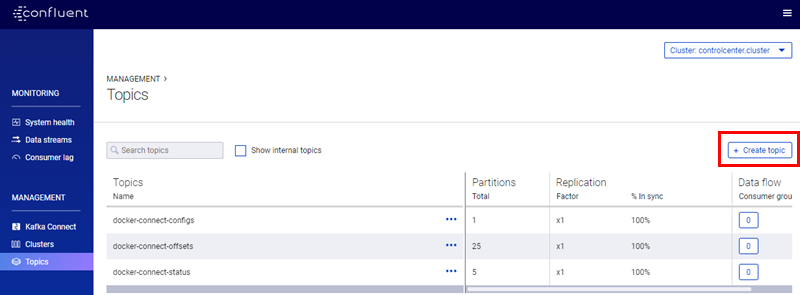
Figure 10: Control Center Topics
We see in Figure 10 the Topics screen, and some pre-configured topics (this is a new Kafka installation). To create a topic we click on the + Create topic button, (outlined in red), on the right-hand side of the screen:
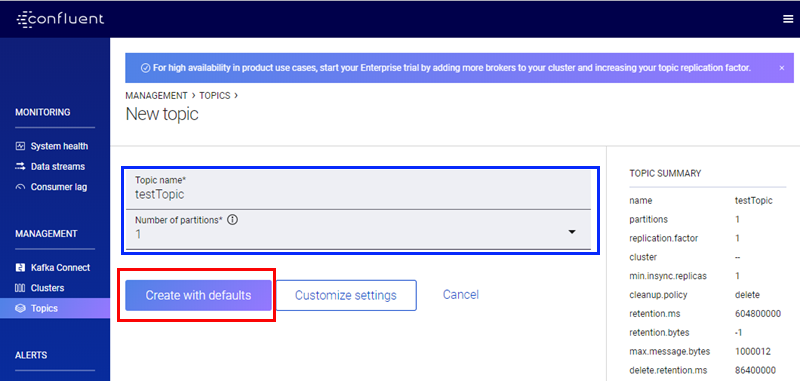
Figure 11: Control Center New Topic
In Figure 11 we see the New topic screen, and we see - outlined in blue - the area where we define the topic name and how many partitions we want for the topic. I am about to create a new topic: testTopic with default settings and a partition count of 1. I then click on the Create with defaults button, (outlined in red), and I go back to the Topics screen:
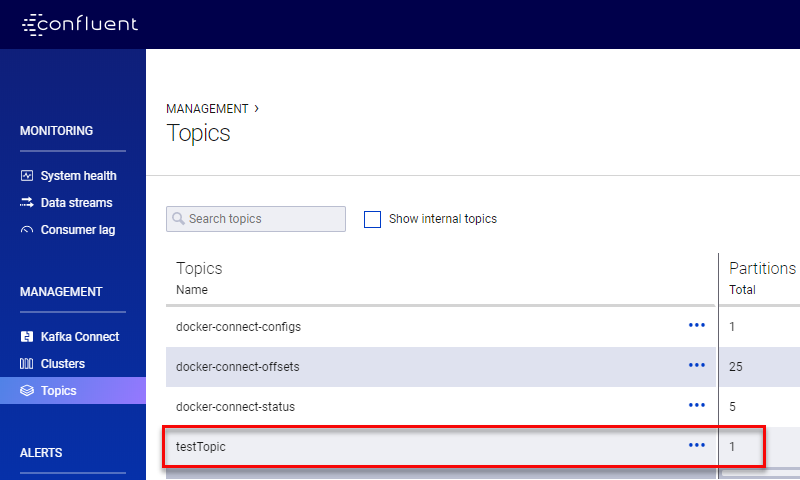
Figure 12: New Topic
We see in Figure 12 our new testTopic, and we can now start to use it.
Before we look at how to publish and consume messages with .NET, let us make sure the topic actually works. We do that by using a couple of Kafka command line tools that ship with any Kafka installation. In fact Kafka ships with quite a few command line tools, (we spoke above of one of them: kafka-topics), and the two we use here are:
kafka-console-consumer: reads data from a Kafka topic and writes the data to standard output.kafka-console-producer: the opposite ofkafka-console-consumer, it reads data from standard output and writes it to a Kafka topic.
To use the two tools we:
- Open two command prompt windows.
- In both windows,
docker execinto thebashshell of the Kafka broker container:
|
|
Code Snippet 3: Execute into Bash Shell
We see in Code Snippet 3 the code to get into the Docker container’s shell, and when we execute the code in both command windows we see:
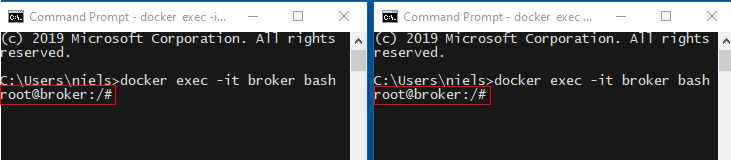
Figure 13: Docker Container Shell
As we see in Figure 13 we are now in the shell as root. The reason we have “spun” up two command windows is so we can use one for publishing and the other for consuming messages.
Let us start with the command window for consumption:
|
|
Code Snippet 4: Console Consumer
In Code Snippet 4 we first cd into the /usr/bin directory where the Kafka command line tools are. We then execute the kafka-console-consumer command, where we say what broker and topic we want to connect to. Notice how we define the internal Docker connection here, (broker:29092), as this is on the internal network.
When we execute the code in Code Snippet 4, we see how the command window now waits for data to read from the broker. Now we set up the producer in the same way (in the second command window):
|
|
Code Snippet 5: Console Producer
When we execute the code in Code Snippet 5 we see how the command window waits for input. We enter some strings, and we see how the “consume” window reads the data from the broker topic and writes it to standard output.
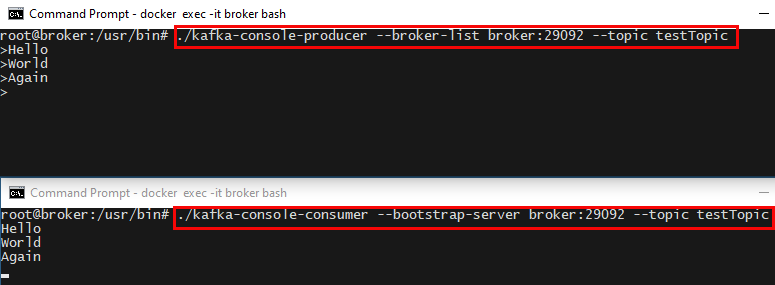
Figure 14: Publish Consume
The upper window we see in Figure 14 is the publish window, and we see how I entered three strings: Hello, World, and Again, and how they appear in the second window. This simple test shows that our topic works, and we can now move on to .NET.
.NET
For the .NET part I use VS Code and .NET Core (2.2). As I am a “newbie” when it comes to VS Code and .NET Core, I list the steps I to get up and running so I have something to come back to.
NOTE: Actually, I am pretty much a newbie in all topics in this post.
I start with the publisher, and I:
- Create a new folder for my publisher project.
- In VS Code I open that folder.
From the integrated terminal in VS Code, (View > Integrated Terminal), I create a new console project: dotnet new console:
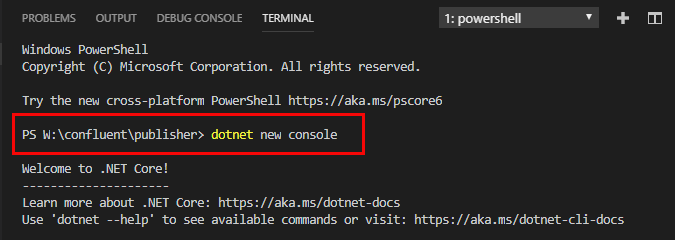
Figure 15: New Console Project
When I execute the outlined statement in Figure 15, some files get created in the chosen directory:
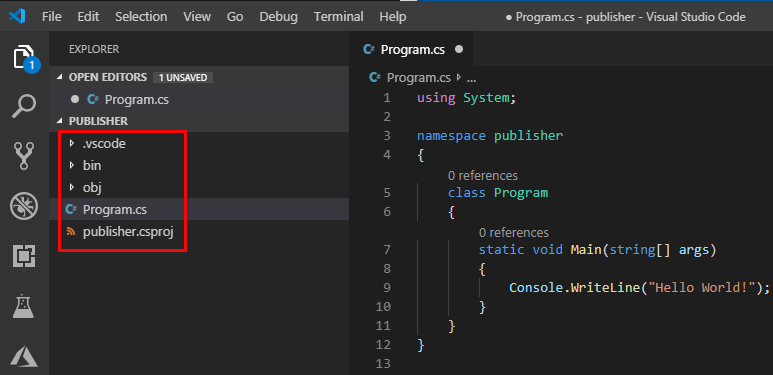
Figure 16: Newly Created Project
What we see in Figure 16 are the various project related files, including the source file Program.cs. What is missing now is a Kafka client. For .NET there exists a couple of clients, and theoretically, you can use any one of them. However, in practice, there is only one, and that is the
Confluent Kafka DotNet client. The reason I say this is because it has the best parity with the original Java client. The client has NuGet packages, and you install it via VS Code’s integrated terminal: dotnet add package Confluent.Kafka --version 1.0.1.1:
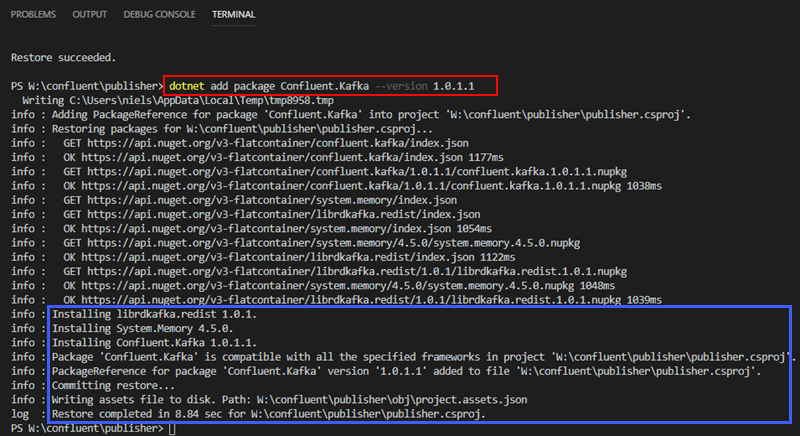
Figure 17: Install NuGet Package
When you execute the dotnet add package the result is as we see in Figure 17; VS Code downloads necessary files and then installs the package, (outlined in blue). We can now “code up” our publisher.
NOTE: The code here is purely for demonstration purposes, no error handling, etc.
Publish
When publishing messages to Kafka with the Confluent .NET client, you need an instance of a Publisher class. When creating a Publisher, you need a PublisherConfig class which - as the name implies - configures the Publisher. In the configuration, you set up things like:
- Bootstrap servers - a list of brokers for the client to connect to.
- Retries.
- Max message sizes.
- etc., etc.
To create the Publisher, you use the ProducerBuilder class which expects a PublisherConfig in the constructor. The code to create a Publisher looks something like so:
|
|
Code Snippet 6: PublisherConfig and ProducerBuilder
The code we see in Code Snippet 6 is the beginning of the publish application. The Main method is not “hooked” up yet; we do that later. We see how we have a using statement for the Confluent.Kafka namespace, and how we declare two class variables of the types IProducer, and ProducerConfig. In the method CreateConfig we instantiate ProducerConfig and set the BootstrapServer property to our Kafka broker. Notice how we use the external listener port, as we now connect into the Docker container from outside the Docker internal network. Oh, the AutoResetEvent class variable is used to react on CTRL-C key press to exit the application.
The producerConfig is then used in the CreateProducer method where we see how we use the Build method on ProducerBuilder to get an IProducer instance.
Having a producer, we now code the method to publish messages:
|
|
Code Snippet 7: Publishing a Message
The method to publish messages is SendMessage as we see in Code Snippet 7. The method takes two parameters; the topic we want to send to, and the actual message we want to send.
In the method, we create an instance of the Message class. That class has two properties:
Key- this is for if/when our topic has multiple partitions. It refers to the value we want to use for Kafka to decide what partition to target. In our case, we have not defined partitions, so we set the value tonull.Value- the message we want to send. In the code, we set it to the incomingmessageparameter.
To publish the message, we call the ProduceAsync method, which expects a topic name, and an instance of the Message class. The method returns an instance of the DeliveryReport class. This class contains information about the delivery of the message, and we are interested to see the original message and partition and offset it was sent to. This, we then write out to the console.
The final thing to do is to “hook up” everything in the Main method:
|
|
Code Snippet 8: Main Method
In Code Snippet 8 we see how we, in Main, call the different methods. We also have some code to capture CTRL-C to exit the application. We should now be able to publish messages to the broker. We can test that this works without having a consumer, and ensure that we get an offset back from the delivery report.
NOTE: If you want to you can also use
kafka-console-consumerand the code in Code Snippet 4.
To make sure everything works, we use the integrated terminal in VS Code and execute dotnet build, followed by dotnet run:
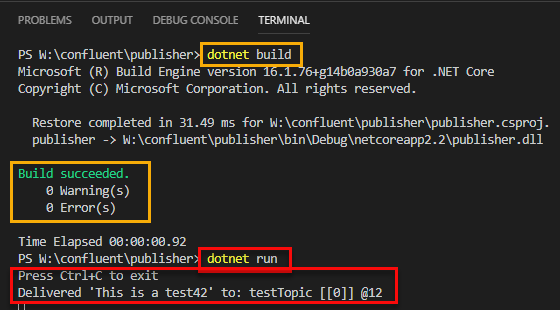
Figure 18: Build and Run
What we see in Figure 18 is how the build command succeeded, (sections outlined in yellow), and run also succeeded, (sections outlined in red). The delivery report says that the message was delivered to the topic testTopic on partition 0, and the offset for the message is 12, (@12).
Cool, let us now create an application to consume messages.
Consume
To consume messages, we create a new application much along the lines of what we did for the publishing app:
- Create a new folder for the consumer project.
- Open that folder in VS Code.
- In VS Code’s integrated terminal create a new console application:
dotnet new console. - After the project has been created, add the Confluent Kafka DotNet client to the project as we did above.
The way we create a Kafka consumer is more or less the same way we did with the publisher; we have a configuration, ConsumerConfig, and a builder: ConsumerBuilder:
|
|
Code Snippet 9: Consumer Code
We see in Code Snippet 9 the two interesting methods CreateConfig and CreateConsumerAndConsume. In CreateConfig we set three properties:
BootstrapServers- as for the publisher, this is a list of brokers to connect to.GroupId- theGroupIdis the name of the consumer group you connect as to the broker. The article here explains consumer groups fairly well.AutoOffsetReset- this tells Kafka where to start reading offsets from.
In CreateConsumerAndConsume we:
- Create a
ConsumerBuilderbased on theConsumerConfiginstance we created above. - Subscribe to the topic(s) we are interested in.
- Consume in a
whileloop.
The Consume method returns a ConsumeResult instance which we use to print information from to the console. What is left now is to build and run from the integrated terminal as we did with the publisher:
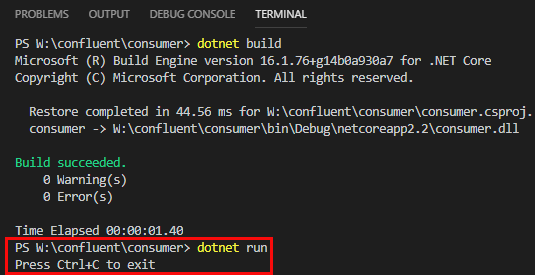
Figure 19: Build and Run Consumer
Dependent on the AutoOffsetReset value you now either see a list of messages (if there are any), or the consumer “sits” and wait for messages to arrive (as in Figure 19). Let us finish this post with sending some messages from the publish application above. In my code, I changed the Main method to instead of just sending one message, send messages in a while loop:
|
|
Code Snippet 10: Loop and Send Messages
In Code Snippet 10 we see the while loop, and how we send 100 messages, pausing 200ms between each message. The reason I pause is that it makes it clearer to see what happens when I run the code. I build the project, and when I run the code I see in the publisher terminal:
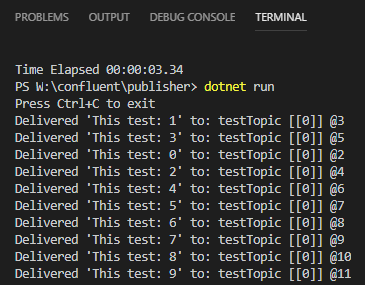
Figure 20: Publishing Messages
At the same time, I see in the consumer terminal:
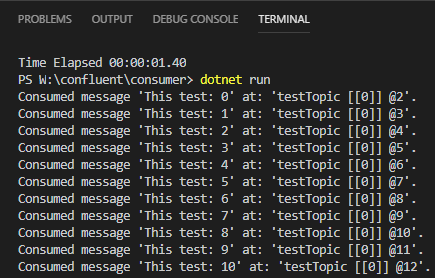
Figure 21: Consuming Messages
So from what we see in *Figure 20, and Figure 21 both the publishing application, as well as the consuming application, works! Awesome!
Summary
In this blog post, we saw how we can install Docker containers for the Confluent Platform on a Windows development machine. Thanks to the announcement of one broker “free forever” I have the ability to write streaming applications fully utilizing the Confluent Platform.
In the second part of the post we saw how we can use VS Code together with the Confluent Kafka DotNet client.
In future posts, I will “dig” deeper into both Kafka as well as the .NET client.
~ Finally
If you have comments, questions etc., please comment on this post or ping me.