This blog post series is inspired by my conference talk Analyze Billions of Rows of Data in Real-Time Using Azure Data Explorer. Posts in the series are:
- Develop a Real-Time Leaderboard Using Kafka and Azure Data Explorer - Prelude (this post)
- Develop a Real-Time Leaderboard Using Kafka and Azure Data Explorer - I
- Develop a Real-Time Leaderboard Using Kafka and Azure Data Explorer - II
In the presentation, I talk about “user-facing” analytics. Historically analytics has been limited to a small set of users in an organization (think the C-suite, power users, etc.). User-facing analytics changes that and makes analytics available to the end-users. An example of “user-facing analytics” is LinkedIn’s: “Who’s viewed your profile”. Another example is leaderboards, which are popular in online gaming.
Since I work for a company ( Derivco) that develops systems for the iGaming industry, this series looks at the basics of a real-time leaderboard for online gaming using Kafka and Azure Data Explorer (ADX).
Initially, I thought one post would cover this, but I quickly realized one post covering everything would be way too long. Therefore, I am splitting this topic into multiple posts, and in this post, I look at Kafka and event generation.
Arguably, this first post has little to do with ADX, which is why the title says Prelude 😄. Still, it is important because it sets up the publishing mechanism, which can be reused for anything else you want to do.
Pre-Reqs
This section is here to list what you need if you want to follow along:
- Docker Desktop. We use Docker to “spin up” containers for Kafka and a Python application. The Python application generates and publishes events to Kafka. Caveat: If you are on an Apple Silicon Mac (M1 or M2), you need Python installed as the container for the event generation application won’t build on Apple Silicon. This is because there is no “wheel” for the Confluent Kafka Python client that installs in an ARM-based container.
For this post, the above is the only thing you need. If you want to “prep” for the follow-up posts you also need this:
- An Azure account. If you don’t have an Azure subscription, sign up for a free account.
- An Azure Data Explorer cluster. To set up an ADX cluster and a database, look here: Quickstart: Create an Azure Data Explorer cluster and database. Please note that there may be a cost associated with the ADX cluster, so be sure to tear it down when you are done.
Code
The code for this post is in the leaderboard-prelude GitHub repo. To follow along, clone the repo somewhere on your machine.
Having the pre-reqs and the code lets us continue.
User-facing Analytics
Above I spoke briefly about user-facing analytics, and it doesn’t seem that difficult: “how hard can it be?” 😄. The difficulty comes when you want to provide users with up-to-date and relevant insights. This requires real-time data processing and analysis. This, in turn, can be challenging to achieve as it requires a robust and scalable infrastructure to handle potentially large numbers of users accessing the analytics simultaneously.
The two last sentences in the paragraph above are the crux: real-time processing and many users. In the iGaming world, you have thousands and thousands of online users simultaneously generating events that need to be handled in real-time. Then these users want access to their data, once again, in real-time.
With the above in mind, you want technologies offering the following:
- Real-time ingestion of large volumes of data.
- Ability to handle thousands and thousands of queries per second.
- Low latency (milliseconds).
Technologies
The technologies chosen for the posts in the series are:
- Kafka
- Azure Data Explorer
Kafka is not a surprise as it is the de facto standard for streaming. In the next post, we discuss Azure Data Explorer (ADX) and why it is the chosen technology. Knowing you can “automagically” ingest data from Kafka into ADX using Kafka Connect is enough for now.
Enough of the underlying technology; let us see what to build.
The Online Gaming Event Leaderboard
You have been asked to build a leaderboard system for a company that promotes/runs different online games. This company wants to set up promotions/campaigns where each campaign can have its own leaderboard.
When a user plays an online game (think one-armed bandit), each spin generates an event containing information about the spin:
|
|
Code Snippet 1: Event Schema
The fields you see in Code Snippet 1 should be self-explanatory. The one field that may not be obvious is stake. That is the value of the spin. When a spin happens, the event is published to a Kafka topic.
In future posts, I will cover more about the design/architecture of the leaderboard. In this post, the architecture looks like so:
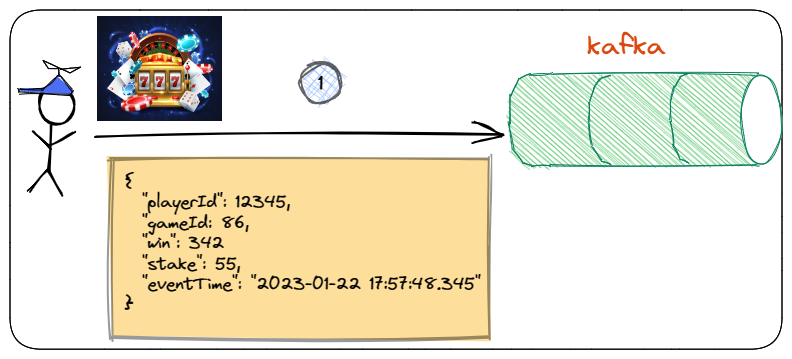
Figure 1: Publishing to Kafka
You see the system’s flow in Figure 1 where the player makes a spin, which generates a spin event. This event is being published to a topic in Kafka.
Kafka and Event Generation
Now is the time to implement what you see in Figure 1:
- Spin up a Kafka Cluster
- Generate events and publish them to Kafka.
You do the above using a Docker compose file: docker-compose.yml.
Docker Compose File
You will find the file in the GitHub repo mentioned above in the docker folder:
|
|
Code Snippet 2: Docker Compose
In Code Snippet 2, you see an abbreviated version of the docker compose file. As you see, the compose file spins up containers for a Kafka cluster, with some exceptions:
kafka-ui: If you need a UI for your Kafka, ksqlDB, etc., cluster, this is a nice UI. Give it a try!kafka-init-topics: This container is used to create a topic(s) in the broker. I use it here to create the topic to which you publish events:gameplay.
The third exception is event-gen.
Event Generation
The event-gen container contains a Python application that generates and publishes events to the Kafka topic. Oh, and as you will see in a bit, it also consumes.
As you see in Code Snippet 2, the app is built from a Dockerfile:
|
|
Code Snippet 3: Docker File
In Code Snippet 3, you see the Docker file used to build the event-gen app. Looking at the file, you see the following:
- The build is based on a Python Docker image:
3.9.16-slim-bullseye, a lightweight version of Python 3.9.16. - I set an environment variable:
BOOTSTRAP_SERVERS. The variable points to the bootstrap servers for the Kafka cluster. When looking at the docker compose file in Code Snippet 2, you see how I override that variable to point to thebrokercontainer, which is internally available on port29092. - Three Python source files are copied into the container.
- Finally, I install the Confluent Kafka Python client into the container.
At the beginning of this post, I mentioned a caveat when running this on an Apple Silicon machine, and it is step 4 above that will not work. If you are on an Apple Silicon machine, you need to run the Python application independently. This also means you need to install the Confluent Kafka Python client into your Python installation: pip install confluent-kafka.
Application Source Code
The source code for the Python application is in the app folder in the cloned repo, and as mentioned above, there are three files:
gameplay.pyrunConsumer.pyrunProducer.py
gameplay.py
This is the source for generating a game event. When looking at the code, you see it is mostly configuration variables for the number of players, number of games, stake, win, etc. Those variables are then used in the generateGamePlay() function:
|
|
Code Snippet 4: Generate Event
You see in Code Snippet 4 how the configuration variables are used to randomly assign values to a new event.
runConsumer.py
So, as implied by the name, runConsumer.py is the source for consumption from Kafka. At first, I hadn’t planned to include any consumers in the app. Still, it is helpful to check that what is produced actually ends up on the intended topic, so here it is 😄.
The consumer expects some command line parameters at startup:
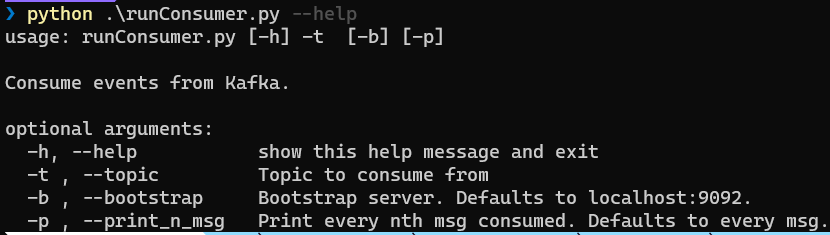
Figure 2: Consume Parameters
In Figure 2 you see the parameters you can set. They should be self-explanatory, but maybe I should say a word about -b (--bootstrap). It indicates the bootstrap server to connect to IF you run the application outside of the container. Running the application inside the container, it uses the BOOTSTRAP_SERVERS environment variable.
runProducer.py
This is the source for producing messages and publishing them to Kafka. This code calls into gameplay.py to generate an event, and then it publishes it. The producer can run in two “modes”:
- Generate events one by one.
- Generate events while running in a loop.
Whether to generate events one by one or in a loop is defined by startup parameters:
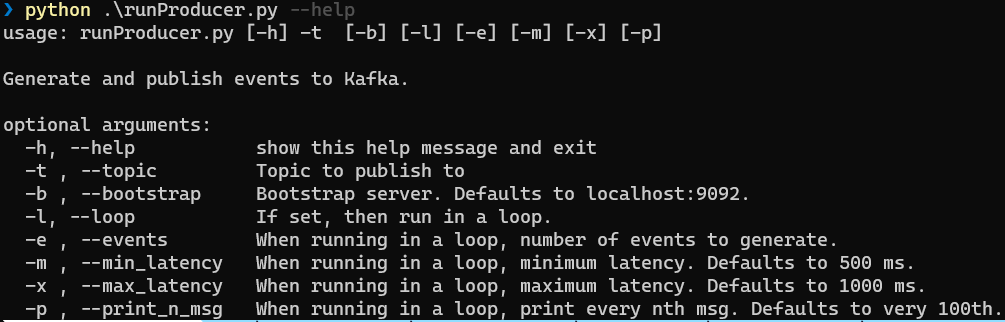
Figure 3: Produce Parameters
The “loop” related parameters are: -l, -e, -m, -x, and -n, as seen in Figure 3. The only required parameter for “looping” is -l; the other “loop” related parameters have default values. Oh, and the -b (--bootstrap) parameter acts the same as for the consumer.
Spin Up the Containers and Run
Now it is time to put this together and “spin up” the Kafka cluster with the application to ensure it works. What you first need to do is to cd into the docker folder.
NOTE: If you are on Apple Silicon, open the
docker-compose.ymlfile and comment out theevent-genpart, as you will run the Python application independently.
Now you:
- Ensure that Docker Desktop is up and running.
- Spin up the containers:
docker compose up -d --build.
Having spun up the containers you should see in Docker Desktop something like so:
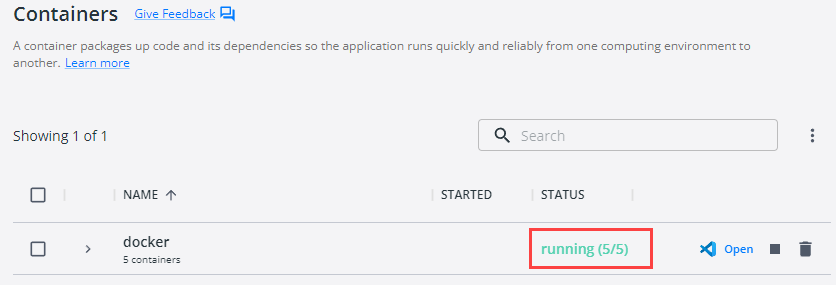
Figure 4: Docker Desktop
Initially, the status is 5/5 (Apple Silicon 4/4), as in Figure 4. After some seconds, the status will change to 4/5 (Apple 3/4) as the kafka-init-topics container exits after creating the gameplay topic.
To ensure everything is OK, in your browser, you browse: localhost:8080:
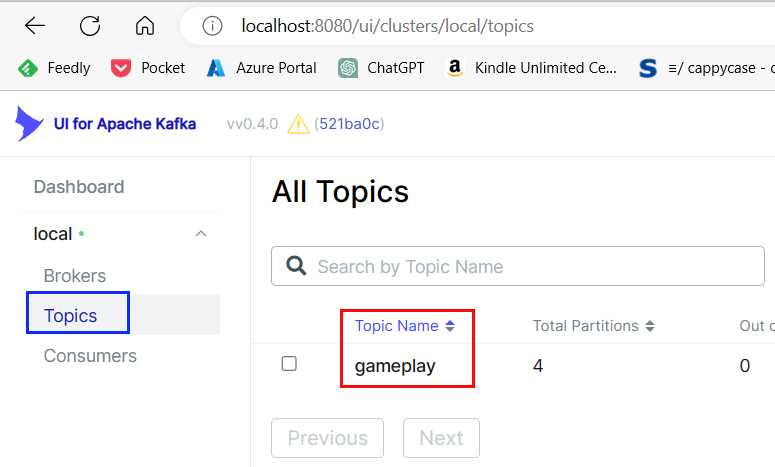
Figure 5: UI for Kafka
After opening my browser and browsing to the UI for Kafka (localhost:8080), I clicked on the Topics menu to the right (as in Figure 5 - outlined in blue). I see one topic in the Kafka cluster, gameplay, outlined in red. All is OK!
Publish and Consume
You are now ready to publish. However, you also want to ensure that what you publish IS published, so you start with “spinning up” the consumer.
Apple Silicon
Before we look at consuming (and publishing): the instructions below assume running the application container. If you are on Apple Silicon, you have to run the application independently.
So instead of executing the Python scripts from the container (see below), you cd into the app folder and run the scripts from there.
Consuming
To start the consumer, you need to docker exec into the event-gen container and in there, execute runConsumer.py:
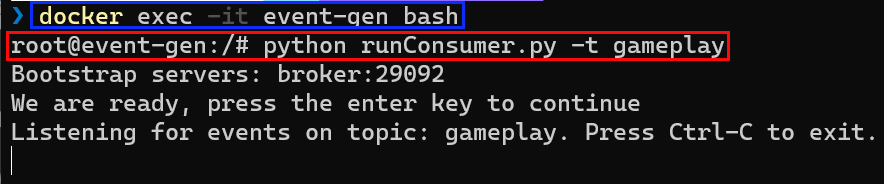
Figure 6: Run Consumer
In Figure 6 you see:
- Launch a
bashterminal in theevent-gencontainer (outlined in blue). - After launching the terminal, you execute the Python script (outlined in red).
Part of executing the Python script is sending in the topic startup parameter (-t): gameplay.
The consumer is now up and running.
Publishing
Time to publish:

Figure 7: Generate and Publish Events
As in Figure 7, publishing events looks similar to consuming events. The only difference is you execute runPublisher.py instead of runConsumer.py. As you are not looping, you click Y to produce and publish an event.
After generating and publishing an event, you should see the same event appearing in the consuming application:

Figure 8: Consumed Event
Yay, it works! In Figure 8 you see how the consuming application has received an event (outlined in red) looking suspiciously similar to the event published in Figure 7.
NOTE: When you want to exit either the publisher or consumer, follow the instructions in the terminal and then
exitto exit out of the container.
Having confirmed it all works, you can now “play around” with the startup parameters for the publisher and see how looping works:

Figure 9: Publish in a Loop
Above, in Figure 3, I mentioned the startup parameters for the publisher and what is used for looping. In Figure 9 you see the usage:
-t: You should know about-tby now: the topic to publish to.-l: You explicitly set-lwhen you want to “loop”.-e: The number of events to generate. I.e. the number of loops. In this case, you want to generate 100 events.-m: The minimum latency between events is 10 milliseconds.-x: Maximum latency is 50 ms.-p: Every tenth event generated is printed. The first event is always printed.
You now have a “framework” for generating and publishing events to Kafka.
Tear Down
When you are finished, tear down everything by exiting out of the publish and consume applications and then do docker compose down in the location where docker-compose.yml is.
Summary
As mentioned above, this post is a prelude to coming posts covering creating an online gaming leaderboard using Kafka and Azure Data Explorer.
This post gave you the foundation for future posts:
- Spinning up a Kafka cluster in Docker.
- In that cluster, having a container which publishes and consumes events.
That’s it for now. Look out for future posts in this series.
~ Finally
If you have comments, questions etc., please comment on this post or [ping][ma] me.