This is the second post in a series about using Kafka and Azure Data Explorer (ADX) to develop a real-time leaderboard for online gaming. Hmm, the second post you say - why is it that the post title says " - I"? Good question; that is because the initial post was more of an intro, where I introduced a framework for generating and publishing events to Kafka. Posts in the series are:
- Develop a Real-Time Leaderboard Using Kafka and Azure Data Explorer - Prelude
- Develop a Real-Time Leaderboard Using Kafka and Azure Data Explorer - I (this post)
- Develop a Real-Time Leaderboard Using Kafka and Azure Data Explorer - II
Anyway, in this post, you will learn more about ADX and why it is an excellent choice for near real-time applications, how to “hook up” Kafka to ADX and how to ingest data into an ADX database.
Background
In the last post, I discussed how analytics is being democratized. From analytics for the few (BI teams, the C-suite, etc.) to analytics for everyone - think LinkedIn’s “Who’s viewed your profile”, online gaming leaderboards, etc. The implication of analytics for everyone is that we may have a huge volume of users accessing the analytics system simultaneously. The way we do analytics has also changed. It is no longer enough to run a batch job occasionally; now, we need the analytics to be in near real-time.
The above (massive volume of users, near real-time insights) results in some “interesting” requirements:
- Real-time ingestion of large volumes of data.
- Ability to handle thousands and thousands of queries per second.
- Low latency (milliseconds).
So in the first post, I said that the chosen technologies are Kafka and ADX. In that post, I looked at Kafka and ingesting event data into a topic. In this post, I look closer into ADX and how to ingest data from Kafka into ADX.
Pre-Reqs
This section is here to list what you need if you want to follow along (they look more or less as in the last post):
- Docker Desktop. We use Docker to “spin up” containers for Kafka and a Python application. The Python application generates and publishes events to Kafka. Caveat: If you are on an Apple Silicon Mac (M1 or M2), you need Python installed on your machine, as the container for the event generation application won’t build on Apple Silicon. Subsequently, you must install the Python Confluent Kafka client on your Mac:
pip install confluent-kafka. - An Azure account. If you don’t have an Azure subscription, sign up for a free account.
- Azure CLI. The Azure CLI is a cross-platform command-line tool connecting to Azure and executing administrative commands on Azure resources. You find downloads and install instructions here.
- An Azure Data Explorer cluster and database. To set up an ADX cluster and a database, look here:
Quickstart: Create an Azure Data Explorer cluster and database. You can name the database as you like. My database is called
leaderboard. Please note that there may be a cost associated with the ADX cluster, so be sure to tear it down when you are done. The assumption is that you now have a running ADX cluster or you set it up as per the instructions in the link.
You may have seen how ADX offers free clusters. A free cluster allows you to explore the platform’s features, experiment with data analytics queries, and develop proofs of concept without incurring any cost. This would have been ideal for our purposes, but unfortunately, a free cluster does not allow streaming ingestion, which we will be using here.
Code
The code for this post is in the leaderboard-ADX GitHub repo. To follow along, clone the repo somewhere on your machine.
Now is the time to look at what to build.
Online Gaming Leaderboard
Your “mission” (as mentioned in the previous post) is to build a leaderboard system for a company that promotes/runs different online games. This company wants to set up promotions/campaigns where each campaign can have its own leaderboard.
When a user plays an online game (think one-armed bandit), each spin generates an event containing information about the spin:
|
|
Code Snippet 1: Event Schema
You see the fields of the event in Code Snippet 1. The one field that may not be obvious is stake. That is the value of the spin. When a spin happens, the event is published to a Kafka topic.
Based on the event, the leaderboard should show the following information for the promoters of the games as well as the players - where the players can be in the ten of thousands:
- The top x players with the highest win/stake ratio during the campaign’s last
ytime units. - The top x players with the highest win/stake ratio during the campaign.
Based on the challenges mentioned in the previous post and repeated above, the chosen technologies are Kafka and ADX (also discussed above). The proposed architecture looks like so:
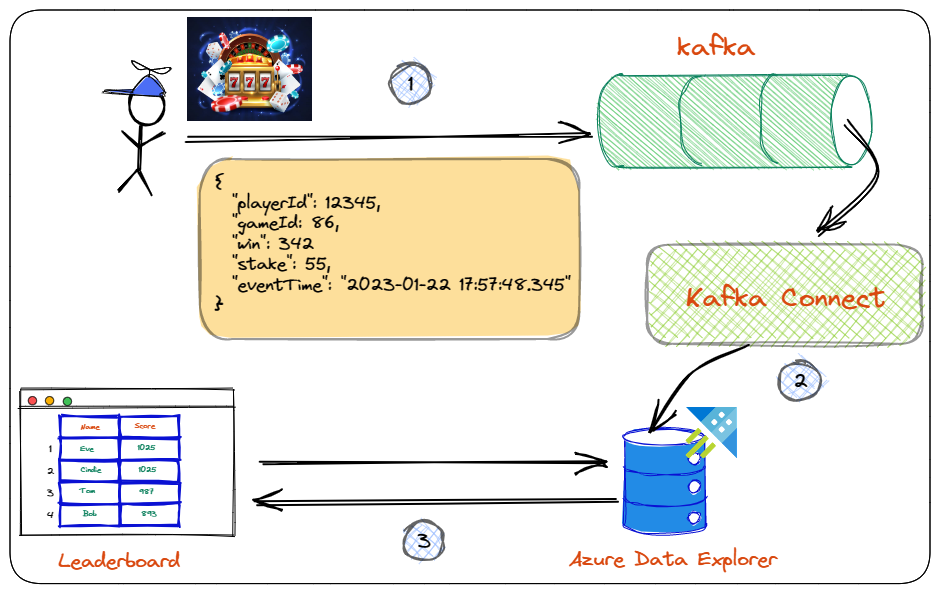
Figure 1: Leaderboard Architecture
You see in Figure 1:
- The player makes a spin, which generates a spin event. This event is being published to a topic in Kafka.
- The event is ingested into ADX using Kafka Connect and the Kusto Sink connector.
- In ADX, you have written queries which process the ingested data. These queries return leaderboard standings to a web page using ADX REST APIs when called.
In the previous post, you implemented step 1 - generating and publishing events to Kafka. Logically you would now work on the ADX ingestion. However, before ingesting, you have to set up ADX.
Azure Data Explorer
Before setting up ADX, let’s briefly look at what ADX is and why it fits our purposes.
Azure Data Explorer is a fully managed data exploration service provided by Microsoft Azure. It is designed for big data scenarios and allows users to quickly and easily analyze large amounts of data using a SQL-like language. ADX can handle structured and unstructured data and can be used to perform tasks such as data exploration, real-time analytics, and visualization.
It uses a distributed columnar storage system and a query engine designed to handle complex queries and perform well even with massive datasets. Additionally, ADX uses advanced indexing and caching techniques to speed up queries and reduce the need for full table scans. It also allows for near real-time data ingestion and supports complex data types such as JSON and Avro.
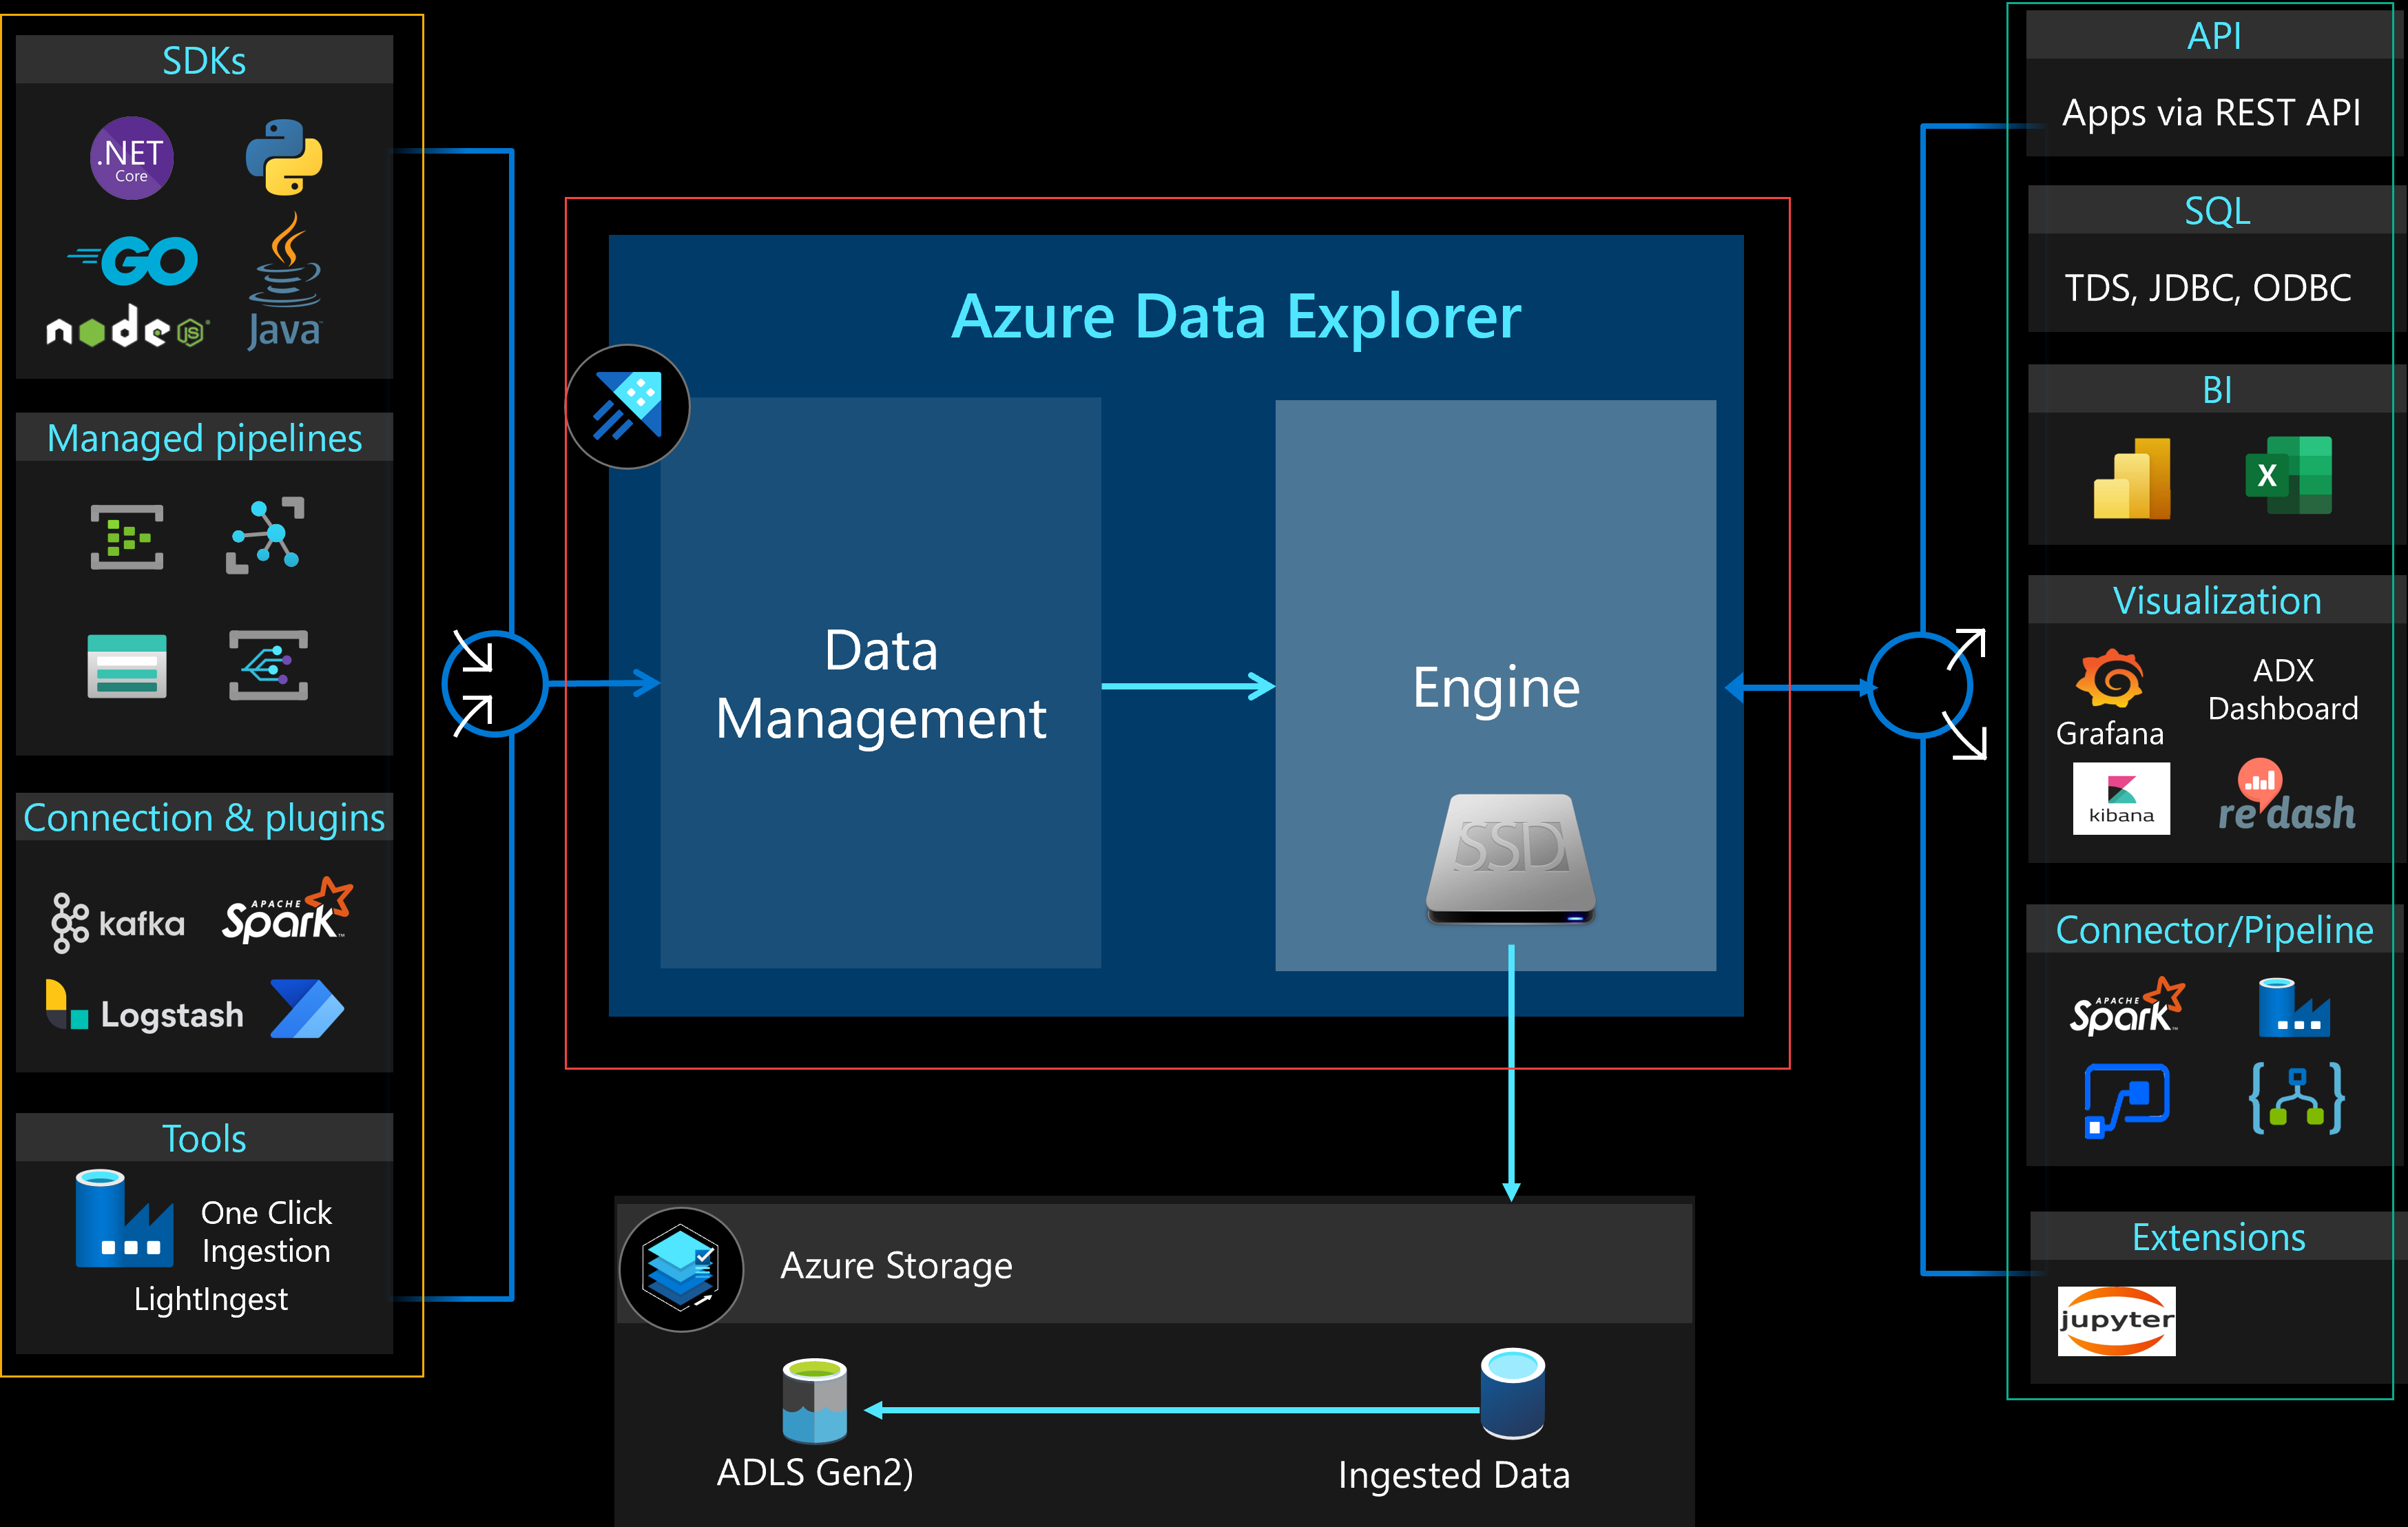
Figure 2: Azure Data Explorer Architecture
You see in Figure 2 a high-level overview of ADXs architecture. I will not go into detail about the architecture, but I want to point out a few things.
ADX Service
The Azure Data Explorer service (outlined in red in Figure 2) consists of two services which run in Azure VMs:
- Data Management Service: The DMS connects the Engine service to various pipelines and orchestrates and maintains the data ingestion process from these pipelines/components. These pipelines/components are outlined in yellow in Figure 2.
- Engine Service: The Engine Service is responsible for processing the incoming raw data from the DMS. It also serves users’ queries via an API. Data ingested from DMS is cached on SSDs local to the Engine Service. Outlined in green in Figure 2, you see the various methods you use to query data in ADX.
NOTE: Ingestion and querying are separated, so there is no contention.
Speaking of ingestion. Let us look at ingesting into ADX.
ADX Ingestion using Kafka & Kafka Connect
When looking at Figure 2 you see the ingestion pipelines/components outlined in yellow. Amongst them, you see (outlined in red) that Kafka is supported for ingestion into ADX. As mentioned above, ingesting into ADX from Kafka uses Kafka Connect and the Kusto Sink connector (Figure 1, step 2).
Kafka Connect
Kafka Connect is a tool for streaming data between Apache Kafka and other systems in a scalable and reliable way. The way you move data between systems and Kafka is using connectors, and there are two flavors of connectors:
- Source connectors: understand how to interact with the source system and publish records from the source into Kafka Topics
- Sink connectors: propagate records from Kafka topics to other systems.
Kafka Connect is a JVM process that operates separately from the Kafka Broker. Connectors are .jar files loaded by the Kafka Connect process. The diagram below shows a high-level overview of what it looks like:
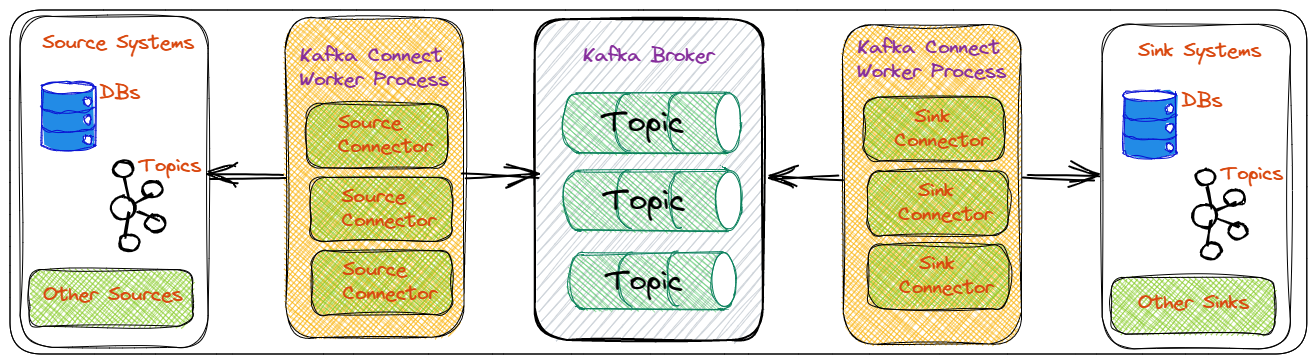
Figure 3: Kafka Connect Overview
In Figure 3 we see from left to right:
- Source systems, i.e. systems we want to get data from. These systems can be databases, Hadoop, file systems, etc.
- The Kafka Connect worker with source connectors. The connectors know how to interact with the source system, whether querying a database, using CDC, reading from a filesystem, etc. The connectors publish data to Kafka topics.
- The Kafka broker(s). The broker(s) contain topics that are the “sinks” for the source connectors.
- Kafka Connect worker with sink connectors. Source and sink connectors can be in the same Kafka Connect worker. The sink connectors know how to consume and ingest events from Kafka topics into sink systems.
- Sink systems. These are systems we ingest data into. As with source systems, these can be databases, Hadoop, filesystems, etc.
In the leaderboard system, you use the Kusto sink connector, which reads data from a Kafka topic(s) and ingests it into ADX tables.
ADX Setup
At last, it is time to set up ADX. After reading the Pre-Reqs above, you should have a running ADX cluster and a database. What you need to do now is:
- Create a service principal. The SPN is used by the connector to connect to ADX.
- Create a table to ingest the data into.
- Enable streaming ingestion on the cluster, database and table.
Oh, you also need to get the ADX endpoints for ingestion and querying. Let us do that now.
Query / Ingestion Endpoints
Above, I mentioned the Data Management and Engine services and how they are responsible for ingestion and querying, respectively. What I didn’t say was that they are exposed by independent URLs. To ingest, you “hit” one URL; to query, you “hit” another.
NOTE: These URLs can be considered connection strings.
You will find the URLs in the overview page for the ADX cluster:
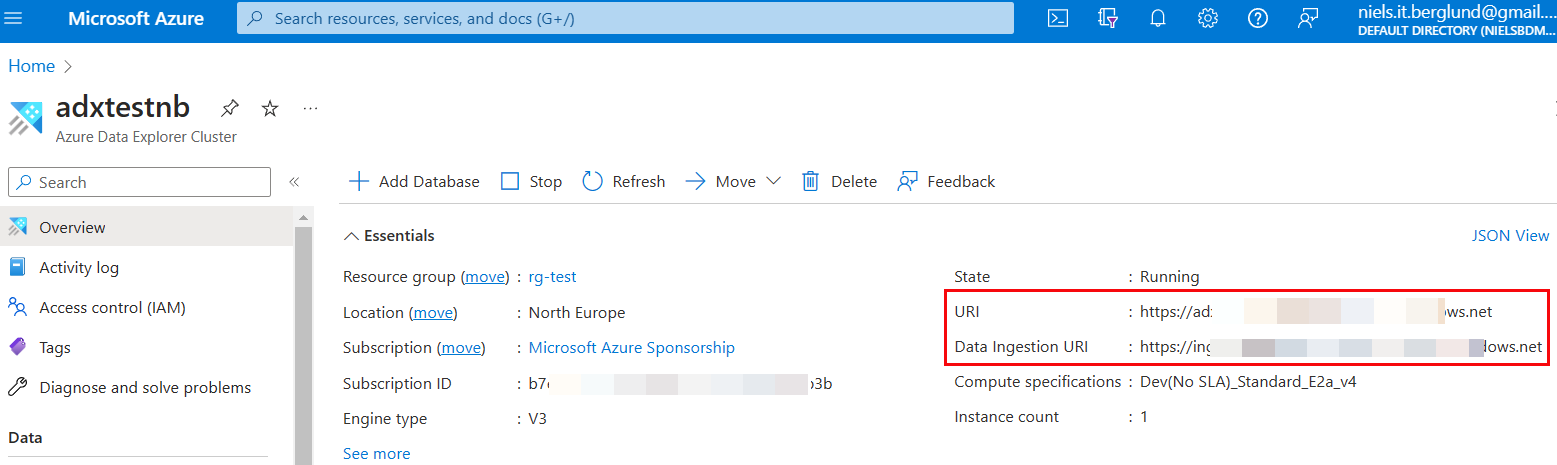
Figure 4: Connection Strings
We are looking for two endpoints outlined in red in Figure 4. Those two endpoints represent the following:
URI: endpoint for querying the cluster.Data Ingestion URI: this is the endpoint for ingesting into the cluster.
Take note of the two endpoints. You will use the ingestion endpoint later in this post and the query endpoint in the next post.
ADX Service Principal (SPN)
You use the Azure CLI mentioned above in the Pre-Reqsto set up the SPN. This is what you do:
- Log in to Azure:
az login. This returns a list of your subscriptions after successful login. - If you have more than one subscription, you set the subscription you want to use:
az account set --subscription <your-sub-id>.
Having done the above, you now create the service principal:
|
|
Code Snippet 2: Create Service Principal
The code in Code Snippet 2 creates - as mentioned before - a service principal configured to access Azure resources. The output, when executing the code, looks something like so:
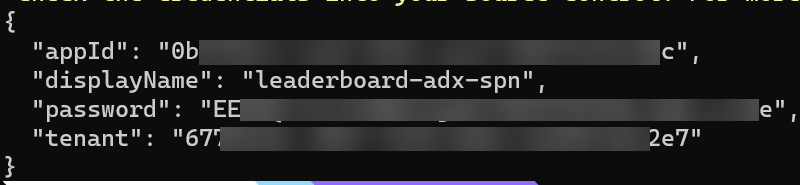
Figure 5: Service Principal Properties
In Figure 5, you see the result from executing the code in Code Snippet 2. You see a JSON blob with 4 fields/properties. Take note of appId, password, and tenant, as you will use them later when configuring the connector.
In fact, you will use them right now, as the SPN need to be associated with your ADX database. There are different ways to do this, and I find using the Query editor for ADX in the Azure Portal the easiest:
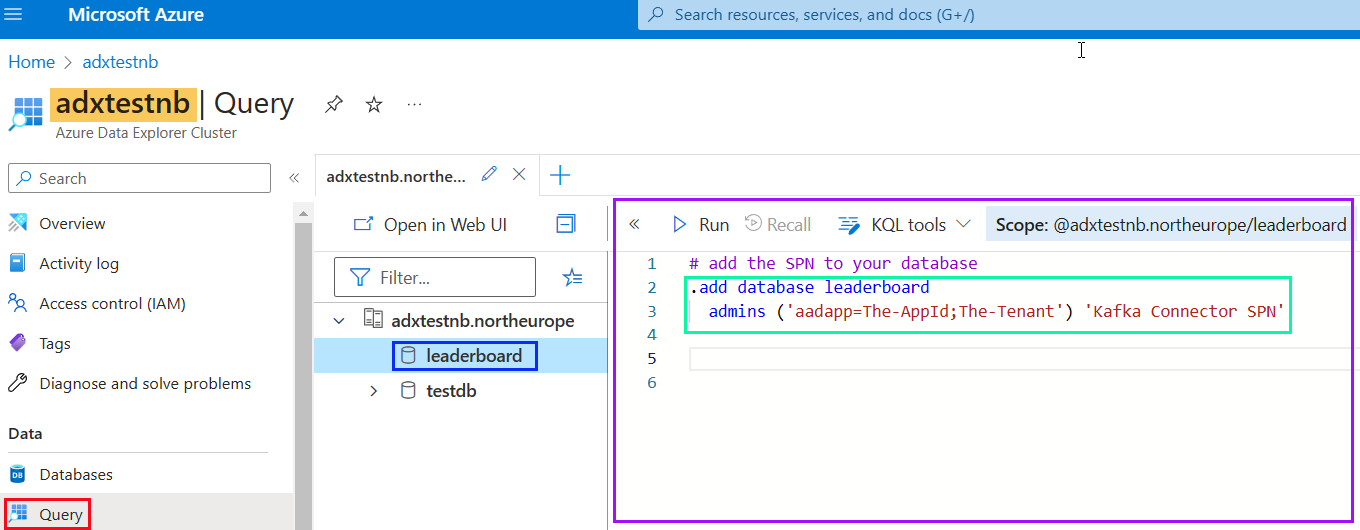
Figure 6: Query ADX Azure Portal
In Figure 6, I logged in to my Azure subscription and navigated to my ADX cluster (highlighted in yellow). I then:
- Clicked on the Query button outlined in red.
- Did chose my database
leaderboardoutlined in blue.
By clicking on the Query button, the query editor opens. You see it outlined in purple in Figure 6. You also see - outlined in green - the code to execute to add the created SPN to the database.
NOTE: You replace the
The-AppIdandThe-Tenantwith the values forappIdandtenantyou got when executing the code in Code Snippet 2.
You will find the code in *Figure 6 in the kql-queries.kql file in the kql folder of the repo you cloned above.
ADX Table
You need to create a table to ingest the data from the Kafka gameplay topic. You do it from the Query editor for ADX, as we saw in Figure 6. The table schema should match the event schema in Code Snippet 1:
|
|
Code Snippet 3: Create Table
In Code Snippet 3, you see how the table matches the event schema in Code Snippet 1. After executing the code in Code Snippet 3, you can check that the table has been created by executing: .show tables.
Ingestion
Let us discuss ingestion and how to set it up in ADX.
ADX supports two types of ingestion:
- Batch Ingestion: Batching ingestion does data batching and is optimized for high ingestion throughput. Data is batched according to ingestion properties. Small batches of data are then merged and optimized for fast query results. Batch is the default ingestion type.
- Streaming Ingestion: Streaming ingestion is ongoing data ingestion from a streaming source. Streaming ingestion allows near real-time latency data sets. Streaming ingestion can be done using an Azure Data Explorer client library or a supported data pipeline (the Kusto Sink connector supports streaming ingestion).
Streaming ingestion is the best bet as you require low latency for the leaderboard system. As batch ingestion is the default type, streaming ingestions must be explicitly enabled.
Enable Stream Ingestion
Stream ingestion must be enabled on cluster and database/table levels.
Cluster
You start by enabling it on the cluster level. In the Azure Portal, you go to your ADX cluster:
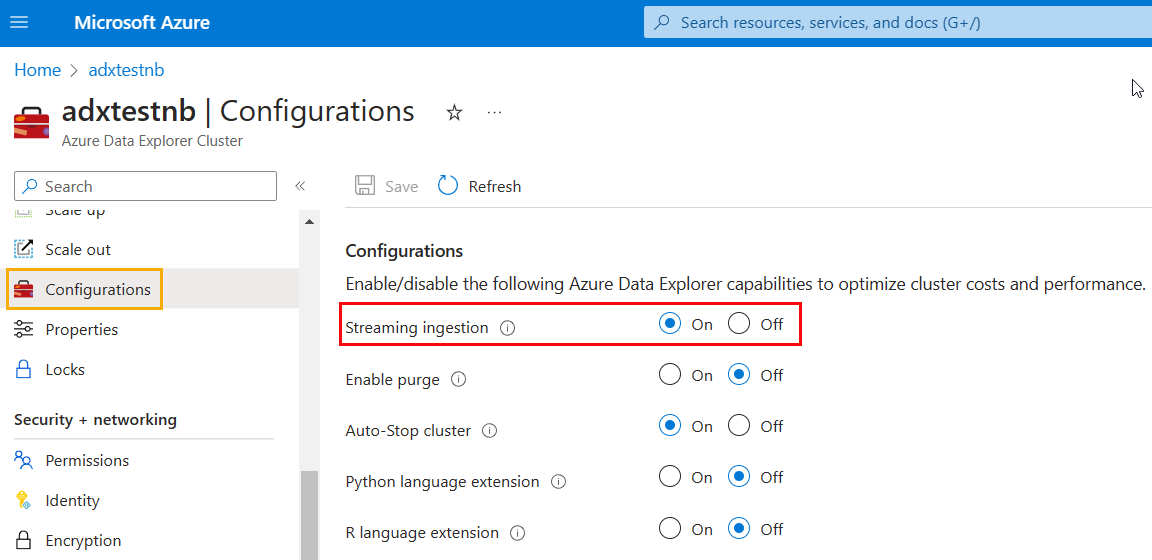
Figure 7: Enable Stream Ingestion ADX Cluster
In Figure 7 you see what to do:
- Under the Settings heading select Configurations (outlined in yellow).
- In the In the Configurations pane, select On to enable Streaming ingestion (outlined in red).
- Click Save just above Configurations.
Be aware that it may take some seconds, up to half a minute, for ADX to enable streaming ingestion.
Database / Table
You use KQL statements to enable streaming ingestion on a database or table level. If you enable streaming ingestion on a database level, it applies to all tables in the database (existing or future):
|
|
Code Snippet 4: Enable Streaming Ingestion Code
You see in Code Snippet 4 the KQL statements to enable streaming ingestion on a table or database level. Before you run the code, ensure you have enabled streaming ingestion for the cluster as in Figure 7.
The question is now; what is the relationship between the events in the Kafka topic and the table in the database?
Ingestion Mapping
The following section aims to answer the question above.
As the event lands in Kafka as JSON (or some other format), ADX needs to understand how the fields in the event map to the columns in the table. You do this by creating a table ingestion mapping in the database:
|
|
Code Snippet 5: Ingestion Mapping
The code in Code Snippet 5 shows how you create a JSON ingestion mapping, naming it gameplay_json_mapping.
After running the code in Code Snippet 5, you can check that the mapping exists executing: .show table GamePlay ingestion mappings, which returns all mappings for that table.
The page .show ingestion mapping from the ADX documentation covers ingestion mapping in more detail.
You now have all the “pieces of the puzzle”. Let us put it together!
Kafka Connect & Kusto Sink Connector
What is left to do is to set up the Kusto Sink connector in Kafka Connect.
As in the previous post, you will run Kafka (and the event-generating application) in Docker using the supplied docker-compose.yml file in the repo (in the docker folder).
Docker Compose File
The Docker Compose file looks the same as in the previous post, except for the addition of a Kafka Connect container:
|
|
Code Snippet 6: Kafka Connect
You see in Code Snippet 6 how I use the Kafka Connect base image and how I am installing (in the command section ) the Kusto Sink connector via confluent-hub install.
NOTE: When using
confluent-hub installin a Docker Compose file, it is important to include the--no-promptstatement, i.e.confluent-hub install --no-prompt .... If you don’t do that, the connector will not install.
I suggest you now check that the Docker Compose file works as expected and that the connector loads. However, before you do that, remember from the last post the caveat around Apple Silicon; if you are on a Mac with Apple Silicon, you must comment on the Python application container (event-gen) in the compose file. This is because there is no “wheel” for the Confluent Kafka Python client that installs in an ARM-based container.
When everything is ready you:
- Ensure that Docker Desktop is up and running.
- Spin up the containers:
docker compose up -d --build.
In the last post, you checked that everything was OK using the Docker Desktop application and the browser-based Kafka UI: UI for Kafka. Here you use docker ps to check what containers are running:
|
|
Code Snippet 7: Check Containers
You see in Code Snippet 7 me using the --format option to filter the output. Executing the code in Code Snippet 7 results in:
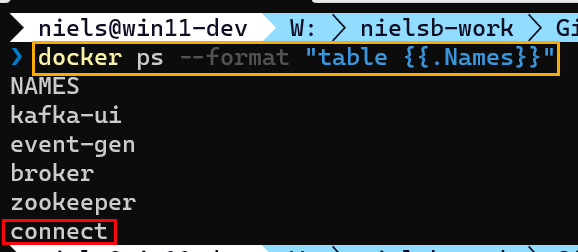
Figure 8: Output
It looks like everything has worked, as in Figure 8 you see that the Kafka Connect container is up.
Installed Connectors
From the above, it seems all is OK. To be sure, you check that the Kusto Sink connector is loaded into Kafka Connect. You do it by using the Kafka REST API:
|
|
Code Snippet 8: GET Connectors
You can use whatever tool you are comfortable with to call the REST API (curl, Postman, etc.). Personally, I prefer Postman, and in Code Snippet 8, you see how I call into the connector-plugins endpoint using port 8083 exposed by Kafka Connect:
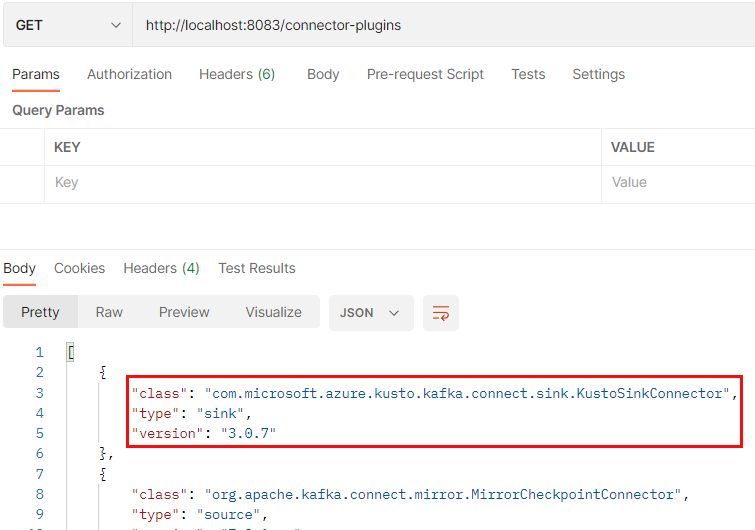
Figure 9: Installed Connectors
Executing the code in Code Snippet 8, I get the result you see in Figure 9, and outlined in red is the Kusto connector. The other connectors you see are part of the base Kafka Connect Container.
Connector Configuration
Cool, the Kusto connector is loaded. Now it is time to configure it. Remember, you created an ingestion mapping in ADX so that ADX understands the events being ingested. On the connector side, you configure the connector, where to read data from, where to ingest the data, etc.
The configuration is done using a JSON file and POST:ing it either via curl or Postman.
The configuration file I use looks like so:
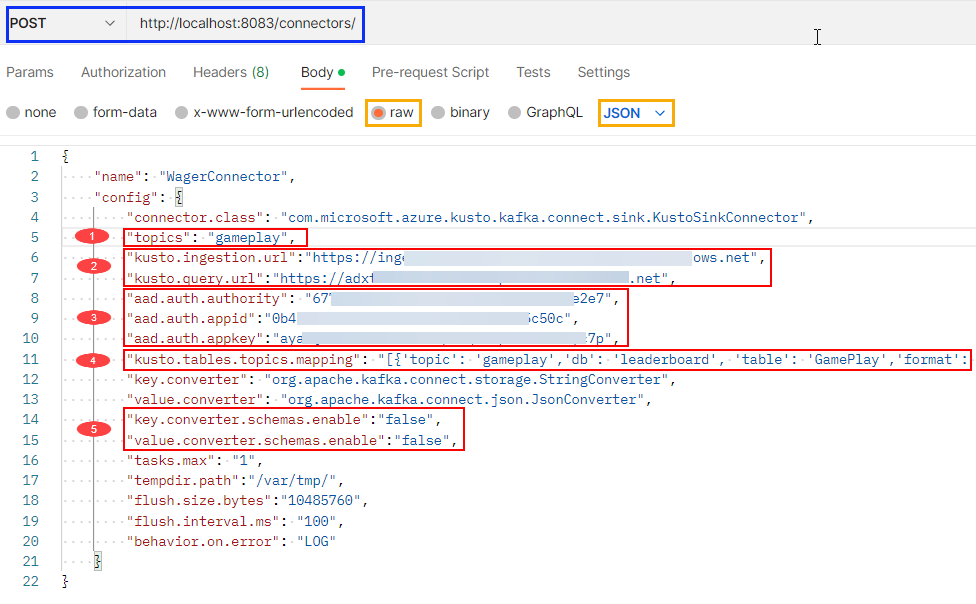
Figure 10: Kusto Configuration
Below follows an explanation of some of the fields you see in Figure 10:
- The
topicsproperty points to the topic(s) the connector consumes. It is defined as a comma-delimited string. - In the
kusto.ingestion.urland the `kusto.query.url, you set the URLs you retrieved in Figure 4. - The three
aad.auth.xyzproperties refer to the properties from creating the SPN. Theauthorityis thetenant,appidis theappId, and theappKeyis thepassword`. - Let us come back to
kusto.tables.topics.mappingbelow. - I have found that I need to set both
key.converter.schemas.enableandvalue.converter.schemas.enabletofalse. I get some errors otherwise.
Above, I said we’d come back to kusto.tables.topics.mapping, so let us do that.
kusto.tables.topics.mapping
As the name implies, this property defines the mapping between the topic and the table(s) in the database(s). My mapping looks like so:
|
|
Code Snippet 9: Tables Topic Mapping
The mapping is an array of topics and their respective mapping to databases and tables in the cluster. In my example, I have only one mapping, and in the mapping, I define:
- the topic I am consuming from.
- the database and table to ingest that particular topic’s events into.
- the format of the data.
- the ingestion mapping that has been set up for the table. You see this in Code Snippet 5.
- whether the ingestion is streaming or batch. This post is streaming ingestion as you want as low latency as possible.
When you have set the different properties in the configuration, you POST the configuration to the connectors endpoint as outlined in blue in Figure 10.
I should have mentioned the name property in line 2 in Figure 10. The name is an arbitrary string. You use it when managing the connector. Things you can do are:
- pause the connector.
- restart the connector.
- delete the connector.
- check the status of the connector.
- etc.
Each operation is against the /connectors endpoint and takes the connector name as an input parameter, potentially followed by a resource request. An example would be that when we have created the connector, we want to check that it actually is up and running:
|
|
Code Snippet 10: Connector Status
In Code Snippet 10, you see how you check the newly created WagerConnector connector status.
Everything is OK (it works on my machine)! Let’s test it!
Testing the Connector
Let us start in ADX Query editor and ensure that the GamePlay table is empty: GamePlay | count. That should return 0.
You can now start publishing events to the topic. In the previous post, you saw how to publish events one-by-one or in a loop. To keep things simple, you start by publishing one-by-one.
Publish Single Events
If you haven’t read the first post, I suggest you go back and read, at least, the part about publishing events and the different command line parameters.
NOTE: If you are on Apple Silicon (M1, M2), note how you need to run the Python application independently, not from the Docker container.
To publish events, follow the “instructions” in the previous post:
- From the command line, you
docker execinto theevent-gencontainer:docker exec -it event-gen bash. - Execute the
runProducer.pyscript.
When you start running the script, you pass in command-line arguments. For one-by-one events, you only need to pass in the argument for which topic to publish to -t:
|
|
Code Snippet 11: Single Event Mode
When executing the script in Code Snippet 11, you press Y to generate and publish an event. Do this a couple of times. Having done that, in the Query editor, do the equivalent of a SQL SELECT * FROM GamePlay: GamePlay:
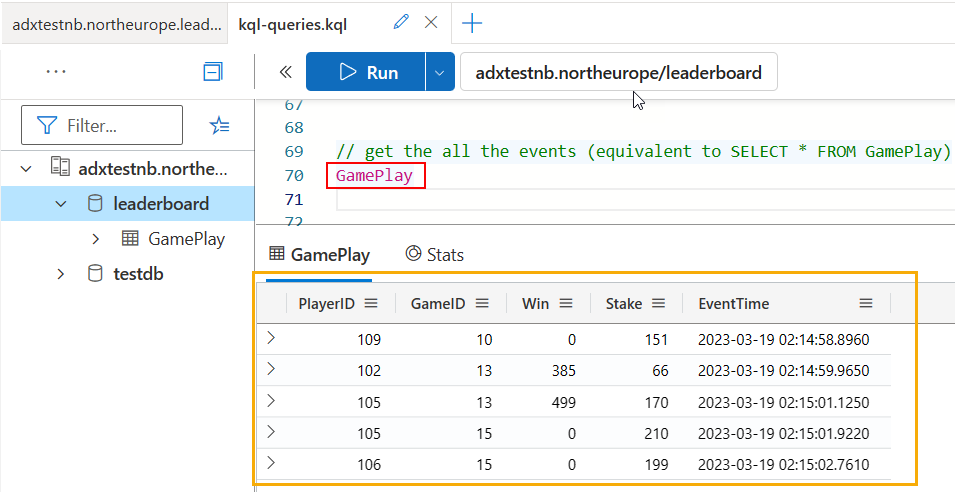
Figure 11: Query GamePlay
Yay, it works! In Figure 11 you see the result (outlined in yellow) of the query (outlined in red).
You are now ready to do a more realistic test where you emulate online gameplay by generating and publishing events in a loop. However, before that, clear out the GamePlay table, so you start afresh: .clear table GamePlay data.
Publish in a Loop
To recap what was said in the previous post, to publish in a loop, you set - at minimum - the following command line parameters:
-t: The topic to publish to.-l: Flag to indicate you want to loop.
Those are the only required parameters. Executing with those parameters would generate 10 events in a loop. To emulate “real world” gameplay, you probably want to do some more, so I suggest you publish at least 500:
|
|
Code Snippet 12: Publish in a Loop
Before running the code in Code Snippet 12, I suggest you create a KQL query which will be the base for the leaderboard calculations in the future:
|
|
Code Snippet 13: Win/Stake Ratio
To calculate the win/stake ratio, use the summarize operator as in Code Snippet 13. It aggregates data by grouping it based on one or more columns and applying aggregate functions to the data within each group. In Code Snippet 13, you use summarize to get the max ratio for a player.
NOTE: In the next post, you will see more about what you can do with KQL.
While the code in Code Snippet 12 runs, execute the code in Code Snippet 13, and look at how the leaderboard position changes. Very cool!
Summary
In this post, you continued your “journey” towards creating a leaderboard system, and you:
- Created an Azure Data Explorer database.
- Created an Azure Active Directory Service Principal using Azure CLI (
az). - Created an admin user in your ADX database from that Service Principal.
- Created an ADX table to persist the game events.
- Enabled streaming ingestion on the cluster and the database/table.
- Defined ingestion mapping and streaming ingestion policy in the ADX database.
- Created the connector configuration file and got an insight into some properties.
- Created the connector from the connector configuration file.
After having done the above, you published some events to Kafka. You saw that your setup worked.
Finally, you published events in a loop and had a KQL query calculating the highest win/stake ratio for the individual players in real-time.
The next post will cover more about KQL and how to use Azure Data Explorer’s REST API to query ADX.
~ Finally
If you have comments, questions etc., please comment on this post or [ping][ma] me.