As many of you may know, (or not), is that my background is SQL Server. Ever since I started programming, SQL Server has been my “trusty companion”, and my belief is that if you don’t have SQL Server as a backend, then there is something wrong. At work, ( Derivco), it is the same thing, and we are jokingly saying that we do not have business logic in the database, we have full-blown applications!
However, both me personally and at work, we do realise the value of streaming data; for real-time processing as well as to distribute data without having to rely on replication. In the ideal world, we would change the applications/systems that are the source of the data to both publish the data as event streams as well as persisting the data to the database. However, it may not be possible to change those applications/systems - at least not in the time frame we would like. So what we want to do is to use the database as the source of the data, but treat the data, not as rows in a database but, as streaming events.
This is the first post in a “mini” series where we look at how we can do what is outlined above. In this post, we look at how to use the SQL Server Extensibility Framework, and more specifically the Java language extension to solve the issue.
NOTE: What we do in this post requires SQL Server 2019 CTP 3.0+.
Scenario & Code
In this post, we look at a scenario somewhat like what we have at Derivco. We have online Casino gameplay where the user, (player), plays Casino games, (slots, table games, etc.), on his PC, tablet or mobile. The game play is persisted to a SQL Server database:
|
|
Code Snippet 1: Game Play Database
In Code Snippet 1 we see some SQL code which creates:
- The database
GamePlayDB. - A table,
dbo.tb_GamePlay, to persist each outcome of a spin, hand, etc.
NOTE: The code is as simple it can be, this to concentrate on the important parts.
When the player spins, etc., the gameplay goes via various services, and finally, the last service in the call-chain calls a stored procedure which persists the outcome:
|
|
Code Snippet 2: Game Play Procedure
We see how the procedure in Code Snippet 2 takes relevant gameplay details and inserts them into the dbo.tb_GamePlay table.
In our scenario, we want to stream the individual gameplay events, but we cannot alter the services which generate the gameplay. We instead decide to generate the event from the database using, as we mentioned above, the SQL Server Extensibility Framework.
SQL Server Extensibility FrameworkBack
Together with the release of SQL Server 2016, Microsoft introduced the feature to be able to execute R script code from inside SQL Server against an external R engine. SQL Server 2017 added the ability to execute Python code against an external Python environment.
A SQL Server framework enables the ability to call R/Python: the SQL Server Extensibility Framework, and you can read more about it in my blog post SQL Server 2019 Extensibility Framework & External Languages. For SQL Server 2019, Java is available as an external language, and that is what we use in this post.
If you are unsure about what I talk about here are some blog posts that may help:
-
Microsoft SQL Server R Services: sp_execute_external_script - I - When calling out to R/Python/Java you do it from a specific procedure:
sp_execute_external_script. This is the first post of three looking atsp_execute_external_script. -
Microsoft SQL Server R Services - sp_execute_external_script - II - The second post about
sp_execute_external_script. -
Microsoft SQL Server R Services: sp_execute_external_script - III - The third post about
sp_execute_external_script. - SQL Server 2019 Extensibility Framework & Java - A series of posts discussing how to write Java code so we can call it from SQL server.
Solution
As we mentioned above, we want to generate the wager “event” from inside the database, and there are a couple of ways we can do that:
- Change Data Capture - CDC captures insert, update, and delete activity that is applied to a SQL Server table, and makes the details of the changes available to consumers.
- Change Tracking - CT tracks and makes available rows that change in SQL Server tables. The difference between CT and CDC is that CT does not capture the changed values.
Both CDC, and CT can be used to get data from SQL Server to Kafka, and we will cover that in future posts. In this post however, we look at doing the event generation in another way: hook-points in stored procedures.
The idea with stored procedure hook-points is that at a place in a stored procedure, a code block is inserted, (hooked in), and this code block executes some code. In this case, it publishes a message to Kafka.
NOTE: With the definition of a hook-point above, you may ask what the difference is between a hook-point and an ordinary procedure call? There is no real difference; the way I see it is that the hook-point executes code which is, to a large degree, un-related to what the procedure does. Oh, and the name “hook-point” sounds cool.
So, where do we insert the hook-point in the procedure we see in Code Snippet 2? As the pr_LogWager is transactional, we insert the hook-point after the commit, so we do not publish any messages for rolled back wagers. The implication of publishing the event/message after the last commit is that if you have several stored procedures calling each other, the hook-point may be in the beginning of the call-chain.
Now we know where the hook-point should be, but what should it do? Obviously, it should publish to Kafka, but what should it publish? In this case, it should publish an event, so the hook-point also needs to generate the event. What the event should look like is very much up to you, for now, let us assume the event looks something like so:
|
|
Code Snippet 3: Wager Schema
We see in Code Snippet 3 how the schema for the event looks very much like what we persist to the table in our stored procedure. The only difference is that we also define an eventTypeId, which we can use when we do stream processing to filter out various types of events.
Even though the hook-point can be just a few lines of T-SQL code, best practice is to define an event-specific stored procedure:
|
|
Code Snippet 4: Hook Point Procedure
The code we see in Code Snippet 4 is the start of the hook-point procedure. We see how the procedure generates the wager event by using the T-SQL FOR JSON syntax. A placeholder for the publish call follows the creation of the event.
NOTE: when you look at the hook-point procedure it may seem like overengineering as the call is basically a pass-through from the
dbo.pr_LogWagerprocedure. The reason we have a specific procedure is that in the “real world” you most likely do more things inside the procedure.
So, the placeholder for the publish call; that is where we call into some Java code that publishes to Kafka. Before we look at the Java code, let us see what the Kafka setup should look like.
Kafka
I have assumed in this post that we have Kafka installed “somewhere”, and that we can connect to it. If that is not the case, have a look at the Confluent Platform & Kafka for a .NET Developer on Windows post to see how you install Kafka in a Docker container.
Now, when we have Kafka installed, let us create two topics:
testTopic- as the name implies, it is a topic for test. We use it initially just to make sure our Java code works. Create it with 1 partition.wagers- this is the topic to where we publish wagers. We create it with 4 partitions.
NOTE: In a future post we will talk more about partitions, and what role they play.
As I did in the post mentioned above, I create the topics using Control Center:
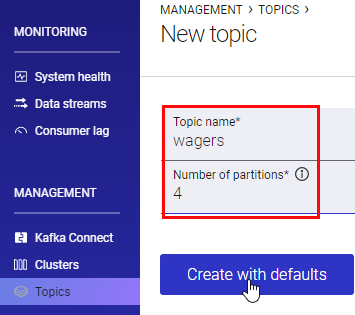
Figure 1: Create Wagers Topic
In Figure 1 we see how I create the wagers topic in Control Center’s New topic screen.
NOTE: If you don’t have Control Center you can create topics via the command line, using the
kafka-topics --create ...statement.
When we have the two topics, let us write some Java code.
Java
NOTE: I am by no means a Java developer, so I apologize in advance for simplistic and naive code. Furthermore, the code is definitely not production code; no error handling, etc., so use it on your own risk.
For this blog post, I use VS Code together with the Maven extension. You can read more about that in the SQL Server 2019 & Java with Visual Studio Code post.
To begin with, let us:
- Create an empty folder where you want your Java project.
- Open VS Code and open the folder you created above.
- Create a new Maven project, using the archetype
maven-archetype-quickstart.
During the creation of the project, you are asked for some properties of the project: groupId, artifactId, version, and packageId. In my project, I set them to:
groupId:com.nielsberglund.sqlserver.artifactId:SqlToKafka.version:1.0.package:kafkapublish.
To be able to publish to Kafka, we need a Java Kafka client, and we use the native client from org.apache.kafka: kafka-clients. To use the client, we need to add it as a dependency in the projects pom.xml file:
|
|
Code Snippet 5: Kafka Clients Dependencies
We see in Code Snippet 5 the dependency we added to the pom.xml file. We are now ready to start to write some code.
To begin with, we create a very basic method which publishes to Kafka:
|
|
Code Snippet 6: Simple Publish
The code we see in Code Snippet 6 is in the project just for us to make sure that we can publish to the broker, and has nothing to do with SQL Server. In the publishToKafka method, we see how we:
- Set some properties, amongst them are the brokers, (
bootstrap.servers), we connect to. - Set the serializers we use.
- Create a
Producerinstance. - Call
sendon theproducerinstance.
To check that everything works we “spin up” a bash shell in the Kafka broker instance. If you run this in Docker you:
- Do a
Docker exec -it <kafka_instance_name> bash. - From the command prompt in the container you
cdinto the/usr/bin/directory.
When you are in the /usr/bin/ directory you start up a Kafka console consumer like so:
|
|
Code Snippet 7: Kafka Console Consumer
You may ask yourself why, in the code in Code Snippet 6, bootstrap.servers is localhost:9092, whereas in Code Snippet 7 it is broker:29092; different host-name as well as port number? That is because we run in a Docker container where we have different listeners for internal network connections compared to external (from the host machine or other machines).
NOTE: Robin Moffat, who is a Kafka guru, has written a blog post about port addresses and listeners: Kafka Listeners - Explained. If you are interested in Kafka, you should read that post, and whatever else Robin publishes. He knows his stuff!
Anyway, you execute the code in Code Snippet 7. When you subsequently run the Java code in Code Snippet 6, the output in the terminal window where you run kafka-console-consumer looks like so:
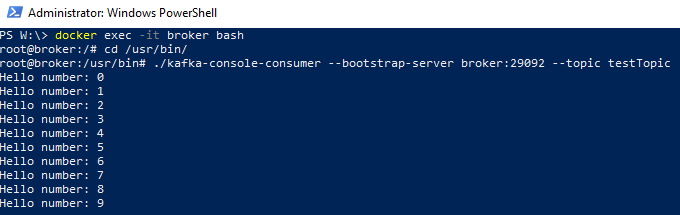
Figure 2: Consume Output
We see in Figure 2 the commands we used to run the containers bash shell, together with the kafka-console-consumer command, and the output, (“Hello number: n”), which we receive after executing the Java code. That’s cool - our simple code works, but - once again - the code is very simple, and we definitely cannot use it, as is in SQL Server. Let us see what we need to do to make this work from SQL.
Java Code & SQL Server
This post is not about how to write Java code so it can be used from SQL Server, read my
SQL Server 2019 Extensibility Framework & Java series for that. There is one thing however that is important that I want to re-iterate, and that is the
Microsoft Extensibility SDK for Java, which is required if we want to write Java code for SQL Server. The SDK was introduced together with SQL Server 2019 CTP 2.5, (I am now on CTP 3.1). I wrote about the SDK in
Java & SQL Server 2019 Extensibility Framework: The Sequel. One difference between CTP 2.5 and CTP 3.1 is that the SDK is now part of the SQL Server distribution, so you do not need to download it. You find it at: \<path_to_instance_install>\MSSQL\Binn\mssql-java-lang-extension.jar.
What we need to do is to add the SDK as a dependency for our project. If you use VS Code and Maven I covered how to do it in the Java & SQL Server 2019 Extensibility Framework: The Sequel. A short recap:
- Create a new directory in Maven’s local repository directory. For me, on Windows, it is
%USERPROFILE%\.m2\repository. - Create a subdirectory of the new directory, named
mssql-java-lang-extension. - Create a subdirectory of
mssql-java-lang-extension, and name it as a version number. (1.0for example). - Copy
mssql-java-lang-extension.jarto the “version” directory and add the “version” number to the.jarfile like so:mssql-java-lang-extension-1.0.jar:
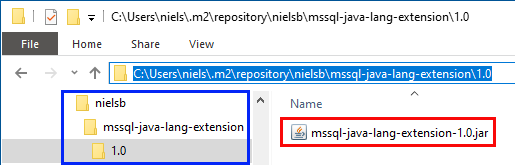
Figure 3: Folder Hierarchy Dependency
In Figure 3 we see the “layout” of the local Maven repository after I have set it up for the SDK dependency, and we see how I named the top-level directory nielsb. Outlined in blue we see the different folders below..\m2\repository, and the outline in red shows the renamed SDK file. We can now add the dependency to the pom.xml file:
|
|
Code Snippet 8: Java SDK Dependency
By having added the dependency to the pom.xml file, we can now reference the SDK in our code:
|
|
Code Snippet 9: Extending the SqlKafka Class
What we see in Code Snippet 9 is how I import all classes in com.microsoft.sqlserver.javalangextension, and how I subsequently extend the SqlKafka class with AbstractSqlServerExtensionExecutor. Oh, I also import java.util.LinkedHashMap, which I use later.
We know from
Java & SQL Server 2019 Extensibility Framework: The Sequel that when we call Java code from SQL Server, our code needs to implement the execute method from the AbstractSqlServerExtensionExecutor class, and that the method looks like so:
|
|
Code Snippet 10: Execute Method
In Code Snippet 10 we see how the method expects two parameters: a dataset, and a map of strings and objects. That is quite useful for us, as, even though right now the publish method in our code has hardcoded values for broker, topic, message, and so on; in a “real world” scenario we do do not publish to just one topic, and we may publish the same event to different brokers.
So, the way we code it is that we expect the dataset to contain a broker address, (including port-number), topic, and partition value. We pass in the event, (message), as a parameter, part of the LinkedHashMap. That way, we do not duplicate the message if we publish to multiple brokers:
|
|
Code Snippet 11: The Execute Method
We see in Code Snippet 11 how I have implemented the execute method, and how I, in that method, handle the incoming parameters and subsequently call into the new sqlPublishToKafka method.
The Java language extension has some requirements on the code, which means we have to set some member variables in the class constructor like so:
|
|
Code Snippet 12: Variables Required by Language Extension
You can read more about the required variables we see in Code Snippet 12 in the Java & SQL Server 2019 Extensibility Framework: The Sequel post.
Normally we can now build the application and create a .jar file out of it, to use later. If you use VS Code together with Maven see my post
SQL Server 2019 & Java with Visual Studio Code if you are unsure how to create a .jar file.
In the previous paragraph, I wrote “normally”, because when we want to use our code from SQL Server, it is not as straightforward as to just create a .jar file. As the .jar file will be deployed to SQL Server we need to ensure that all dependencies also are included, i.e., we need an “uber jar”.
To create this “uber jar”, (at least in VS Code and Maven), we use a Maven plugin maven-shade-plugin which is part of the org.apache.maven.plugins group, and we add the plugin to the pom.xml file. Let us see how and where to place it.
When we create a Maven project, the pom.xml file looks something like so:

Figure 4: Build Section
We see in Figure 4 that there is a <build> section in the pom.xml file, and it is in that section we add the plugin. In fact, for this project, we do not need anything else in the <build> section apart from our plugin. So we replace the whole existing <build> section with the following:
|
|
Code Snippet 13: New Build Section
Notice in Code Snippet 13 how there is an <excludes> section containing . That nielsb` refers to the directory we added for the Java SDK dependency, (Figure 3). What we say here is that we do not want to include the Java SDK as a dependency in our “uber jar”, as we later deploy the SDK standalone, and having two SDK’s deployed to the same database cause bad things to happen.
Having done this, we:
- Save the
pom.xmlfile. - Compile the project.
- Create the
.jarvia thepackagecommand.
The created .jar file is in the project’s target directory, and “weighs” in at around 9Mb. Later we see how we use this .jar file, but let us now go back to the database.
SQL
Having a .jar file for our application means that we can deploy it to the database and test and see what happens. However, there are a couple of things we need to do before that.
Remember from the code in Code Snippet 11 how we send in a dataset with the relevant information about where to publish a message to. That information comes from tables in the database. Let us create the tables:
|
|
Code Snippet 14: Routing Tables
The code in Code Snippet 14 creates two tables which will contain information about who wants the different events, and where to send it to. Notice the BootstrapServers column in the dbo.tb_KafkaCluster table. That column contains the bootstrap servers as a comma-delimited string.
NOTE: The setup above is very simplistic. We should have a tables for different type of events, and with foreign key references to that table. Potentially also a table for topics. The
BootstrapServerscolumn is also a shortcut. We should have a separate table for the brokers with foreign key reference to the cluster table. However, for this blog-post, this is enough.
When we have created the tables in Code Snippet 14 we insert some data:
|
|
Code Snippet 15: Insert Data
As I run both SQL Server and Kafka on my local machine, I set the BootstapServers value to localhost:9092 which we see in Code Snippet 15.
In the hook-point procedure, (Code Snippet 4), we can publish straight to Kafka, but that means we need the same publishing code in each event type’s hook-point procedure. So let us instead create a procedure which does the actual publish to Kafka:
|
|
Code Snippet 16: Procedure to Publish
In Code Snippet 16 we see how we pass in parameters for what type of event it is, the partition value, and the event message. To publish to Kafka we use the procedure sp_execute_external_script, and in the procedure we:
- Set the language to Java.
- Set the
@scriptparameter to our package and class name. - Retrieve the broker and topic information for the event type, together with the partition value. This the
SELECTstatement in the@input_data_1oarameter. - Define parameters that we use in the
SELECT, and also by our Java code, (the@msgparameter).
Now we are almost done, and we alter the procedures to call into our hook-point procedure, and the publish procedure:
|
|
Code Snippet 17: Altering Procedures
In the procedures in Code Snippet 17 I have taken out the parameter definitions, and also left out some of the code for brevity. We see how dbo.pr_LogWager calls into dbo.pr_GenerateAndPublishWagerEvent, which calls into dbo.pr_PublishToKafka.
Deploy
We are now ready to deploy our Java code into the database. However, if this is the first time we deploy Java code to the database, we need to create Java as an external language in the database. I covered this in my post: SQL Server 2019 Extensibility Framework & External Languages. From reading that post, we see we need to:
- Create an archive file (
.zip) of the Java language extension filejavaextension.dll, which is located at..\<path_to_sql_instance>\MSSQL\Binn\javaextension.dll. - Deploy the zip file to the database using the
CREATE EXTERNAL LANGUAGEsyntax:
|
|
Code Snippet 18: Creating External Language
I zipped the extension dll and placed it in the root of my W:\ drive, and then called CREATE EXTERNAL LANGUAGE. We can check that it worked by calling SELECT * FROM sys.external_languages. If all is well we can go ahead.
NOTE: The name we assign to the language is as such of no importance, except that we use it in
sp_execute_external_script, and as well as when we create external libraries, which we see below.
Once again, if this is the first time we deploy Java to a database we also need to deploy the Java language SDK (mssql-java-lang-extension.jar), the one we used in our Java code above. For this, we use the CREATE EXTERNAL LIBRARY:
|
|
Code Snippet 19: Creating Java SDK Library
As in Code Snippet 18, I copied the SDK file to W:\, and then ran what we see in Code Snippet 19. The name we give the library does not matter, but it is a good idea to keep it somewhat descriptive. Use SELECT * FROM sys.external_libraries to ensure it worked.
Right, so finally we can deploy our application, and what we deploy is the .jar file we created just after Code Snippet 13:
|
|
Code Snippet 20: Deploying the Application
We deploy the application by creating an external library, as we see in Code Snippet 20, and yes, I copied the .jar file to W:\ this time as well.
Run the Application
So finally, it is time to see what we have done works. Start with “spinning up” a Kafka consumer against the wagers topic. Use similar code to what we see in Code Snippet 7, but change --topics testTopic to --topics wagers. When the Kafka consumer is up and listening, it is time to see if it works:
|
|
Code Snippet 21: Emulate Game Play
In Code Snippet 21 we see a procedure which emulates gameplay, and it expects some parameters:
@Loops- In the procedure, we loop arounddbo.pr_LogWagerand passes in random values for the required parameters indbo.pr_LogWager.@MinDelay,@MaxDelay- in the procedure we do a random wait between each loop and these two parameters define min, and max values, (milliseconds).
Let us see if we get any output from the Kafka consumer when we execute the code in Code Snippet 21:
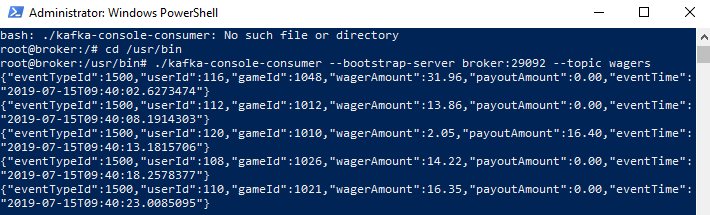
Figure 4: Kafka Output
Yes! From what we see in Figure 4 it works, as we see 5 events as output. We have succeeded in streaming data out from the database into Kafka by using SQL Server Extensibility Framework and the Java external language.
NOTE: You may ask what the
dbo.pr_EmulateGamePlaylooks like. I have included the source for that procedure at the very end of this post as an Appendix.
Summary
There are various ways one can get data out of SQL Server and into the streaming world. In this blog post, we looked at using SQL Server’s Extensibility framework and Java as an external language.
We looked at:
- Creating hook-point procedures and injecting them into the procedures whose data we want to capture and create events from.
- Using the Java Kafka client to publish data.
- Adding a dependency in the Java project against the Microsoft Java SDK.
- Creating an “uber jar” containing all Java dependencies, except for the Java SDK. The actual application should also be in that “uber jar”.
- Creating the Java language in the database.
- Deploying the Java SDK to the database.
- Deploying the “uber jar” to the database.
- Using
sp_execute_external_scriptto call into the Java code from SQL Server.
As I mentioned above, there are various ways to “free” your data, and we look at other ways in future posts.
~ Finally
If you have comments, questions etc., please comment on this post or ping me.
Appendix - I
Below is the code for the dbo.pr_EmulateGamePlay procedure:
|
|
Code Snippet 22: Procedure to Generate Game Play
As we see in Code Snippet 22, the procedure is looping, and in each loop, it generates some random values based on min and max setting variables.